My Baking Buddy recently experienced the joy of fatherhood. His little bundle of joy weighs about seven and a half pounds, likes to wake him up at 3:00 AM, and meows when he comes home from work (but also at 3:00 AM).
Yes, he is fully in his Cat Dad era, and I couldn’t be more delighted for him.
With Easter coming up, I wanted to put together a basket of some sort for him. I didn’t want to go overboard on candy, because a) who really needs that much candy, and b) a lot of Easter candy is aimed at kids and isn’t super-great. I finally decided on a few pieces of chocolate (Aero lambs come but once a year, so enjoy the bubbles while you can!), a newly-released book in a series he’s been reading, and a shirt to reflect the bliss that is having a furry friend inspect every plate and every glass he’s trying to eat or drink from.
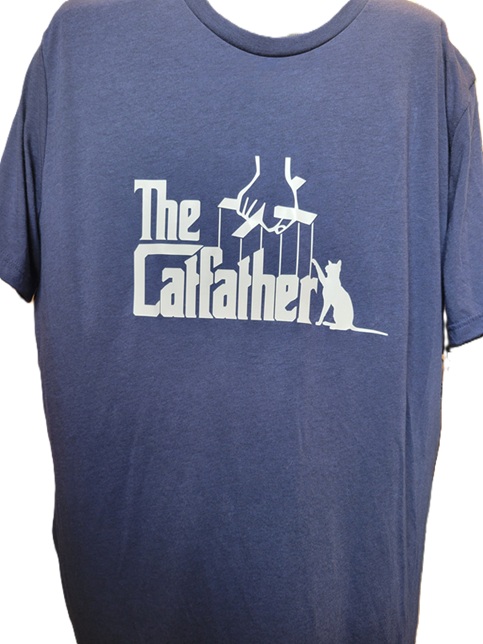
After combing Etsy for “cat dad SVG”, I found this:
Black would have been classic for this but is so overdone, so I opted for a navy heather triblend from Michaels – I think it was Bella & Canvas. The design was cut from white Easy Weed Siser heat-transfer vinyl.
(Excuse the disembodied shirt.)
The vinyl adhered like a dream…I’m so happy with how this came out! He loved it, and couldn’t believe I had made it (despite having worked on vinyl projects with me before). It looks great on him, too.
I can’t remember when I first encountered them, but every Easter the German bakery near me makes these…well, I’m not quite sure how to classify them. (Oh, this post is off to a great start!) They look like they could be cookies – they’re sized to be held in one’s hand and not so complicated that a fork is required – but they’re thick and puffy and in cross-section almost look like a small, not-very-moist, sturdy cake. And one of the staff members once commented on them using a yeasted dough…does that make these bread? The bakery itself coyly calls them “Bunny Faces”, and they usually get consumed so quickly that no one’s taking the time to reverse-engineer them to put a label on them.
Some careful googling took me down a rabbit hole (ha!) to this recipe. Sure, the ones in the picture had clearly used a different bunny-shaped cookie cutter, but these were them! Finally, I could make these, and…uh, what’s quark? I had never heard of it (much less seen it in a grocery store), but every person I spoke to who was of German or quasi-German descent knew immediately what I was talking about and pronounced it differently than I had been. (Because I know you’re curious: I had been saying the last part of the word like “orc”, but it’s really like “arc”, or “ark”, depending on whether you’re doing geometry or building a boat of epic proportions.)
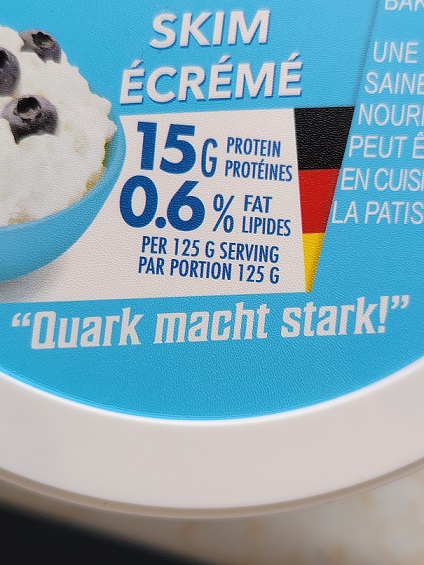
That all changed this year, when a chance detour down the dairy aisle yielded this:
“Quark makes you strong!”
I twisted my Baking Buddy’s rubber arm to help me with these. We took our task very seriously and even broke out his kitchen scale to follow the recipe as accurately as possible. Yes, you can search online to discover that 150 g of sugar is approximately 3/4 of a cup, but that’s not a very precise approach.
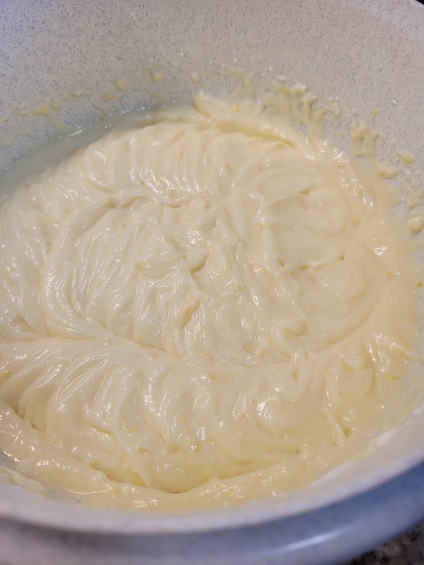
Even after mixing the wet ingredients together, the batter looked like no other cookie dough I’ve seen.
Once the flour and baking powder have been added, it needs to rest for half an hour or so before kneading it briefly and rolling it out. It might not be a yeasted dough, but it sure behaves like one.
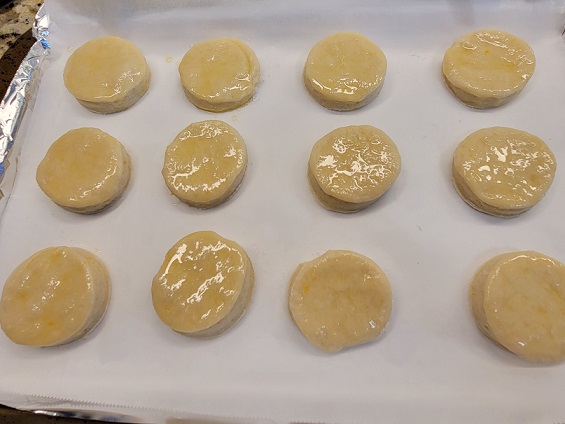
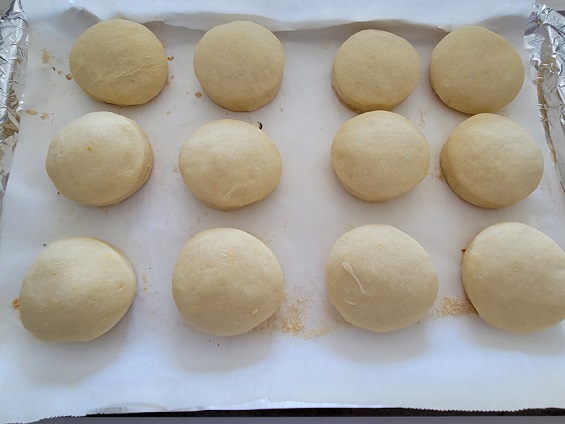
It’s already puffy before being baked! I didn’t have a bunny cutter, so we started out making little cats before deciding circles were easier.
I was a little skeptical about brushing them with melted butter before baking, but they didn’t appear greasy in the slightest after coming out of the oven.
The bottoms got a beautiful golden colour, though!
We opted to skip the step of brushing them with more melted butter before turning them into the sugar, but still got plenty to stick because they were still hot when we did this.
Look at that inside! Is it a cake? Is it a cookie? Who cares – it’s tasty as all get-out!
They don’t have as much colour on the tops as the bakery version does, and we think if we make them again we might try an egg wash to combat that. The prepackaged vanilla sugar we used didn’t seem to have a lot of kick, either, so this may require homemade vanilla sugar.
All in all, though, I’m pretty happy with how they came out for a first attempt. It’s nice to have an at-home version for when they’re out of season at the bakery.
I’ve gotten myself hooked up with a few different snail-mail groups over the last several years. Who doesn’t like getting a bit of mail that’s not a bill or a solicitation for money? I wanted to make a few notecards to send out in anticipation of Easter, but I’m not the single most artistic person out there (read: I can’t draw or paint).
Last year, when I was still essentially scared of playing around with the Silhouette Cameo cutting machine, I had downloaded a file of three bunnies shaped like…well, like those marshmallow candies that are everywhere at this time of year, and with the wording “Hanging With My Peeps”. My friend and I cut out a few repeats of the pattern out of heat-transfer vinyl and made tea towels. I thought about using the file again, but didn’t want to mess around with getting the lettering on straight. Mind you, the bunnies were cute on their own…
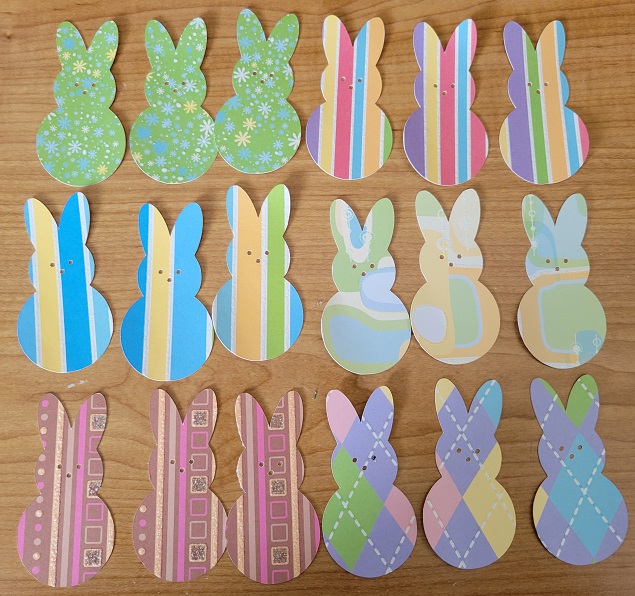
I wound up cutting out six sets of the three bunnies. When I resized the file so that they’d fit on the blank notecards I bought, I discovered they’d fit perfectly on sheets of this glittery cardstock I’ve had for probably the last 15 years. I bought it because it was sparkly and pretty, and then had no idea what to do with it. Also, that much pattern can be a bit much in one big chunk, but in smaller shapes? It works!
Once they were all cut out, I took the plunge and started shuffling them around to see how any three given patterns looked side-by-side-by-side. I have a hard time with being random, and this takes every ounce of self-uncontrol that I have in me.
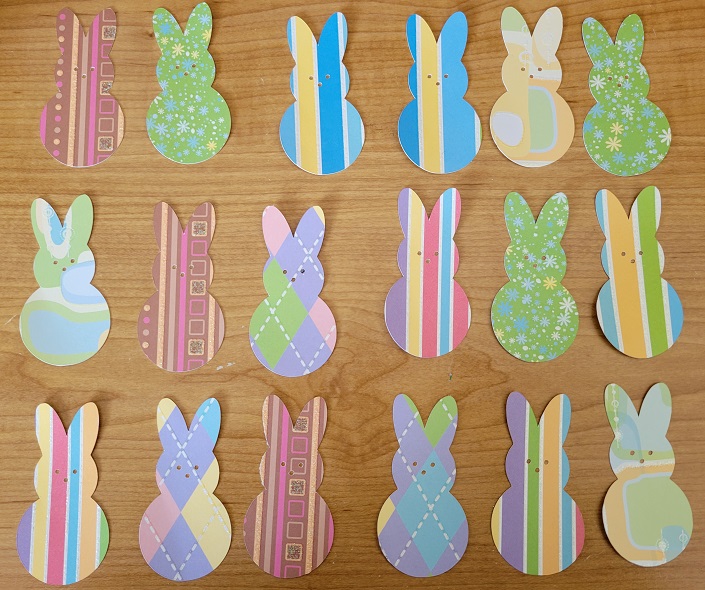
Once I was satisfied with my groupings, I glued them down on my card blanks:
I elected to colour in their eyes and noses just to give them a bit of definition.
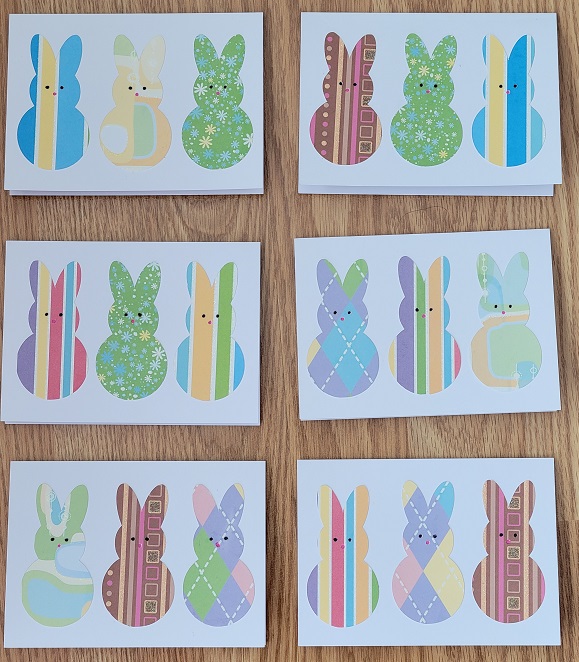
And there we have it: quick, simple Easter cards!
I did use a cutting machine for my bunnies, but I think this could be achieved with a bit of patient tracing and cutting with scissors…although if I were doing that I’d probably not bother trying to neatly cut eyes and noses. I used a plain UHU glue stick to affix them, nothing fancy. And they were a great way to use up smallish pieces of paper that might not have gotten used otherwise.
About a month and a half ago, when I was finally, tentatively exploring the freedom granted by rolled-back restrictions, I found myself in Indigo looking for a gift card for Ricky’s birthday. I can’t go into a bookstore and not look around, and while I was wandering through the magazine nook I saw an issue of Pioneer Woman magazine. Because I’m a good daughter, I bought it for my mom. Because I’m not a great daughter, I wound up reading it before she got a chance. Most of her recipes feature too much meat for my liking, but there, nestled in the middle, was a triad of recipes for savoury buns including these beauties.
Be still my heart! Unlike everyone else on the planet, I didn’t drop into hardcore baking mode last spring, but these looked too good to pass up. I hadn’t worked with a yeasted dough in forever, and this seemed like as good a time as any to get back into it. And with time off work over Easter, it felt like a great time.
The first thing I did was toast my sesame seeds over low heat. It started out feeling a bit like a zen garden as I continually moved them around the pan to ensure even toasting, but became decidedly less zen as I became impatient and increased the heat approximately every 75 seconds to speed it along. Miraculously, they didn’t burn, but developed a beautiful golden slightly-less-pallid colour.
My everything-bagel seasoning, all mixed and ready to go. Those huge patches of black are poppy seed, and not pepper (just in case you thought I liked living on the edge).
Once I made my dough and spread it with cream cheese and sprinkled it with about half my mix, it was time to roll these up and slice them. The one way I deviated from the recipe was to use my trusty 9″ x 13″ Wilton cake pan and not a 9″ pie pan as recommended. The pictures accompanying the recipe showed squished, stunted buns. (No pictures of the process, sorry; my hands were covered in flour and dough and cream cheese and I wasn’t about to start smearing that on my phone.) The tops got brushed with melted butter and sprinkled with the remaining seasoning mixture. Because I wanted these for breakfast and not a late-afternoon snack, I stopped at this point to cover my pan with plastic wrap and stick the whole works in the fridge rather than let them have their rise.
The next morning, I pulled them out of the fridge, removed the plastic wrap, and set them in a low oven with a cake pan of water for steam, until they looked like this. It was quite the relief to see them rise and puff up like that, because when I started making the dough the day before I had panicked that I had killed my yeast due to a difference in opinion of what constitutes “lukewarm”. It looks like I dodged a bullet, because these filled out beautifully.
Baked juuuust until golden. You can see how they expanded even more!
These were so good! The dough was tender yet sturdy enough to hold the buns together, and the cream cheese and everything-bagel seasoning complimented each other perfectly. I probably could have scarfed the entire pan by myself, but instead I shared them and everyone who tried one had only good things to say. Although they’re marvy hot out of the oven, they’re just as good at room temperature – which isn’t something I can always say about cinnamon buns.
Now I think my next project will be the spinach and feta variation. It must be healthy if there’s spinach in it, right?
With Easter approaching (or, ahem, upon us), I wanted to make something light and springy – in taste and appearance, not texture. No one likes rubbery cake. Years ago, my grandmother used to make a dessert we called “Broken Glass”. A quick Google search reveals that yes, this is still something that people know about, and recipes abound. I used this one, but I think I’ll re-write it for myself to better order the steps.
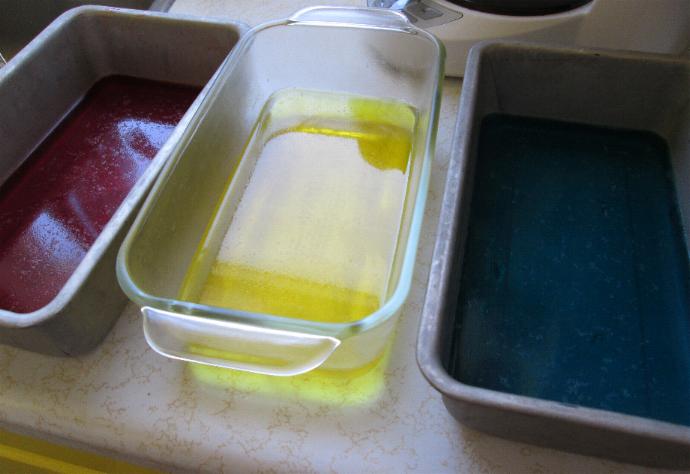
If you decide to make this, you really ought to consider making your gelatin first. The recipe calls for strawberry, lime, and orange, but I opted for a cherry-lemon-berry blue combination. You’re limited only by your imagination, your personal preferences, and what’s readily available in your local grocery stores. (There, that’s not very limiting, is it?!)
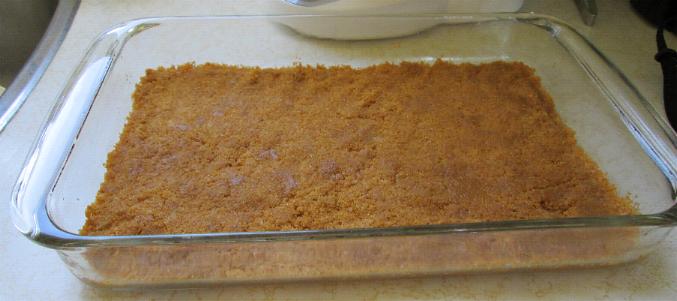
Although the crust is the first step in the recipe – and the second, if you count “chill” as a step – I held off on making it until my gelatin was nice and firm. The crust really doesn’t need to chill for that long, and you want to make sure you’ll have sufficient fridge space for everything. If you’ve got a gloriously large and/or empty fridge, good for you; feel free to shove everything in there at once to chill and/or firm up.
A word about the dreadfully ambiguous eighth step “Set aside until slightly thickened”: I have no idea what “slightly thickened” means, especially since at no time are we told to put it in the fridge to start the thickening/setting process. At last, something that doesn’t go in the fridge! When I made this, I let it cool to room temperature so that it wouldn’t completely dissolve my formerly-frozen, now-thawed whipped topping.
And a quick word about pineapple juice: make sure it’s pure pineapple juice, unsweetened, and untainted by other “filler” juices. My friend made this recipe using a pineapple/apple/pear blend, and it left a funny taste to the filling.
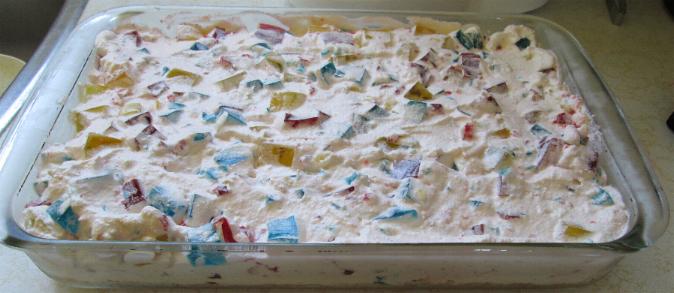
You should wind up with something that looks like this.
Isn’t it pretty when it’s cut?
This makes a light, fruity dessert that goes down easily. It’s also a great recipe for summer because there’s no oven involved – and no stovetop, either, if you boil your water and pineapple juice in the microwave.