Other Crafts

Happy birthday; I got you…mints?

My friend Ricky recently had a birthday, and I wasn’t going to let the little matter of a couple thousand kilometres keep me from celebrating him in style. I got it in my head that I needed to do a “birthday in a box”-type package for him. In rapid succession, I decided on: an actual gift (Lego-adjacent building block set), a banner, a “I’m the Birthday Boy” badge that would likely have gotten him beaten up in school, a singing candle, and…cake? I make a mean cupcake, but I didn’t think they’d travel especially well via Canada Post. I looked at mug cake mixes at the grocery store, but just about dropped the box when I made the mistake of reading the nutrition information. (Cake will never be health food, but for 400 calories and 50 grams of sugar, reconstituted and microwaved “cake” just isn’t worth it.) I did find a homemade cake-in-a-can tutorial on Pinterest that, although I applaud its creativity in having layers of cake and icing sandwiched securely in a repurposed tin can, looked frankly kind of gross. Maybe if I couldn’t reasonably make him dessert, I could buy him dessert instead.

Armed with that somewhat heartening thought, I bought a Dairy Queen gift card to tuck in the box. Only…we all knew I couldn’t just toss the card in on its own, right? In looking through my Downloads folder, I found a sprinkle patterned digital paper I bought ages ago off of Etsy, and everything fell into place.

I’ve used this tutorial for altered Altoid tins before, and it’s delightful. The step by step pictures are a fantastic help, even for someone who doesn’t consider herself a papercrafter and gluer (like me).

I started out by covering the outside and inside surfaces with the paper, and then (not pictured) covered the edges. I learned in kindergarten that cutting in a straight line eludes me, so I used my Silhouette to cut perfectly straight pieces exactly the width of the various edges I had to cover.

Next, I had to figure out what kind of decoration I wanted to add to it. I’m a fan of vintage kitsch (shocking, I know), and after a search-engine rabbit hole of results for “retro birthday party”, I found a couple of images I liked. I resized them to the width(ish) of the tin and printed them out, then cut out the section I wanted by hand. I also used a typewriter-inspired font to spell out a few well-wishes (although I only used one in the end). I couldn’t resist sneaking a quote from National Lampoon’s Animal House in there.

The front, on the other hand, required the big guns be brought out (brought in?).

Just laying out slips of paper saying Happy Birthday didn’t quite give it enough oomph. Luckily, I had bought some alphabet beads a year or so ago in a moment of inspiration.

When the glue had dried, I was ready to add the gift card.

Besides being festive, the ribbon made it easier to pull out the gift card – experience is a great teacher sometimes.

The tin was the perfect size to tuck into a little open space at the end of the box, and the postal gods were on their game because it made it to him in time for his big day.

Thanks for looking! 🙂

Other Crafts

Where are you now, my fingerprints?…er, fingertips?

(post title inspiration can be found here)

For my mom’s birthday, I wanted to have at least one homemade component. I wound up with several: a card, a nifty poochie-style bag to hold her swag, an altered Altoids tin meant to hold a gift card, and these fingerless gloves.

Or is that fingerless mittens? Generally the defining characteristic of gloves is that they have, well, fingers. In any case: something meant to help keep her hands warm while affording her dexterity.

I found the pattern in some sort of “Autumn Crochet” magazine I had picked up for myself, and luckily had one of her favourite colours in my stash, so it was meant to be.

(Please excuse the Enid Sinclair-inspired nails.)

Isn’t that purple something? It’s called “Amethyst”, and I think it pops even more in real life.

What was really cool was how the gloves were constructed. The ribbing comes first, created by rows of back-loop-only stitches, then you stitch the ends together to create a tube, give the works a 90-degree turn right here:

…and start your rounds to form the upper part. It’s all done as one piece and doesn’t come off your hook until you have a fully-formed glove. Pretty neat, eh? I’m especially proud of the fact that I kept my tension even enough to produce two the same size. 😉

It’s still a little bit cold out for her to wear them, but these will be just the thing once spring starts springing and she needs just a little coverage.

Thanks for looking! 🙂

Other Crafts

Don’t Go Breaking My Heart

Actually, in this case, you don’t need to! There’s a handy pull string to reduce your smashing by 100%.

I had seen these mini pinatas ages ago on the dearly departed Craftster, and saved the tutorial for myself despite being an asocial and unromantic weirdo. I managed to find the original tutorial using the Wayback Machine, but also took my own step-by-step pictures in case that ever ceases to be.

To start with, you’ll need to cut out two hearts from cardstock or posterboard. Mine are just a hair over 8″ across because I was using letter-sized cardstock, but you’re limited only by your imagination and raw materials. You’ll also need a “side strip/strips” whose width will dictate how deep your pinata is (and how much you can stuff inside it). I cut three 2.5″ wide x 11″ long strips from another sheet of cardstock, but only wound up using two of them.

Once I taped my two strips together, I could start attaching them to my first heart. I ran pieces of masking tape along one edge of my new double-long strip and then starting curving it along the edge of my heart and taping it down. Your edge will – nay, should – be shorter than the full circumference of your heart; that gap is where you’ll add your candy.

Here’s one spot where I deviated from the original tutorial: while I only had one heart attached to the edge, I poked a couple of holes in the edge and added a hanging loop, in case the recipient wants to display it.

Once I was satisfied a) with the size of my candy door, and b) that my hanging loop was secure and I wouldn’t need to access the inside of the pinata, I added my second heart and secured it to my edge with even more masking tape.

Now the raison d’être: add your candy. If you want this to be hung/displayed for a while, you may want to be mindful of the weight of whatever you’re putting in.

Remember when I said I wouldn’t need to access the inside of the pinata anymore? I lied, kind of. Once the candy is in, you can cover the opening with a folded-up piece of tissue paper, but to add a pull string you’ll need to affix that to the inside of the pinata above the opening, then tape it to the underside of the tissue. It’s a bit fiddly, and if I do one of these again I might attach it before I add my second heart, just to save fumbling around after. Make that pull string good and long so that your recipient has something to grab onto!

And now…you get to decorate! This was less annoying than I thought it would be. The girl who wrote the original tutorial used shredder scissors to fringe her tissue paper, but I did it old-school with normal scissors, and managed to not completely cramp up my hand.

I decided to go for a quasi-ombré look, and overlapped rows of tissue to keep it looking full and fluffy.

Once I got the heart faces done, I cut short pieces of my fringed tissue to do the sides. I used your garden-variety glue stick for this, and it was shockingly neat: no gluey residue, and practically zero dry time.

Finally seeing the light of day! Once my tissue-papering was done, I made a little instructional tag for my pull string, just in case there were any doubts as to what to do.

This didn’t take me too long, overall – a couple of episodes of Lolita Podcast – but just long enough to serve as a good reason to not be polyamourous.

Thanks for looking…happy Valentine’s Day!

Cross-stitch and Embroidery

It’s dangerous to go alone! Take this.

Happy New Year! (Can I still say that now…?) I hope everyone had a nice – and safe! – holiday season.

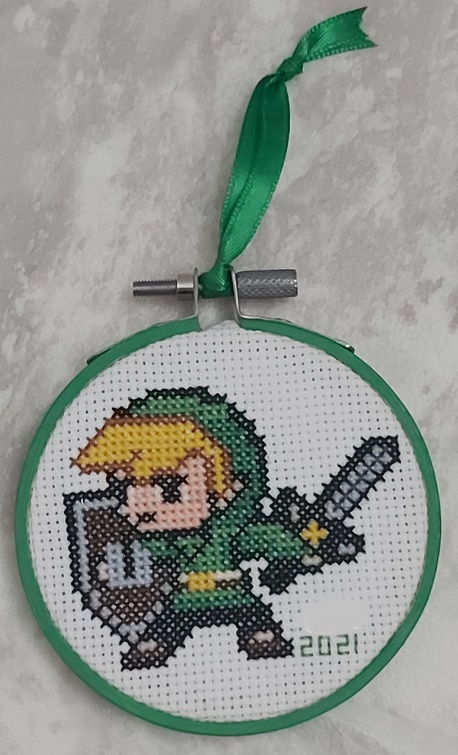
After my Christmas making, I got a few days’ rest before starting in on this project. My friend Jeanette has a birthday coming up later this month, and has been a Legend of Zelda fan forever. I’ve never played a single one of the games, but the franchise is 35 years old this year. Crazy, isn’t it? In any case, it’s certainly iconic, irrespective of my own gaming proclivities.

I found this pattern as pixel art on Pinterest, and knew I had found the perfect little stitch.

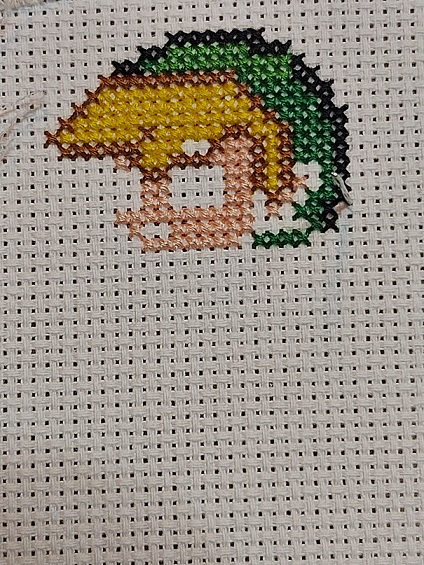
He started to take shape pretty quickly. Can you see where I missed a couple stitches in his hair?

Better lighting, but still with that weird negative space in his bangs.

Hair (and everything else) complete, and framed up. That 3″ hoop turned out to be the perfect size.

When I first found the pattern, it showed his pants as white/grey, which was not how I remembered them. A pretty-much-identical pixel art pattern showed his pants as black, which looked more correct to me, but I wasn’t quite sure.

Folks, there are entire wikis devoted to Link’s outfit across various games. Sometimes his pants are brown; sometimes they’re white/grey; sometimes he wears none at all, his modesty protected only by his long tunic. Never are they black, but this seemed like a good place to start a trend.

I mailed this out last weekend, so if our respective postal systems have managed to work out the backlog of Christmas gifts clogging the works, she should have this before the big day actually arrives.

Thanks for looking! 🙂
craftmas, General Sewing

On the fourth day of Craftmas…

…my true love gave to me: some fun, patterned PPE!

(If you had asked me back when I started this blog whether I’d ever use the term “PPE” here, I probably wouldn’t have known what you were talking about. Oh, the times we live in…)

My friend Jeanette is considered an essential worker, and although I would sincerely hope her employer provides her with suitable equipment when she has to be around people, I wanted to do something fun for her. A writer, she loves all things vintage-typewriter, and when I saw this fabric at Marshalls this summer, I had to pick up a third of a metre – just enough for a mask or two.

They have the coolest fabrics there, honestly (that’s where my background came from, too). Earlier in the summer, I found this beautiful zodiac fabric and made my mom an Aquarius mask, and then found Leo and Scorpio for my dad and for Mr. Gummi Bear when I found the typewriter key fabric.

The original Aquarius mask (not pictured) wasn’t long for this world. On about her third or fourth time wearing it out, she bent and re-bent the nose wire so vigorously that it broke. This is probably also a cautionary tale about using dollar-store pipe cleaners as nose wires, but what do you have to do to it to break it so quickly? She also complained about the thin elastic I used for ear loops cutting into her ears; the fact that she requested that elastic specifically was irrelevant. Could I replace the wire and elastic? I thought about the amount of unpicking required, and decided it was easier to make her a new one. And hey, if she was getting a new one for Christmas, so were the others.

I used a sturdier wire in all three of them, and the elastic is this super-soft and springy, rounded stuff I found on Etsy. Just let them try and complain about sore ears!

Thanks for looking – Merry Christmas! 🙂

craftmas, General Sewing

On the third day of Craftmas…

…my true love gave to me: a scarf for the pep rally!

Even though my friend Ricky* defected to Toronto 15+ years ago, and I see him once a year if I’m lucky, I still try to find the perfect Christmas gift to send every year. In this case, “perfect” translates loosely to “not totally impersonal, not ridiculously expensive, and not a bear to ship in terms of either packaging logistics or postage costs”. I don’t ask for much, do I?

A couple of years ago, I put together a Batman starter kit (mini Bat Signal plus some socks, soap, and mints all featuring the caped crusader’s likeness), and last year it was a box of local goodies that he wouldn’t be able to get in the Big Smoke. With everything that’s been going on this year, I opted for something nostalgic to remind him of those carefree high school days. *pause for laughter* Or at least something in our school colours.

I’ve actually made this scarf twice before, but this was my first time making it according to the original instructions and not trying to shoehorn in an extra colour. Based on a tutorial from the dearly departed Craftster, the premise is simple: choose two colours of fleece (A and B); cut eighteen 4″ by 6″ rectangles and four 6″ squares out of colour A; cut twenty 4″ by 6″ rectangles out of colour B; use nine, two, and ten of each kind of cutout to form each side of the scarf and then sew the two sides together for double-layer warmth.

I sincerely thought that cutting out all those rectangles was the most annoying/time-consuming part of this (admittedly simple) project – and then I remembered that every time you sew two of them together, you have to tie off the thread ends at both ends of the seam. Every time. For 2+10+9-1 seams per side.

To be fair, tying off the thread ends isn’t difficult or as prone to causing hand cramps as marathon fleece-cutting, but it’s the start-and-stop (especially if you leave them all until the end) that makes them a pain. By the time I was doing the second side of my scarf, I got smart, and tied my threads while I was on a conference call – it kept my hands busy, but wasn’t so distracting that I wasn’t paying attention to what was going on.

I think this should ward off the Toronto chill, no?

There was a time when I would have wrapped that scarf all around my model’s head to preserve anonymity or else digitally alter the photo up to and including decapitation; but darned if a co-ordinating mask doesn’t do the trick.

And sure, the scarf is nice and wouldn’t look out of place at the homecoming game (assuming we had a football team, which we did not), but it needed a little something extra to really complete the theme.

Perfect, right? It had the blue-and-gold scheme, and we both spent four years with the same English teacher who spent those years drilling into our heads such gems as the eight (nine? Ten? Google seems to be very divided on this) parts of speech. I think all of my grammatical neuroses can be traced back to that classroom.

In some miracle of modern postal service, his parcel arrived with a week to spare before Christmas, and I hope he’ll be able to get some use out of both, lockdown or no.

Thanks for looking….go Sabres!! 🙂

*Not his real name, but a nickname given by that same English teacher.

craftmas, Other Crafts

On the fourth day of Craftmas…

…my true love gave to me: a last-minute Christmas quickie!

(Get your minds out of the gutter…)

I’m not going to do a big, long how-to, but keep it simple: I used this tutorial to create some golden snitch chocolates for a friend’s stocking.

They came together really quickly; I had Discord open in the background while I worked (because apparently I keep glue at the computer desk), and it took less than 10 minutes to get all three made.

There’s no way these were getting back in the cellophane sleeve, so instead, I’ve tucked them into a little organza bag to go at the very top of his stocking, and hopefully keep the wings from getting crushed.

Thanks for looking – Merry Christmas! 🙂

craftmas, General Sewing

On the third day of Craftmas…

…my true love gave to me: a gift that’s very “hand”-y!

When I was little, my grandmother used to cut decorative hand towels in half and then crochet a topper on each half, complete with a loop for hanging. When she had a good stash built up, she’d bring them out at a family gathering and let us pick which one(s) we wanted. These were a serious staple of my childhood, and I can’t imagine a kitchen without one.

My own crochet skills are not as sophisticated as hers were, sadly, but when I saw this glorious fabric:

…I had the perfect plan for it.

I took a towel I had bought somewhere else (charity fundraiser?) and traced around its fabric topper to draft a pattern for myself. I found some plain red towels at the store that matched the red lettering pretty much perfectly. I cut each towel in half (width-wise, not lengthwise), folded each half in approximate thirds (lengthwise, not width-wise) to fit into the topper. Once they were fit in, I sewed the topper shut, et voilà.

The first time I tried making towels like this, I attached some Velcro unbranded hook-and-loop tape to make it easy to hang the towel from an oven handle or whatnot. Unfortunately, after repeated washings, the Velcro-like product lost its “stick” and the towel would fall to the floor at the slightest provocation, like some sort of kitchen-linen fainting goat.

Sooo…I worked through my dislike of sewing buttons and sewed on buttons. It honestly wasn’t as painful as I remember, and now these towels aren’t going anywhere until you decide they are.

My mom has laid claim to two of them; the rest will be tucked into various Christmas gifts as a fun little bonus. In fact, one has found its way to its new home already:

I want a dishwasher handle like that!

Thanks for looking! 🙂

craftmas, General Sewing, Uncategorized

On the second day of Craftmas…

…my true love gave to me: ein Schal für Schnuckiputzi!

Last year, I cross-stitched Berlin as a Christmas gift for my friend of German descent, which felt like it took more or less forever. This year, I opted for something less ambitious but far more pragmatic: a double-layer fleece scarf, in the colours of the German flag, perfect for warding off the frigid Prairie air.

I used this tutorial, which I also used a few years back to make a scarf for my dad, so I already had a pretty good idea of what I was doing. (That never happens!) I found the fleece at a good price back in the summer when, ahem, the eventual recipient happened to be with me.

HIM: What are you going to do with the fleece?

ME: Oh, remember those Star Trek stockings I made? I want to make more. I’ve already got Spock blue at home.

Good excuse, right? Fast-forward to the cutting table.

OVERLY OBSERVANT FABRIC STORE EMPLOYEE: Looks like you’re making a German flag.

ME: Um, no. Star Trek stockings.

OVERLY OBSERVANT FABRIC STORE EMPLOYEE: So where’s the blue?

Much measuring, cutting, and sewing later, I had this:

My model is in the Witness Protection Program. 😉

Actually, I’m lucky I was able to take it off long enough to have her model it for me – it’s soooo warm and snuggly!

It’s nice and long, so he’ll be able to wrap it around and make sure he’s covered. Perfect for those early-morning waits for the bus!

Thanks for looking! 🙂

craftmas, Cross-stitch and Embroidery

On the fourth day of Craftmas…

…my true love gave to me: a whirlwind tour of Germany! (Cheaper than a plane ticket, and more fun than lost luggage and boorish seatmates.)

Yes, it’s January, but as far as I’m concerned it’s still the holiday season – so here’s the final installment of Craftmas 2018! Superstition says that whatever you’re doing as the clock strikes midnight on January 1 is a harbinger of what you’ll be doing that year. I was asleep at the time, but this is still pretty darned close…my way of starting off 2019 with a bang.

One of my nearest and dearest is of German descent, and when I saw “Pretty Little Berlin” by Satsuma Street, I knew I had to stitch it for him. He’s actually been there, albeit when there was still a wall down the centre, and this seemed like a fun way to document his travels.

This was such a fun stitch! The pattern didn’t include the city name – I charted that myself and added it in – but it did include a handy guide to the spots included in the piece, and I can now pick out, say, the Brandenburg Gate or the Television Tower (which I had previously thought of as only das große, spitze Gebäude) from a photograph. It’s always a good day if I can say I’ve learned something!

I framed it in a 9″ square shadowbox. I had originally contemplated painting the frame yellow to match the train and the Beetle, but I think the white offers a contemporary sleekness.

Because I’m kind of weird, I took pictures of my progress and turned them into a stop-motion video:

(Make sure your sound is on!)

The lucky recipient was really pleased with the finished product – and as for me, I’m just glad to be finished stitching it.

As always, thank you for looking, and for hanging out with me all year. Cheers to a great 2019! 🙂