Other Crafts

Don’t Go Breaking My Heart

Actually, in this case, you don’t need to! There’s a handy pull string to reduce your smashing by 100%.

I had seen these mini pinatas ages ago on the dearly departed Craftster, and saved the tutorial for myself despite being an asocial and unromantic weirdo. I managed to find the original tutorial using the Wayback Machine, but also took my own step-by-step pictures in case that ever ceases to be.

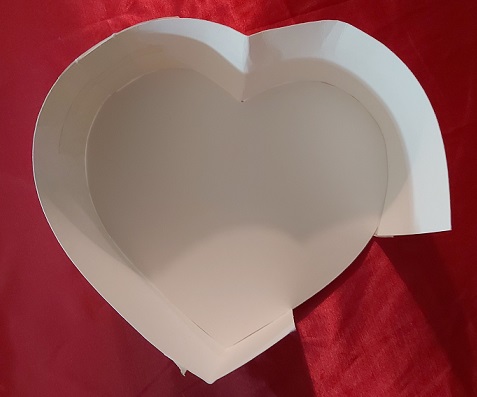
To start with, you’ll need to cut out two hearts from cardstock or posterboard. Mine are just a hair over 8″ across because I was using letter-sized cardstock, but you’re limited only by your imagination and raw materials. You’ll also need a “side strip/strips” whose width will dictate how deep your pinata is (and how much you can stuff inside it). I cut three 2.5″ wide x 11″ long strips from another sheet of cardstock, but only wound up using two of them.

Once I taped my two strips together, I could start attaching them to my first heart. I ran pieces of masking tape along one edge of my new double-long strip and then starting curving it along the edge of my heart and taping it down. Your edge will – nay, should – be shorter than the full circumference of your heart; that gap is where you’ll add your candy.

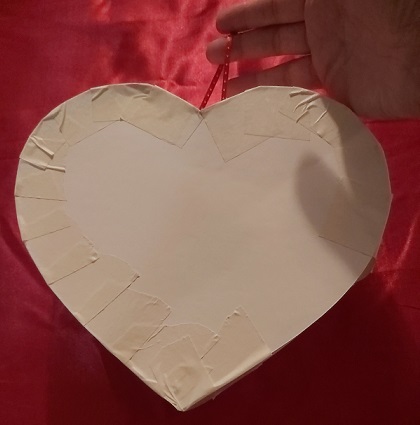
Here’s one spot where I deviated from the original tutorial: while I only had one heart attached to the edge, I poked a couple of holes in the edge and added a hanging loop, in case the recipient wants to display it.

Once I was satisfied a) with the size of my candy door, and b) that my hanging loop was secure and I wouldn’t need to access the inside of the pinata, I added my second heart and secured it to my edge with even more masking tape.

Now the raison d’être: add your candy. If you want this to be hung/displayed for a while, you may want to be mindful of the weight of whatever you’re putting in.

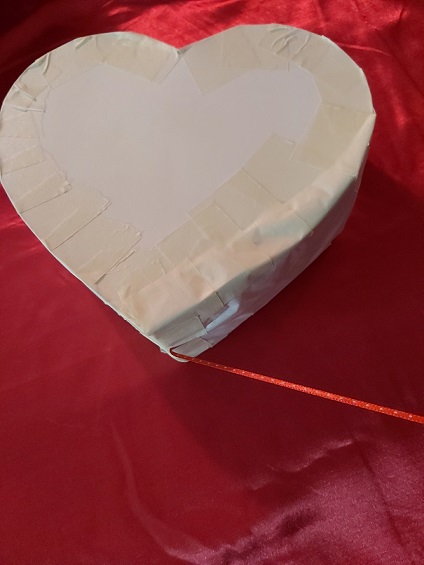
Remember when I said I wouldn’t need to access the inside of the pinata anymore? I lied, kind of. Once the candy is in, you can cover the opening with a folded-up piece of tissue paper, but to add a pull string you’ll need to affix that to the inside of the pinata above the opening, then tape it to the underside of the tissue. It’s a bit fiddly, and if I do one of these again I might attach it before I add my second heart, just to save fumbling around after. Make that pull string good and long so that your recipient has something to grab onto!

And now…you get to decorate! This was less annoying than I thought it would be. The girl who wrote the original tutorial used shredder scissors to fringe her tissue paper, but I did it old-school with normal scissors, and managed to not completely cramp up my hand.

I decided to go for a quasi-ombré look, and overlapped rows of tissue to keep it looking full and fluffy.

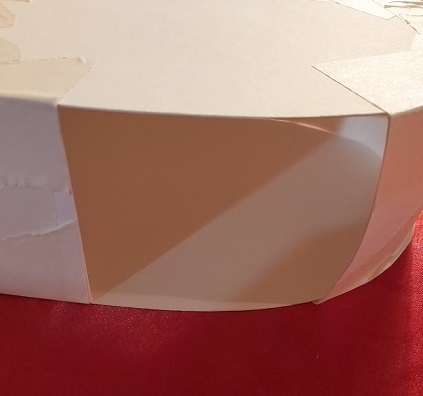
Once I got the heart faces done, I cut short pieces of my fringed tissue to do the sides. I used your garden-variety glue stick for this, and it was shockingly neat: no gluey residue, and practically zero dry time.

Finally seeing the light of day! Once my tissue-papering was done, I made a little instructional tag for my pull string, just in case there were any doubts as to what to do.

This didn’t take me too long, overall – a couple of episodes of Lolita Podcast – but just long enough to serve as a good reason to not be polyamourous.

Thanks for looking…happy Valentine’s Day!

craftmas, General Sewing

On the third day of Craftmas…

…my true love gave to me: a scarf for the pep rally!

Even though my friend Ricky* defected to Toronto 15+ years ago, and I see him once a year if I’m lucky, I still try to find the perfect Christmas gift to send every year. In this case, “perfect” translates loosely to “not totally impersonal, not ridiculously expensive, and not a bear to ship in terms of either packaging logistics or postage costs”. I don’t ask for much, do I?

A couple of years ago, I put together a Batman starter kit (mini Bat Signal plus some socks, soap, and mints all featuring the caped crusader’s likeness), and last year it was a box of local goodies that he wouldn’t be able to get in the Big Smoke. With everything that’s been going on this year, I opted for something nostalgic to remind him of those carefree high school days. *pause for laughter* Or at least something in our school colours.

I’ve actually made this scarf twice before, but this was my first time making it according to the original instructions and not trying to shoehorn in an extra colour. Based on a tutorial from the dearly departed Craftster, the premise is simple: choose two colours of fleece (A and B); cut eighteen 4″ by 6″ rectangles and four 6″ squares out of colour A; cut twenty 4″ by 6″ rectangles out of colour B; use nine, two, and ten of each kind of cutout to form each side of the scarf and then sew the two sides together for double-layer warmth.

I sincerely thought that cutting out all those rectangles was the most annoying/time-consuming part of this (admittedly simple) project – and then I remembered that every time you sew two of them together, you have to tie off the thread ends at both ends of the seam. Every time. For 2+10+9-1 seams per side.

To be fair, tying off the thread ends isn’t difficult or as prone to causing hand cramps as marathon fleece-cutting, but it’s the start-and-stop (especially if you leave them all until the end) that makes them a pain. By the time I was doing the second side of my scarf, I got smart, and tied my threads while I was on a conference call – it kept my hands busy, but wasn’t so distracting that I wasn’t paying attention to what was going on.

I think this should ward off the Toronto chill, no?

There was a time when I would have wrapped that scarf all around my model’s head to preserve anonymity or else digitally alter the photo up to and including decapitation; but darned if a co-ordinating mask doesn’t do the trick.

And sure, the scarf is nice and wouldn’t look out of place at the homecoming game (assuming we had a football team, which we did not), but it needed a little something extra to really complete the theme.

Perfect, right? It had the blue-and-gold scheme, and we both spent four years with the same English teacher who spent those years drilling into our heads such gems as the eight (nine? Ten? Google seems to be very divided on this) parts of speech. I think all of my grammatical neuroses can be traced back to that classroom.

In some miracle of modern postal service, his parcel arrived with a week to spare before Christmas, and I hope he’ll be able to get some use out of both, lockdown or no.

Thanks for looking….go Sabres!! 🙂

*Not his real name, but a nickname given by that same English teacher.

craftmas, General Sewing, Other Crafts

On the second day of Craftmas…

…my true love gave to me: a flock of sheep for the tree!

Back in the days of Craftster (RIP), I participated in the Sweat Shoppe Ornament Swap a couple of times. Basically, you’d create three or six ornaments – usually similar if not actual clones of one another – and be partnered up with three or six people to swap one for one. It was really kind of lovely because you could get your ornaments made well ahead of time and then just wait for your partners’ information. Craftster’s successor, Lettucecraft, is still in its infancy and the swap process has been a little different, and there was no SSOS this year.

Being me, I had already found a pattern I had wanted to use, and wound up making a few anyway.

I added some miniature 1:12 (I think?) lights that weren’t called for in the pattern, but took these from just being sheep to actually being Christmas sheep, and therein lies the difference.

These were really simple to make! My first one came to life during a conference call that required nothing from me apart from confirming my presence during roll call and answering the icebreaker question, and I completed the next two over a few evening phone calls with friends.

When I started making these, I couldn’t decide whether their overall vibe was “Fleece Navidad” or “Baaaaa Humbug”, but my “focus group” overwhelmingly preferred the former.

I call them a flock of sheep at the top of this post, but pity the poor collie who has to herd them: they wound up with (or are in the process of making their way to) friends in three different countries.

If the SSOS ever comes back, I might have to revisit these little guys. Love ’em!

Thanks for looking! 🙂

Cross-stitch and Embroidery

It’s your first name initial, a great big initial…

Soooo…a few weeks after the last swap of Craftster/first swap of Lettucecraft wrapped up completely, I was pleasantly surprised to receive a little ‘zine-type booklet in the mail from the organizer. She had made a list of some of her own little good things (like big fluffy cats, fun clothes, oak trees, etc.) and sketched out a small cartoon for each one before photocopying the whole shebang and sending one to every swap participant. How cool was that?

I wanted to send her something back, but what? I like it when crafts can be functional as well as pretty, and somewhere along the line I hit on the idea of a hand-embroidered monogrammed handkerchief. I know the thought of handkerchiefs grosses some people out, but I envisioned this being the perfect accessory for delicately wiping away a tear of joy at a summer wedding, not handling winter-level snotty output. I mean, the handkerchief, at least, won’t fall to shreds after bouncing around one’s purse or being balled up in one’s hot little hand, so there’s that. (This is back when the virus was a problem for other continents, and there was no conceivable reason that there might not be summer weddings. Oh, how I laugh now at my childlike naivete.)

That was nearly two months ago, and I’ve yet to hear boo from her about it. There are lots of reasons that could have happened, right?

  1. The Canada Post/USPS liaison I’ve come to rely on has finally failed me, and it’s lost somewhere in the bowels of the postal system. Maybe it’s just due to the newfound slowness of everything, or maybe USPS squeezed the benign-looking greeting card envelope and was alarmed by it’s plush squishiness and had it destroyed, or maybe the envelope glue gave out and there’s a card and a handkerchief sitting loose and unclaimed somewhere.
  2. The postal system did its job, but as I forgot to add my Lettucecraft handle to the card when I signed it, the recipient has no idea who her mysterious benefactor of such beautiful, heirloom-quality linens is.
  3. It made it to its destination in a prompt and timely fashion, completely unscathed by its rather plebeian form of transport, and…she can’t believe that someone sent her this. A handkerchief? How disgusting! This is the 21st century, people, and Kleenex were invented for a reason! Ugh! It’s things like this that help viruses proliferate. And anyway, this is ug-leee! Those colours assault my delicate eyes!

Of those above, which one feels the most likely? And yet, which one does my mind jump to?

In any case, even if she positively hated it, I was pleased with how it turned out. I used the white handkerchiefs from Sublime Stitching, and they are honestly so perfect. I washed them before starting to embroider in order to remove any sizing, and they’re soft and delicate but not totally papery.

Here, in all its 12″ x 12″ glory, you can see the pattern of the floor beneath it faintly.

Once it’s folded into quarters, you get a slightly better sense (maybe) of how wonderfully soft the fabric really is – that drape, though.

A close-up of the embroidery! I used this pattern, which is probably something I would never have bought for myself, but I love how it turned out. I used stem stitch for the A, satin stitch (outlined with backstitch) for the petals, lazy daisy for the leaves, and a single French knot for the centre of the flower.

I’ve still got three hankies left from the package…I might have to stitch up one for myself, because wedding season is bound to resume sooner or later.

Thanks for looking! 🙂

Cross-stitch and Embroidery, General Sewing

Stop! Grammar time!

Happy Grammar Day! I did not craft some lovely, grammatically sound work of art (nor did I invite the strippers, JFK and Stalin. Always use your Oxford commas, people!), so I’ll leave you with this because it makes me smile.

Oh, Jasper…watch out for that pencil sharpener…

But back to our regularly scheduled crafty post, and apologies for the bait-and-switch.

Back in December, Craftster closed the membership part of its site, leaving a bunch of us without a crafty place to call home. (The site still exists, but in archive mode, and you can still look up projects assuming the original poster didn’t take down her pictures.) Just before that unpleasant little announcement was made, one of the members had started gauging enthusiasm for a Little Good Things swap: we’d send our partner something quick and simple, that took two hours-ish to make, plus a sweet treat and a little card telling what one of our personal little good things was. I liked the idea of a quick turnaround, and if I was considering it before the announcement, the fact that it would be the last Craftster swap ever sealed the deal.

I wasn’t the only one thinking like that: this thing turned out to be epic, with 50 participants (something that hadn’t happened there in years) and zero flakers. I requested two partners, and although there was a bit of overlap between their questionnaires and likes, I wanted to make sure I didn’t send twin packages.

My first partner mentioned adult merit badges as a little good thing, and I thought this would be a fitting way to commemorate her time as a member of the site. I cut two 3″ circles out of light blue felt, and then resized an image of Craftster’s mascot (unofficially known as “Cork Guy”; I don’t think he has a name) to fit and cut him out of felt, too. Cork Guy and the dates were sewn only onto one circle, and then I attached the second one with a rainbow blanket stitch to hide the back of my work. The numbers really set my nerves on edge, trying to make them a) the correct size and b) legible. But oh! I got to use math to figure out how long each colour of blanket stitch should be: πd / six colours = 1.57″ per colour.

Although my second partner had also mentioned adult merit badges, I wanted to go a different route. Her questionnaire declared stormy weather to be a little good thing, particularly if she didn’t have to go out in it. The darker blue fabric with the silver streaks reminded me of lightning streaking across the sky, so I paired it with a bright-sky blue fabric to make a 6″ x 8″ mug rug. There’s a layer of fleece in between to offer a bit of extra cushioning and absorbency. To round out the “cozy night in” theme, I sent a few individually wrapped tea bags and some chocolate.

There’s a happy ending to the Craftster trauma: almost immediately after its closure was announced, a few of the moderators put their heads together and launched a new crafty community. Lettucecraft (Just Let. Us. Craft.) has been up and running since January 1, and it’s already full of crafty inspiration.

As always, thanks for looking! 🙂

craftmas, General Sewing, Uncategorized

On the second day of Craftmas…

…my true love gave to me: ein Schal für Schnuckiputzi!

Last year, I cross-stitched Berlin as a Christmas gift for my friend of German descent, which felt like it took more or less forever. This year, I opted for something less ambitious but far more pragmatic: a double-layer fleece scarf, in the colours of the German flag, perfect for warding off the frigid Prairie air.

I used this tutorial, which I also used a few years back to make a scarf for my dad, so I already had a pretty good idea of what I was doing. (That never happens!) I found the fleece at a good price back in the summer when, ahem, the eventual recipient happened to be with me.

HIM: What are you going to do with the fleece?

ME: Oh, remember those Star Trek stockings I made? I want to make more. I’ve already got Spock blue at home.

Good excuse, right? Fast-forward to the cutting table.

OVERLY OBSERVANT FABRIC STORE EMPLOYEE: Looks like you’re making a German flag.

ME: Um, no. Star Trek stockings.

OVERLY OBSERVANT FABRIC STORE EMPLOYEE: So where’s the blue?

Much measuring, cutting, and sewing later, I had this:

My model is in the Witness Protection Program. 😉

Actually, I’m lucky I was able to take it off long enough to have her model it for me – it’s soooo warm and snuggly!

It’s nice and long, so he’ll be able to wrap it around and make sure he’s covered. Perfect for those early-morning waits for the bus!

Thanks for looking! 🙂

craftmas, Cross-stitch and Embroidery

On the first day of Craftmas…

…my true love gave to me: a Christmas fit for Elvis Presley!

Having once participated in the Sweat Shoppe Ornament Swap on Craftster, I knew immediately I was going to do it again. This year, I was a little more prepared, and had been lazily working on my ornaments throughout the year so that all I had to do once signups began was finish them off and name them.

Name them – sounds weird, doesn’t it? Last year I called my set Festive Foxes (a bit lame, but it was my first time out). This year, I wrestled with the name a bit. Fairisle Festivities? Scandinavian Season’s Greetings? Three-inch hoops that look vaguely like a knitted sweater? Suddenly, inspiration struck: Blue Christmas.

The patterns came from an issue of Cross Stitch Crazy I bought last year. I really liked the designs, but couldn’t imagine making them for myself or anyone I know – nobody I know really has that particular theme running through their holiday décor. The swap turned out to be the perfect outlet!

To stitch them, I cut one long strip of 14-count white aida fabric, eyeballed thirds, and kept moving my Q-Snap down as I went – then cut them apart when it was time to frame them. I took plain 3″ wooden hoops from Michaels (I stock up every time they have them in stock) and painted them with white acrylic paint, then sprayed them with an iridescent white glittery spray paint. I had some iridescent white cording on hand for the hanging loops, and I’m hoping that they catch the light on my recipients’ trees.

In a more “natural” habitat (no tree up yet, so I trekked to the furthest reaches of the back yard to the cedar tree I normally forget is there):

The one with the deer has made it to its new home, and the other two are currently in transit. Fingers crossed they arrive soon! I’ve already received two of the three I’m getting:

It says “Craftster Christmas 2019”, with some rows of lights stamped between the lettering. The flash photography doesn’t do it justice, but I was having short days/snowy weather lighting issues when they first arrived.

Seriously, how is this little guy so relaxed about Christmas prep? And where did the crafter find little star-shaped baking tins like that? I love the aesthetic of it!

I finally got my last one! It’s a simple wooden disk with an intricate series of dots and gemstones that don’t show as well in this picture.

Thanks for looking! 🙂

Cross-stitch and Embroidery

Words to live by

A little while ago, I was part of an ATC Address Card swap on Craftster. (An ATC, for the uninitiated – as I was – is an Artist Trading Card; you can read all about them here.) The idea was that you would create cards for four swap partners that featured your name and address on one side and a brief biography and/or likes and dislikes on the other, so that you would be able to exchange birthday cards, random crafted items, or even swap stash. I’m a sucker for anything that might mean more mail coming my way, and despite not being a papercrafter (or, um, able to draw) I was on it.

One of my partners went completely above and beyond, and I was shocked to receive an envelope too large and too fat to hold just a 2 1/2″ x 3 1/2″ card. She had filled this thing to the gills with assorted pieces of cardstock, embellishments…all sorts of different colours and textures to play with. As soon as I opened it, I knew I’d have to come up with something amazing to send her. I’m not a papercrafter, though, so I played to my strengths, and when I saw the pattern in my stitching stash, I knew I had found my something.

The pattern is by Emma Congdon, but I changed up the colours a bit and really prefer the rich green to the original shades of yellow. I love typography, and given that the recipient is a prolific and multi-talented crafter, this was just too perfect for her.

She wasn’t expecting anything and so this proved to be a complete surprise when she came home after work one day to find it in the mailbox. And really, isn’t that the best kind of mail?

Thanks for looking! 🙂

Cross-stitch and Embroidery, Other Crafts

She’s still preoccupied with 19…19…1985

Nostalgia makes everything better, doesn’t it? Food is tastier, music is better…all because of the memories associated with it.

When the “I Love the 80s” swap showed up on Craftster, I was so, so in. The cartoons! The neon colours! I think that was probably the first generation of kids that was marketed to hardcore by businesses, and it showed in the Pinterest rabbit hole I found myself falling down. I think I could have made a career (if a low-paying one) out of curating just the right Popples and Strawberry Shortcake pins.

Apparently not many people feel that way, because when sign-ups closed, there were only three of us signed up. We did a round-robin swap, which sounds more family-friendly than “three-way” – Person A sent to Person B, Person B sent to Person C, and Person C sent to Person A. It was a three-point swap, which meant that your swap package should take three or more hours to craft or cost $30 or more in supplies.

I found a truly outrageous pattern to stitch up:

I found neon craft acrylics to paint the hoop, too. Between the colours and the sparkly aida fabric, it popped. But it felt kind of underwhelming on its own (despite meeting the 3-hour mark), so I made a felt-appliqué My Little Pony to go with it.

Luckily, the same purple paint complemented Glory’s mane and tail perfectly.

I felt pretty good about my package, but hoo boy, did my partner ever spoil me!

A mug rug! The 80s-est (it’s a word now) notecards ever! Even a Caboodles! But the Lisa Frank shrine really shone, and needs a little love of its own.

I was seriously blown away by her generosity, and quite frankly by the utter perfection of her choices. It seemed like if it was on my swap questionnaire, it found its way into my package. I thanked her profusely, of course, but couldn’t let that be the end, so I felt-appliquéd a hoop for her, too.

What else do you send someone who brought such cheer to your day but Cheer Bear? All right, and some chocolate, too. (By the way: that purple door in the background isn’t long for this world. Pretty soon you’ll be seeing a different backdrop for hanging crafts.)

This all culminated in mutual goodwill, and I was a little sad to see it all over – this was probably the most fun I had ever had in a swap, playing with the colours and characters. As it turned out, one of the Craftster members hadn’t been able to take part in the official swap, and so with a brief private-message exchange, we were able to work out details of a private swap.

My new partner was a collector of My Little Pony as well, and in the course of our exchange, I quickly hit on exactly what I had to make for her.

Gusty!

And Medley! (I’ve also seen it spelled “Melody”, and if someone knows which is right, let me know.) Gaah, the detailing on her wings stressed me out. I kept worrying the definition wouldn’t come through.

I still wanted to include something else with them – I might be a lot of things, but I’m no one-trick pony (ha!). While Googling the Wuzzles at work one day, I discovered just what an amazing collection of vocal talent that show had. Bill Scott (you might know him as Bullwinkle J. Moose, Dudley Do-Right, Mr. Peabody…) was on it, but – and this is what did it for me – so were Henry Gibson and Joanne Worley. I had never heard of them, or of Rowan and Martin’s Laugh-In, as a kid, but present-day Witty Child just about fell out of her chair.

But how to immortalize their characters? More felt appliqué? Nah. Embroidery would be nice, but I’d want to do a fill stitch of some sort to capture the colours better than an outline alone could do, and I didn’t have the time for that. And for the first time ever, Michaels provided me with something useful, in the form of fabric markers.

The markers gave me the colours I was looking for, and worked really well on the tea towels I used. They even held up after being washed, and I can’t imagine how many hours and needle-induced callouses they saved me.

It seems that my partner and I were kind of on the same wavelength, because I got home one day after work to find these waiting for me:

Felt-appliquéd My Little Ponies! Cotton Candy will always be #1 in my books. And Lisa Frank kittens! That neon yellow on both of them (fleece for the ponies, and embroidery floss for the kitten) positively draws the eye. Who am I kidding, I can’t stop looking at either one of them.

80s-themed crafting: can’t stop, won’t stop.

Thanks for looking! 🙂

Cross-stitch and Embroidery, General Sewing

Tangled Up in Blue

When I signed up for the 2019 edition of the Colour in a Box Swap on Craftster, my mind danced with possibilities. I had done it a couple of years ago, when it was the Sunshine in a Box Swap, but everything was in sunny shades of orange and yellow. This time, I had limitless options. I chose pink as my colour, and couldn’t wait to see what bright hue my partner had picked. Ooh, or maybe that would be hues, plural! When I saw her colour was navy, I was temporarily flummoxed.

It’s so dark. Wasn’t that akin to sending a big box of gloom?

Still, if navy was what she wanted, navy was what she was going to get, and I scanned her Pinterest for ideas (gleaning a few Christmas ornament how-to’s along the way), until I hit a pocket of beachy Pins. Something sea-y would work well! A quick trip to Michaels later, I had two packages of iron-on embroidery transfers and a set of blank, navy-striped tea towels.

I’m pretty sure the lighthouse design is bigger, but it went more quickly than the beach chair one did. Weird.

Close-ups:

I kept things super-simple, and used a basic backstitch to outline everything. Partway through the first one, I panicked – although I knew I was using navy thread, it looked almost black. (Though this clearly didn’t panic me enough to stop stitching and switch colours. Go figure.) It must have just been a trick of the light, because when my partner received her package and posted pictures, the lines were definitely navy. *whew*

I also made her the Poochie bag we all know and love from a couple of posts back:

I stuffed the bag with some navy goodies: blueberry-scented votive candles, a tin of blueberry mints, some washi tape, navy gel pens…

I couldn’t wait to see how she ran with my request for pink, and I wasn’t disappointed!

I can’t knit, and so I’m in utter awe of the cabling on the hat. The texture…oooh! (The unicorn lights, of course, went straight to work with me to brighten up my cube.)

Thanks for looking! 🙂