Other Crafts

Don’t Go Breaking My Heart

Actually, in this case, you don’t need to! There’s a handy pull string to reduce your smashing by 100%.

I had seen these mini pinatas ages ago on the dearly departed Craftster, and saved the tutorial for myself despite being an asocial and unromantic weirdo. I managed to find the original tutorial using the Wayback Machine, but also took my own step-by-step pictures in case that ever ceases to be.

To start with, you’ll need to cut out two hearts from cardstock or posterboard. Mine are just a hair over 8″ across because I was using letter-sized cardstock, but you’re limited only by your imagination and raw materials. You’ll also need a “side strip/strips” whose width will dictate how deep your pinata is (and how much you can stuff inside it). I cut three 2.5″ wide x 11″ long strips from another sheet of cardstock, but only wound up using two of them.

Once I taped my two strips together, I could start attaching them to my first heart. I ran pieces of masking tape along one edge of my new double-long strip and then starting curving it along the edge of my heart and taping it down. Your edge will – nay, should – be shorter than the full circumference of your heart; that gap is where you’ll add your candy.

Here’s one spot where I deviated from the original tutorial: while I only had one heart attached to the edge, I poked a couple of holes in the edge and added a hanging loop, in case the recipient wants to display it.

Once I was satisfied a) with the size of my candy door, and b) that my hanging loop was secure and I wouldn’t need to access the inside of the pinata, I added my second heart and secured it to my edge with even more masking tape.

Now the raison d’être: add your candy. If you want this to be hung/displayed for a while, you may want to be mindful of the weight of whatever you’re putting in.

Remember when I said I wouldn’t need to access the inside of the pinata anymore? I lied, kind of. Once the candy is in, you can cover the opening with a folded-up piece of tissue paper, but to add a pull string you’ll need to affix that to the inside of the pinata above the opening, then tape it to the underside of the tissue. It’s a bit fiddly, and if I do one of these again I might attach it before I add my second heart, just to save fumbling around after. Make that pull string good and long so that your recipient has something to grab onto!

And now…you get to decorate! This was less annoying than I thought it would be. The girl who wrote the original tutorial used shredder scissors to fringe her tissue paper, but I did it old-school with normal scissors, and managed to not completely cramp up my hand.

I decided to go for a quasi-ombré look, and overlapped rows of tissue to keep it looking full and fluffy.

Once I got the heart faces done, I cut short pieces of my fringed tissue to do the sides. I used your garden-variety glue stick for this, and it was shockingly neat: no gluey residue, and practically zero dry time.

Finally seeing the light of day! Once my tissue-papering was done, I made a little instructional tag for my pull string, just in case there were any doubts as to what to do.

This didn’t take me too long, overall – a couple of episodes of Lolita Podcast – but just long enough to serve as a good reason to not be polyamourous.

Thanks for looking…happy Valentine’s Day!

craftmas, Other Crafts

On the fourth day of Craftmas…

…my true love gave to me: a last-minute Christmas quickie!

(Get your minds out of the gutter…)

I’m not going to do a big, long how-to, but keep it simple: I used this tutorial to create some golden snitch chocolates for a friend’s stocking.

They came together really quickly; I had Discord open in the background while I worked (because apparently I keep glue at the computer desk), and it took less than 10 minutes to get all three made.

There’s no way these were getting back in the cellophane sleeve, so instead, I’ve tucked them into a little organza bag to go at the very top of his stocking, and hopefully keep the wings from getting crushed.

Thanks for looking – Merry Christmas! 🙂

baking

How do you solve a problem like vanilla?

How do you stop the cake from being dry?*

*In my case, I used a schmancy boxed cupcake mix (schmancy in the sense that it cost nearly five bucks, and came with some prepackaged frosting that I ultimately threw away, while the usual Betty or Duncan extravaganza will set you back about $1.29 on sale and yields twice as many cupcakes) and kitbashed it into something much more party-worthy.

The birthday boy in question will always choose vanilla over chocolate, and although I don’t have issues with vanilla per se, I don’t have much luck baking it at home. Even the vanilla recipe from Vegan Cupcakes Take Over the World, whose chocolate cupcakes have garnered rapturous eye-rolling, gives me a finished product that is dense and drier that just about anything else I’ve made. Vanilla might be my new red velvet: vegan or not, that perfect version eludes me. Even the Minion cupcakes I made using VCTOTW’s recipe a couple of years ago were…okay, but not that light, melt-in-your-mouth moist WOW that the chocolate ones are. With that in mind, I didn’t feel exceptionally guilty starting with a mix, and felt even better when Alton Brown said that it’s hard for home bakers to compete with the various commercial ingredients in the boxed mix. I decided this was going to be a gummi bear cake, after seeing one in a magazine and deciding I wanted to try it.

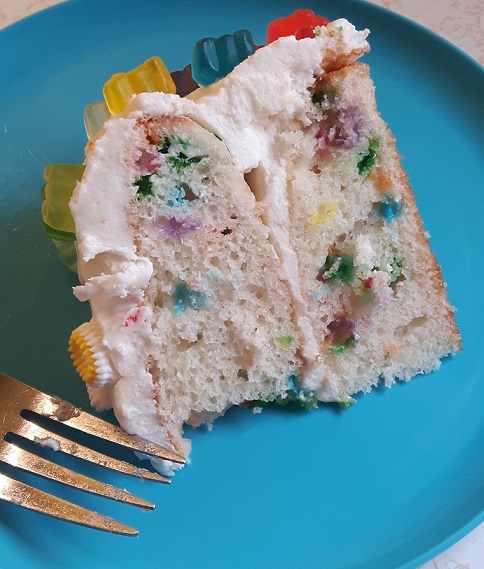
My local Bulk Barn doesn’t carry straight-up quins anymore that aren’t (when I was looking) Halloween or (right about now) Christmas-themed, so I picked up these pastel starts to Funfetti the heck out of the cake.

They do, however, carry the best gummi bears ever. Despite the zoom in the photo, these guys are mini, and come in 11 different flavours. I’m kind of a sucker for proper ordering of colours, so…

Instead of cupcakes, I poured my batter into two six-inch pans. During baking, these things developed a bit of a crazy-high dome, and while leveling your cake before assembling it is the traditional method of handling this kind of baking topography, mine didn’t rise terribly high when baking and completely eliminating the domes would have left me with ridiculously thin layers. I spread a thick layer of almond-flavoured buttercream on the bottom layer, and…

…built up the edge using gummi bears. You won’t find that trick at fine French baking schools, kids. I then set my second layer, dome-down, on top of it, frosted the whole shebang, and added rows upon rainbow-ordered rows of gummi bears.

I staggered the colours in each row, but make no mistake: the order never changes. It was a bit fiddly positioning them in four iterations of twenty-two reasonably even intervals, but that’s the kind of weirdo I am. My original plan was to tint part of my buttercream a different colour and write a message of birthday goodwill on top, but the teeny letters were too cute to pass up. (It doesn’t hurt that they match the aesthetic pretty much perfectly and made that part so much easier and faster.)

You can see a slight fault in the icing in what I’ve come to think of affectionately as the “dome crack”, but it held up really well and the gummi bears between the layers were a fun surprise.

The birthday boy loved his highly customized (*snerk*) dessert, and now I have almost another year to crack the secret to homemade.

Thanks for looking! 🙂

baking

Cuban Lunch: The [insert scary-sounding gerund here]

This is a short one, because Halloween is imminent and I still have to do my nails, gather together the components of the two different costumes I’ll be wearing (yes, I’m insane), and finish planning a birthday party – the latter has nothing to do with Halloween, but still falls close enough to feel like it.

Remember my Cuban Lunch that I shared the recipe for last year? Two very exciting (or not) addenda to that. First, I’ve managed to find the commercially-manufactured resurrected version, which worded thusly sounds a bit Halloween-y in its own right.

It’s a beaut.

Second, I still think I prefer my homemade version, and so I made up a batch to hand out to a few lucky individuals at work as an early Halloween treat.

Because it’s already unseasonably cold around these parts, I was able to stash these in the garage for about 45 minutes to let them really firm up before packaging them for delivery.

Aren’t those bags cute? Each one contains a baggie holding four chocolates, sealed for freshness (if they last that long).

Thanks for looking – have a spook-tacular Halloween! 🙂

baking, General Sewing

A purr-fect start to the holiday season!

(Because I’m capable of domestic arts that aren’t just cupcake porn, doncha know…)

(But don’t worry, there will still be plenty of that!)

Every year, one of the no-kill cat shelters in town has an open house, sort of a fund-raising/awareness/adoption drive.  They hold a bake sale, too, and put out the call for people to bring in baking to help the cause.  I try to make something tasty each year, and one year I recall phoning in sick to work so I could stay home and bake a few dozen cupcakes (I’ve since improved my time-management skills).

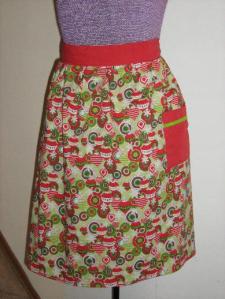
I wanted to do something just a little different this year.  Baking is fine, but homemade treats grow stale quickly, and what if they don’t sell?  Isn’t there something a little more tangible I could do?  Then it hit me: what about a couple of cute half-aprons?  They make the perfect hostess gift, and can be tied on long after the cookies have turned dry and crumbly.  I used fun faux-retro prints to keep things merry and bright, and had at ‘er.

2855

2859

2861

To make them, I measured an apron of my mother’s and drafted up a pattern of sorts.  They were really simple – I think I spent more time steaming my fingers with the iron than sewing – and generously-sized.  I’m not a skinny girl, but the ties wrap all the way around my waist back to the front.  The whole project would have been a great exercise in de-stashing, too (besides helping the homeless kitties), if I hadn’t gone out and bought fabric specifically to make these.  Next year…

I even made little tags with care instructions:

2864

But, you know, they did ask for baking and not for cute housewares, so I did bring something edible, too. My world  city  inner-circle famous Cuban Lunch candies, packaged and ready for giving, or just for enjoying yourself:

2868

Hopefully I’ll help them raise a few dollars to help the kitties…what a nice start to the holiday season!

baking

It’s a marshmallow world in the…spring?

A normal person would, much in the style of Charles Emerson Winchester III, do one thing at a time, do it very well, and then move on to the next thing.  My approach is somewhat more chaotic, and I have found myself with one Mother’s Day project on the go, one yet to be started (eep!), one baby sampler due early summer started, and one anniversary present due late June started.  Everything is slowly getting done, bit by bit, but thanks to my own special brand of multitasking, nothing is really getting finished.  Thank goodness for long weekends.

I did, however, manage to steal a bit of time to try my hand at homemade marshmallows.  These are not vegan, alas, as my experiences with agar agar have been somewhat unpredictable and I actually wanted these to work; if anyone knows a good gelatin-to-agar agar equivalency rate or other vegan option, I’d be thrilled.

That said, they turned out perfectly!  I used Alton Brown’s recipe (found here), although I used nearly 2 1/2 Tbsp of vanilla instead of the recommended 1 tsp to enhance the flavour.  They do get a little sticky if left at room temperature, despite the powdered sugar/cornstarch coating, so I’ve been keeping them in the fridge.

Some of them have extra “skin tags” because I cut them once in the pan, then turned them out and re-cut on the bottom, and some of my cuts didn’t quite line up perfectly – but that’s purely cosmetic.  I’ve never used a candy thermometer before or attempted anything quite like this, but if I can manage, anyone can.  They are vanilla-y, soft, and smooth, and I can’t wait to make s’mores out of these babies!

Oh, yes: Happy Nabokov Day!