General Sewing

I’m Half Joe Camel and a Third Fonzarelli

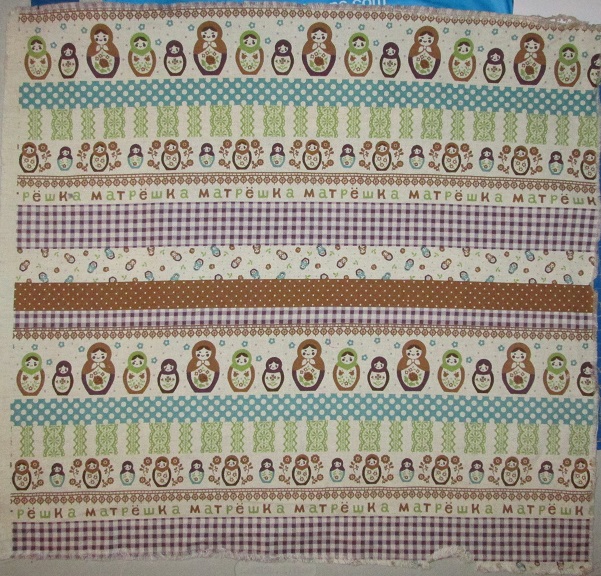
Way back, when I was first dipping my toes into that great pool that is Etsy, I found some fabric from a purveyor of kawaii textiles that I just had to have. I don’t remember how closely I read the listing before adding it to my cart and waiting impatiently for my package to arrive from Japan.

When it did arrive, the package’s contents were just as lovely as they had looked online, only…much smaller than anticipated. I was not and am not a quilter, and had never heard of a fat quarter, and it was inconceivable (“I don’t think you know what ‘inconceivable’ means.” – Ed.) that someone should sell fabric in less than a metre cut. I had no idea what to make with an 18″ x 22″ piece of fabric – though admittedly, I don’t think I had a project in mind for a metre, either – and into my stash it went.

Fast-forward ten years (I know!), and suddenly every store is charging 5¢ for a plastic bag. I’m honestly not bothered by being charged a nickel, and as long as plastic bags are reused or disposed of properly, I don’t believe they’re the environmental bogeyman that everyone makes them out to be. (Edit: I found this, which confirms my theories at least partly.) But some stores’ (looking at you, Michaels) are made so cheaply that anything sharper than a cotton ball will cause them to tear so that they can’t be reused. And who wants to lug around one of those family-sized reusable bags from a grocery store when you’re just heading to the drugstore for dental floss and conditioner?

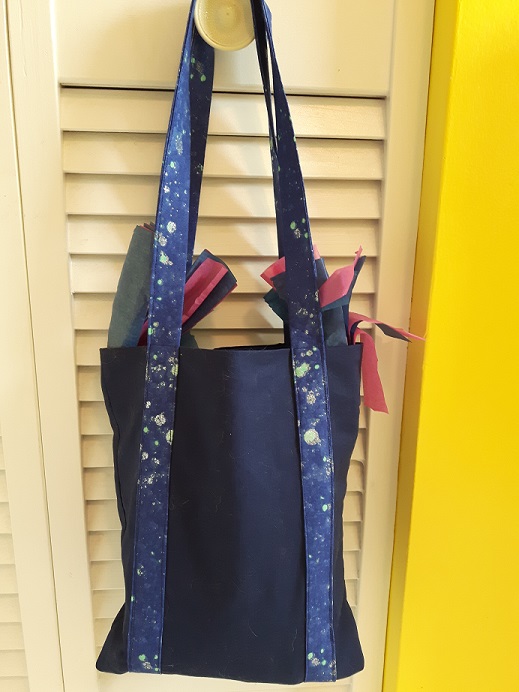
While browsing through files on my computer, I stumbled on a PDF that I had downloaded from the Happy Zombie probably around the time that I bought that abnormally tiny cut of fabric. This so-called “Poochie Bag” looked like the perfect way to use it. Honestly, if I hadn’t had to go out and buy coordinating fabric for the lining and handles, it would have been the perfect destashing project.

Except I didn’t make this a “true” Poochie Bag because…no pooch. Doing that would have relegated that lovely Cyrillic lettering to he bottom of the bag, and I didn’t buy this on whim and then sit on it for ten years just to do that. I still wanted to try the milk-carton corners, though, and decided to make one for my mom’s birthday.

Not only did it hold all of her other birthday swag admirably, she’s gotten a ton of use out of it since for all those small purchases. I picked three coordinating fat quarters (aha!) from Michaels, and was pretty pleased with the results.

So pleased, in fact, that I decided my partner in the Colour in a Box Swap on Craftster needed one in her chosen colour, too.

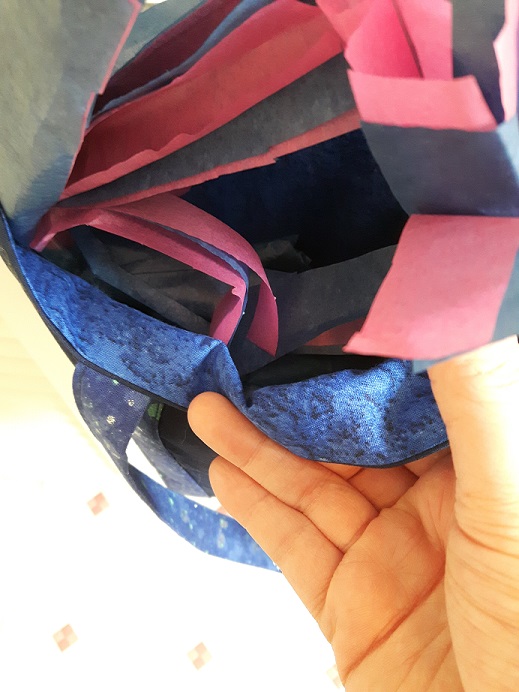
I love the lining fabric!

After three of these, I think I’m poochie-d out for a little bit. But they’re a great quick project, and I may have to revisit them for Christmas gift-giving.

Thanks for looking! 🙂

craftmas, Cross-stitch and Embroidery, General Sewing, Other Crafts

On the first day of Craftmas…

…my true love gave to me: a skulk of foxes for the tree.

For the past nine years (counting this one), a Christmas ornament swap has been hosted on Craftster.  Charmingly dubbed a Sweat Shoppe swap, it functions like a cross between those holiday cookie exchanges and a chain letter: you sign up for either three or six partners, make three or six like ornaments to send off, and receive ornaments from either three or six different people.  Because you’re not crafting something specifically for someone, many participants made their ornaments well in advance and wait for sign-ups to begin.

I had been tempted by it in the past, but never had anything made ahead of time and never had time to start anything once sign-ups began.  This year, some magical wave of forethought seized me, and I started my sewing early.  When sign-ups hit, I was ready.  I had found this pattern by Maisie Moo on Etsy, and gave it the old college try to make sure it would turn out, be an appropriate size, etc.

I named him Les, and he has a home on my Christmas tree. 🙂  I’m glad I practiced on him, because it gave me a chance to tweak the instructions a bit.  Rather than cut out teeny, tiny black eyes from felt, I traced them onto the white pieces and embroidered them using raised satin stitch.  I also used finer stitches than the instructional photos showed.  And…I’m not sure how the scarf, at the length prescribed by the pattern, was supposed to wrap around his throat and have a tail to fringe – so I made it about 1 1/2 times as long so that I had a little room to play with.

Because I have apparently learned my limits after many, many years of Craftmas (official and unofficial), I signed up for three partners and not six, tempting though that was.  These little guys were so much fun to stitch up!

I named them Redd, Michael J., and Renard – just think about that for a sec – and all three have made it to their new homes, despite the best efforts of the postal service to waylay them.

And now that they’re finished, and I should be thinking about the zillion other things I need to get done before Christmas, I can’t help but think what sort of ornaments to offer next year…

EDIT: By popular request, here’s what I got in return.

A fabric tree from Alberta.  (Front and back.)

A cozy cardinal birdhouse from Massachusetts.

A shaker ornament from Pennsylvania – the tree was up by the time the postal system finally decided to get it to me, so it got photographed in its natural habitat. 😉

Thanks for looking! 🙂

Cross-stitch and Embroidery, Other Crafts

Where my witches at?!

I’ll skip the whole “Ooh, Halloween!” preamble, because anyone who’s been reading this for a while knows how I feel about it (and if you don’t, check the Halloween tag).  Spoiler alert: I love it!  Obviously, joining the 2018 iteration of the Vintage Halloween Swap on Craftster was a no-brainer.  My partner has received her package, so I figured it was safe to post this now.

My partner’s era of choice was the 1920s-1930s, and “witches” was among her favourite themes.  This might have pushed me just a wee bit outside my comfort zone – my Halloween aesthetic runs toward “cute” and “cats”, and is just a bit more modern – but one of the fun aspects of swaps is trying something you might not ordinarily try.  An Etsy search for “1930s Halloween” yielded, among other things, a high-quality jpeg version of this image:

2018 Swap 4

(This, of course, is a low-quality image courtesy of a Google search.)

She was Art Deco-y and fun, and I decided to interpret her in embroidery.  Using my lightbox, I traced the basic outline in pencil before going over those lines with a transfer pen.  Once the design was transferred to my fabric, I colour-tinted the image before starting the actual embroidery.

2018 Swap 5

Naturally, I didn’t think to take a picture after transferring and before tinting.  This will be a recurring theme.

After setting the crayon, I used a simple backstitch to define most of the image – I had tried stem stitch, because I think it permits more gentle curvature, but it was proving to be too bulky and weird.  I used a bit of satin stitch on the witch’s eyes and mouth, an some French knots to create the polka-dot pattern on her sleeve.

2018 Swap 6

Her hands in the original image reminded me of a Barbie doll’s steel-fork fingers, so I attempted to humanize her a little bit.  Her overall look reminded me of something, too, but I couldn’t figure out what for the longest time, until it hit me: she’s a tad Claudette Colbert-ish,  I think.  Same era, same shot-from-the-left, same well-defined lips…

That’s a regular wood/bamboo embroidery hoop she’s framed in (5″), painted black to really make the colours pop.

When I had gone to Michael’s to pick up the fabric, floss, and hoop for her, I saw a display of unfinished wooden light-up decorations, and lo, they had a witch one.

2018 Swap 1

It did not occur to me to take a “before” picture until after I had started applying yellow paint – I told you that was a recurring issue.

2018 Swap 2

Even after one coat of craft acrylic, she looked pretty good, but this picture definitely showed me the need for a second coat – and that I had to paint the edges black as well.

2018 Swap 3

This picture doesn’t really do it justice – lit up in a dark room, it positively glows.

Consider Halloween crafting season to be officially underway – thanks for looking! 🙂

Cross-stitch and Embroidery, Other Crafts

It’s time to play the music; it’s time to light the lights…

Remember my twinchies?  Gah, that seems like forever ago.  (“Time’s fun when you’re having flies.” – Kermit the Frog)

Anyway, I had so much fun making them that when another round of the twinchie swap appeared on Craftster, with send-outs in September, joining in was a no-brainer.  I might be a bit late in posting these, but think of them as undiscovered gems.

My partner had a variety of themes offered as suggestions, and I was thisclose to running with Bob’s Burgers – can’t you just picture Louise’s bunny ears immortalized in four square inches of felt?! – when I saw that she also had Muppets on her list.  In that moment, the first coherent thought in my brain was, “Beaker!”

Muppet Twinches 2

That was followed a split-second later by, “Bunsen!”

Muppet Twinchies 4

It wasn’t until I began trawling the internet for source images to use, scrolling past picture after picture of Dr. Honeydew, that I realized with a start that he bears a striking resemblance to my dad’s old boss, only slightly more green.  I tried to find a picture of him, but came up empty-handed, so you’ll have to take my word on this.

With Bunsen n’ Beaker done, how could I round out my quartet?  Statler and Waldorf would have been fun, and practically begged to have a note included in my swap package complaining about what terrible needlework this was (“Ha ha ha!”), but they didn’t feel as iconic to me as some of the other Muppets.

Iconic Muppet?  Why, that would be…

Muppet Twinchies 5

Miss Piggy was the most challenging of the four, I found.  Her various pieces felt a bit more jigsaw-y to me than the others, and trying to capture that heavy-lidded look on a very small canvas wasn’t easy.  But the sparkly fuchsia background seems perfect for the self-proclaimed star of the show, and there’s a joke in there somewhere about casting one’s pearls before swine, but I haven’t found it…  (Comments welcome below.)

Knowing that my partner had already received a Kermit twinchie in the previous round, I couldn’t grab for the low-hanging fruit for my last piece.  Instead…drumroll, please…

Muppet Twinches 3

Big Bird!  Stitching him up made me so happy!  The bright yellow and blue felt, the thin lines of blue and pink around his eyes to make them pop…and those fun little feathers on top of his head to add some texture to the whole deal.

All together:

Muppet Twinchies 1

They made it to my partner with all their embellishments intact, and had me envisioning an entire installation of felt Muppet portraits…

Thanks for looking! 🙂

Cross-stitch and Embroidery, Other Crafts

Snarky Ways to Leave Your Lover

(with apologies to Paul Simon)

“Your problem is trying to be too nice,” she said to me.

“You’ll find it easier if you’ll only be snarky.

It’s just the simplest way to get yourself set free –

Just use snarky ways to leave your lover.”

She said, “Some people think that ‘snarky’ equals ‘rude’.

In fact, some puritans would have it labelled ‘lewd’.

But nuts to them!  I say, who needs their attitude?

Embrace those snarky ways to leave your lover.”

CHORUS

Just tell him, “Nope, dope.”

“Can you not, Scott?”

“Would you go away, hey,

And let me be.”

I said, “No way, Jay!”

“OMG, ewww, Lou.”

What else can I say, hey,

Except for, “Bite me.”

She said, “Don’t let your conscience tell you that it’s wrong.

I hope you’ll see the light before I end this song.”

I said, “That’s great and all, but won’t it take too long

To learn these snarky ways…?”

She said, “Just try to find your inner snark tonight,

And I believe that your man-child will be gone without a fight.”

And then she left me, and I realized she probably was right

‘Bout using snarky ways to leave your lover.

(repeat CHORUS)

Soooo, I signed up for the Be My Snarky Valentine swap on Craftster, after having to sit out the Christmas edition due to having about a dozen other things to try to get done.  But all I really have to do on Valentine’s Day is show up to work (because it’s a weekday, not because I work in a Valentine-specific industry), so I figured I could swing this one.  We each had to craft one small, snarky item plus one snarky card for our partner.

While I typically find Valentine’s Day a bit annoying (and hence the appeal of a snarky swap), I’ve always liked the aesthetic of conversation hearts.  Heck, I don’t even mind eating them, although they tend toward chalky.  I’ve even been known to paint my nails in the same colours and stage ridiculous manicure shoots at my desk:

20160208_095417

(Seriously, what did we do before smartphones?  How did we document the inanity?)

So it seemed like a no-brainer for me to incorporate them into my snarky swap package, somehow.  Fortunately, my partner said she likes pastels, so I thought a mini felt garland might be in order.

Garland 2-2

Each heart is about 3 inches across at the widest points – I didn’t think to measure them – and are spaced 4 inches apart, with 6 inches to the hanging loop on each side.  I cut out two hearts of each colour and then applied fusible interfacing to one before sketching on my snarky sentiments to embroider.  Once they all said something, I sandwiched the ribbon between the two hearts, and blanket-stitched around each heart to secure the ribbon in place.

IMG_1065-2

IMG_1066-2

IMG_1067-2

I’m also a little particular about the colours being in the proper spectrum order, or at least as close as you can get.

Because I’m a cross-stitcher at heart, that’s the approach I used for my card.

Garland 1-2

I had some sparkly white Aida left over from my mom’s cat ornaments which was just perfect for my background.

Whatever your Valentine’s Day brings, I hope it’s better than Ralph’s. 🙂

Cross-stitch and Embroidery, Other Crafts

It’s the most wonderful time of the year…

I started my Halloween crafting early this year (as in, August).  While browsing Craftster one day, I saw sign-ups for a Vintage Halloween Swap and promptly submitted my information.  (It’s so much easier to rush the season if you’ve got a whole gang of Halloween-crazed crafters with you.  In fact, I’d argue this was hardly rushing it at all, considering some grocery stores are selling eggnog.  Yes, the Christmas beverage.)

My partner indicated she didn’t have a specific era of vintage in mind – which made my job simultaneously easier and more difficult – but mentioned that she was setting up a Halloween tree in her house this year and would like something to hang on it.

IMG_0972_1

I found the patterns for these guys on Etsy.  The set also included a cat and a piece of candy corn (neither of which were included in my partner’s preferred motifs).  Their original size was approximately 2 1/2 – 3″ at the widest point; I scanned each pattern piece at 150% to get a slightly more substantial finished product.  It’s really hard to see all the details in the photo, but trust me when I say:

  • the jack o’lantern’s features and the bat’s eyes are sparkly
  • the bat’s wing veins and blanket stitching are metallic purple (the better to glint off the Halloween tree lights, if there are any)
  • the ghost’s blanket stitching plus the bat’s fangs might look benign, but in fact glow in the dark.  I did not get a shot of them glowing, sorry.

The pompom garland was a happy eleventh-hour addition.  I was cruising the store for some little extras to tuck into her package when I happened upon bags of Halloween-themed pompoms, and couldn’t resist them.

They made a cute Halloween tree starter-set, but I was concerned that nothing had a truly vintage feel, which is why I started browsing Pinterest for vintage embroidery patterns.

IMG_0970_1

Because doesn’t everyone need a hand-embroidered tea towel?  I kept this pretty simple, with backstitch for pretty much everything except a little satin stitch to give the carving a warm, glow-y feeling.

It was a spook-tacular (sorry!) start to the Halloween season; stay tuned for more.

Thanks for looking! 🙂

General Sewing, Other Crafts

Hey, it’s no sillier than a Smoot*…

In my crafty exploits, although cross-stitch is my first love, I really enjoy working with felt.  It’s forgiving and easy to work with, comes in a bunch of fun colours and patterns, and works up quickly into something recognizable.

I’m not quite sure how I missed the first round, but back in May, I happened upon Round 2 of a Twinchie Swap on Craftster.org.  What’s a twinchie, you ask?  I’m no expert, but it’s a 2″ square felt patch with some sort of picture or pattern appliquéd onto the front.  Some of the ladies on there take this stuff seriously, and plan to amass enough different twinchies to combine into a wall hanging or something similar.  That part felt like a lot of commitment (how many swaps does that take, Mr. Owl?), but piecing together four patches for a partner?  No sweat.

My partner provided me with a list of five areas of interest, and since I didn’t feel quite capable of translating Harry Potter characters into felt, I chose her “things from the sea” theme.

IMG_0958_1

The jellyfish turned out to be my partner’s favourite, though it was the least-embellished.  The floaty tentacles are stem-stitched, using Petite Treasure Braid from Rainbow Gallery.

IMG_0959_1

This was the first one I completed.  I was so excited to have a use for all those beads I kept after my jewelry-making phase in high school!

IMG_0960_1

“Especially seahorses” showed up on my partner’s swap questionnaire as an addendum to “things from the sea”, so I delivered.  The colours remind me a bit of Pinkie Pie (My Little Sea Pony?).

IMG_0961_1

I think this one was my favourite.  I appliquéd the black stripes onto the yellow fish shape, and then backstitched the fin detail.

IMG_0955_1

All together.  Because the squares were 2″ x 2″, each creature is about 1.5″ – 1.75″ at its widest spot.

As always, thanks for looking! 🙂

* What’s a Smoot?  Glad you asked!

Cross-stitch and Embroidery

And I say, “It’s all right.”

Oh, George Harrison…[sigh]  I had Beatles tunes running through my head a lot while working on my latest project.

A few weeks back, I decided to participate in my first organized swap on Craftster.  I had always felt a little intimidated before: what if what I made wasn’t good enough and looked like the efforts of a dexterity-challenged preschooler?  Some of the crafters on there are crazy talented, and fill a swap box like nobody’s business.  The pressure!

When I saw the Box of Sunshine Swap open for sign-ups, I knew I had found my swap.  This was to be low-cost and low-stress: five or six items, a few hours of crafting, nothing too outrageous.  The only other guideline was that items – crafted or otherwise – should ideally be in warm, sunny shades of yellow and orange, so that the recipient might open a box of sunshine to cheer up a gloomy winter day.  I could do that!  And who doesn’t love getting cheery mail?

Although I dabble in a variety of crafts, longtime readers of this blog will know that needlework, and cross-stitch in particular, is my area of expertise (?).  I spent ages trawling through Etsy (of course) until I found this design by Sewingseed.  Whole stitches only, no backstitch?  Yes, please!

herecomesthesun

I didn’t much care for the steel grey fabric used in the original stitched piece – but I get it, it’s to illustrate the sun breaking through a grey sky – and instead substituted some 28-count Summer Sky hiding in my stash.  I also altered the colours oh-so-slightly, on “comes the”, since the original ultra-light yellow would have been lost on my fabric.

I love how this turned out!  It’s the perfect harbinger of spring days ahead, and I had a lot of fun stitching something that I might not ordinarily stitch for myself or for someone in my usual circle of craftiness (although I do have more Summer Sky, so one never knows).

Have I opened a Pandora’s Box of swapping?  Stay tuned…

Thanks for looking! 🙂

General Sewing

Last-Minute Make

I had seen these owls on Craftster, and had been putting off making one for some time.  But when I did get around to it, was it ever quick!

owl ornaments

I had made the green guy with the intention of attaching him to my cousin’s Christmas gift, but when I showed my mom she immediately decided where he’d look best on our tree, so there you have it…and then I decided to make a purple she-owl so that my parents would have a matched set.

Merry Christmas!