baking

Why double when you can triple?

Maybe it’s a side effect of the pandemic, but I don’t bake as much as I used to. Sure, I’ll bake a batch of cupcakes or muffins sometimes, or my grandmother’s chocolate chip cookies, or mini cheesecakes if I’m feeling really ambitious, but…that’s the exception rather than the rule. Maybe it’s because I don’t have a huge sweet tooth, but these days I’d rather pick up a package of cookies from the grocery store if I’m craving something than be on my feet in the kitchen for ages.

But for one brief, shining moment I felt a flicker of my old self when I made the Triple Chocolate Hazelnut Brownie Pie from the Kitchen Magpie‘s book Flapper Pie and a Blue Prairie Sky for Mother’s Day.

What can I say? My mom likes chocolate – and has a way bigger sweet tooth than I do.

There are a lot of steps, but they aren’t difficult, and the end product looks way more impressive than the effort it actually took.

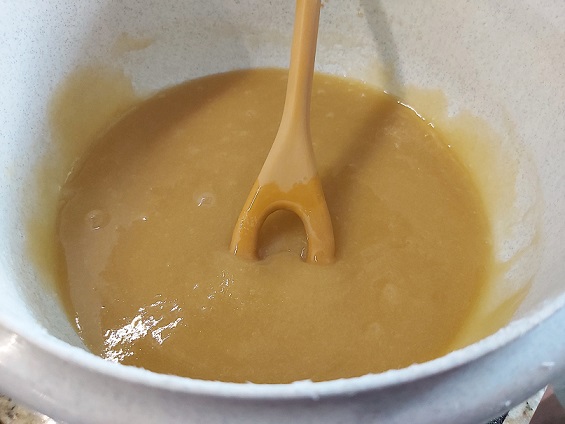
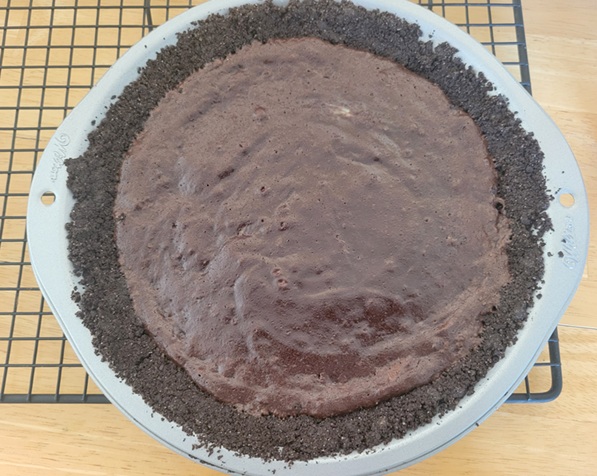
First, a chocolate crumb crust:

I know from this picture it looks level to the top of the pan, but I promise there’s a recess for filling. This pie pan has the weirdest-angled sides.

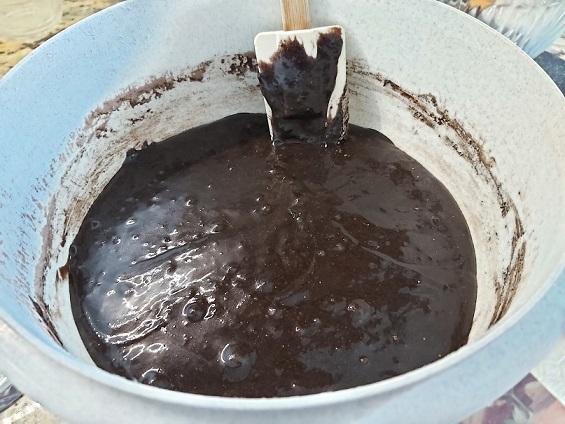
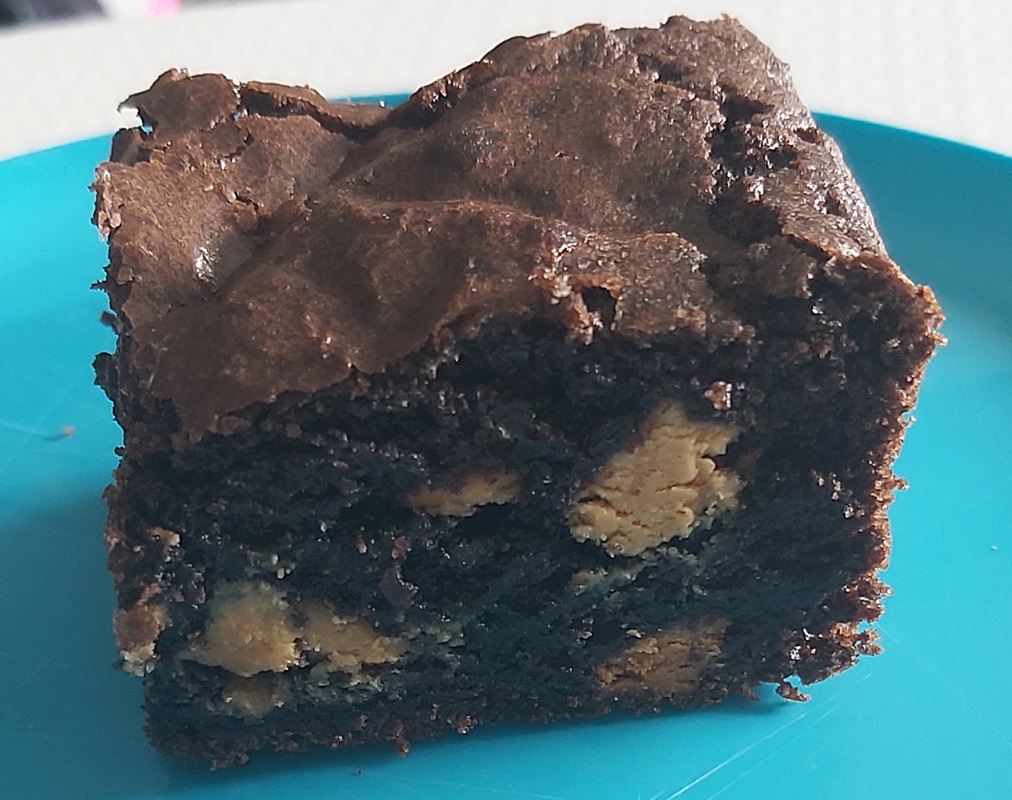
Next, a layer of brownie:

And then, while the brownie is still hot, some Nutella spread over the whole thing (or Kraft chocolate hazelnut spread, if that’s what’s available at your local grocery store).

See? I told you there was space in the middle.

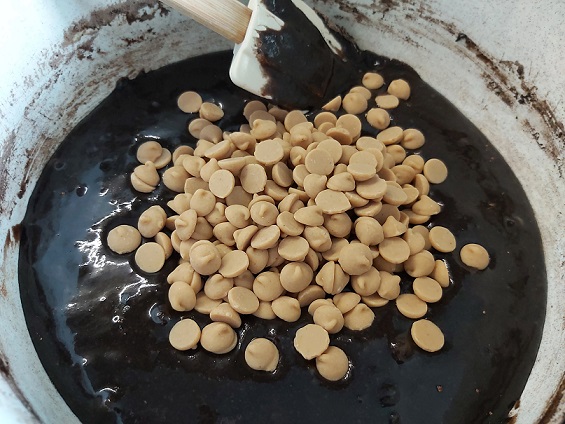
One thing that really made this feel next-level for me? Toasting my own hazelnuts for the garnish. I’ve toasted coconut and sesame seeds (not at the same time), but this was a first for me.

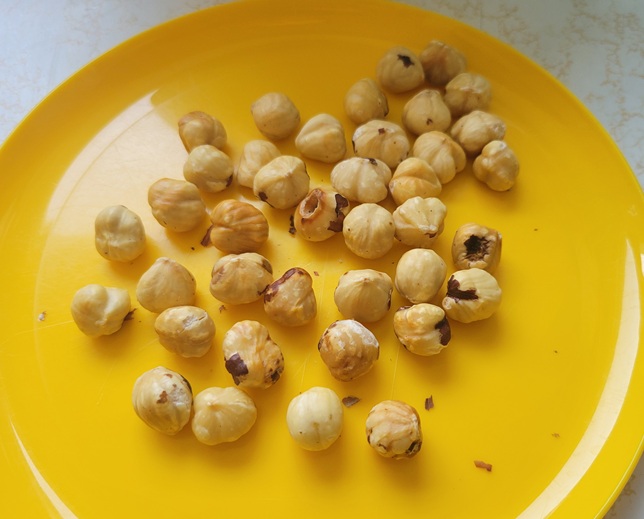
Who would have thought that something as simple as chucking them in the oven for 10 minutes – when it had already been turned on to bake the brownie – would transform them like this? The flavour was so different before and after.

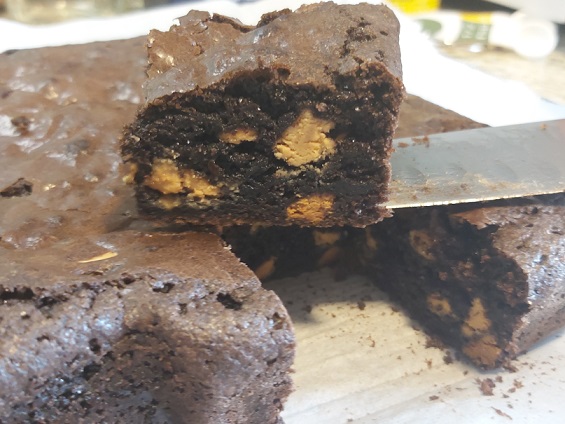
Once the brownie layer cooled completely, I made a chocolate hazelnut mousse to spread on top, and garnished with pieces of toasted hazelnut and chocolate curls. The curls weren’t called for in the original recipe, but while searching the bulk store for nuts I found a bin of curls and thought they’d make a nice addition.

The true test was going to come when we cut into the pie. Did it work?

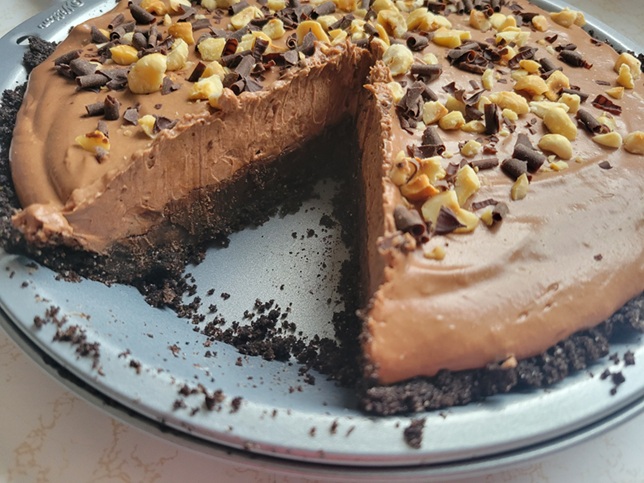
It did! (Also, look at the angle of the pan’s sides. Crazy, man!)

I would like to go on record as stating that I cut that first piece entirely too large. This dessert is rich, and a small slice is more than enough to savour the magic of chocolate and hazelnuts.

Rich or not, my mom absolutely loved it, so mission accomplished.

Thanks for looking! 🙂

cooking

No campfire or mosquitoes necessary!

When I was a kid, I thought I wanted to go to camp. I suspect this is because one or two of my classmates did, and it sounded like the height of summer fun. Did the reality of sleeping in a cabin with seven randos, sharing communal bathrooms, and not having my bed or cat or toys/books/stuff occur to me? It did not, and so it’s probably better for all involved that my parents tuned out this particular passing fancy of mine. I don’t go outside…or swim…or enjoy sports…really, this would have been a terrible idea, and popular culture backs me up.

  • Hail, Hail Camp Timberwood by Ellen Conford – Melanie gets bullied by a cabinmate and her horse tries to drown her. (I’m really showing my bias here: horses terrify me, and in her place, if the drowning didn’t get me the absolute cardiac arrest would have.)
  • I Want to Go Home by Gordon Korman – Rudy can’t escape Camp Algonkian to save his life, but because I’m not experiencing it personally, I can laugh at it. Please read this one if you get the chance.
  • “Kamp Krusty”, S4 ep1 of The Simpsons – Bart and Lisa get sent to the eponymous camp where they’re fed gruel and forced to make wallets for export. This is made up for (maybe?) by a trip to Tijuana; maybe it was easier to sneak across the border with a busload of kids who probably didn’t have passports on them in 1992.
  • Lolita by Vladimir Nabokov – Dolores is sent to camp, from which she is retrieved by her newly-minted pedo of a stepfather who kidnaps her and keeps her isolated from everyone and everything.

To summarize: very happy, in hindsight, to not have gone to camp. Who needs the colour wars, the singalongs, or…the s’mores. Sigh. The s’mores.

My baking buddy and I decided we could definitely do this ourselves, no campfire or mosquitoes necessary.

We started out with marshmallows and chocolate-dipped cookies, figuring they’d be easier to deal with than graham crackers and a chunk of chocolate. Also, the box itself exhorts their suitability for s’mores, so who were we to question that? We found a kitchen torch on sale to get that toasty outside crust on the marshmallows.

We weren’t sure how long it would take to toast them using the torch, or if they’d get soft enough on the inside, or if we’d use all our butane, so we hastened the process by microwaving them for a few seconds first, just to soften them up a bit.

We speared two at a time on a regular fork and had at ‘er with the torch. They toasted up fairly quickly (making me think we were right to pre-soften them) and absolutely caught on fire more than once.

It was a bit of a trick to get them off the fork – once the flame was turned off, they congealed pretty quickly – but two marshmallows made the perfect fluffy layer between our cookies. Unfortunately, because they had cooled a bit, they didn’t melt the chocolate so well…

…until we stuck the assembled s’mores back in the microwave for a few more seconds to soften everything up.

These were a great, no-bake summer dessert. And with most of a bag of marshmallows and a whole bunch of butane left, I think we’ll be making these again. Who needs to sleep on a cot just to get them?

Thanks for looking! 🙂

baking

More fun than clam chowder and candlepin bowling

A little while back, I had wanted to make a dozen vanilla cupcakes. If you’ve been with me for any length of time, you’ll probably know that I have yet to find a really lovely, moist, not-too-dense vanilla cupcake recipe. So it was with only a minimum of guilt that I reached for a cake mix – and because one mix makes 24 cupcakes (or 22, according to the box), I carefully divided the dry mix in two and saved half for another time. Fast-forward to me being sick of making sure I don’t stash my baggie of cake mix too far into the recesses of the pantry, and also don’t lose the instructions I cut off the box to save. It was time to do something with this.

When my baking buddy and I used to work together, we had a birthday club at work. The one year I was in it, I asked him what kind of birthday cake he wanted, and he replied, “Boston cream pie.” I think that was the first time I had ever baked something just for him…who knew it was just the start? I also hadn’t made Boston cream pie cupcakes since then, so it was time for a hit of nostalgia.

I started by baking my cupcakes more or less according to package directions. A full mix calls for three eggs, and I was fresh out of half-eggs so I used two. (Gasp!) There might be something to that promised yield of 22 cupcakes instead of 24, because as I was filling up my last few liners I was really scraping the bottom of the bowl.

Once they had cooled, I grabbed my trusty cupcake corer and put it to good use. The best part about this is that I got to set the cores aside in a little bowl, to be topped with the leftover filling and topping and consumed as a guilt-free snack later because calories don’t count when they’re bite-sized. (Right?)

It was time for the filling. The first time I made these way back when, I had tried making a pastry crème from one of my vegan cookbooks, and it was an abysmal failure. Maybe trying it again until I got it right would have helped, but I didn’t have time for that, and found a shortcut on that wonderful trove that is the internet. It seems that… [looks around for eavesdroppers and whispers hastily] vanilla instant pudding, made with half the milk called for on the box, sets up with just the right consistency to fill cakes and/or cupcakes. And a four serving-size box prepared thusly will provide enough pudding for a dozen cupcakes, plus a bit extra for all those cores I saved.

The final step was adding ganache to the top. I’ve seen recipes for Boston cream pie cupcakes that use a chocolate buttercream and I admit those fluffy swirls are pretty, but the classic simplicity of the ganache is all these treats really need.

(Bonus: this was a great way to use up some snowflake cupcake liners left over from Christmas.)

A brief chill-out in the fridge helped the chocolate set admirably. When I unveiled these with a flourish to my baking buddy, the first thing he said was, “Hey, remember when you made these for me at work?” Nostalgia is a powerful force!

Thanks for looking! 🙂

baking

Main character baking energy

Around Valentine’s Day, my Baking Buddy and I decided to re-watch the To All the Boys trilogy on Netflix. (Was this my idea? Yes. But was he into it? Also yes.) We were partway through the first one when I realized, with a funny pang, that no matter how cute the two leads might be, the book was so much better. The book is always better than its filmic adaptation. And naturally, that (re)discovery meant that I needed to (re)read the books, stat.

One thing they do show in the movies in a mostly faithful adaptation of the novels is Lara Jean’s baking. There’s something so relaxing about watching her very neatly go through the process of making, say, cherry turnovers or frosting a batch of cupcakes perfectly. In the third book, Always and Forever, Lara Jean, she’s on a quest to bake the perfect chocolate chip cookie.

(Can I just say here that that book stresses me the heck out? First of all, it’s the final book in the series, so there’s the anticipation of “goodbye” which is inherently a little stressful in itself. Then, there’s the agony of waiting for university acceptances to be announced, and I am so glad that social media wasn’t a thing when I was waiting. There’s the fact that she doesn’t get in to her first choice school and the idea that her happily-ever-after might be derailed because of it. Her friends ambush her with a surprise birthday party, and her dad ambushes her with a trip to Korea without even asking if she wanted to go or had other plans for the summer. Oh, yeah, and her boyfriend’s mother is a manipulative cow. Ugh.)

When she’s not being pressured five ways from Sunday, she’s baking batch after batch of chocolate chip cookies, and encounters Jacques Torres’ take on it during a trip to New York. I was pleasantly surprised to see that his recipe is readily available online, and decided I had to try it. These are supposedly the ne plus ultra of cookies, and perhaps that’s why the recipe thinks it can get away with its extreme fussiness. In no particular order:

  1. It uses two kinds of flour: cake flour and bread flour. For some of us, this means a trip to the grocery store for five-pound bags only to use ~2 cups of each. What happened to all-purpose flour?
  2. The dough must be made 24 – 72 hours in advance, and allowed to rest in the fridge before baking. While I have made dough the night before in the past just to expedite the baking process the next day, there’s a big difference between deciding to do it as a gift to your future self and being told you have to do it, thereby necessitating even more planning. (Hope you’ve got the flours!)
  3. It calls for chocolate discs instead of chocolate chips, and then (annoyingly) provides a weight rather than a volume measurement. Luckily I found some lovely dark chocolate discs at Bulk Barn; less luckily, a modestly sized bag of them cost $15. I will admit that they were good, though – I don’t even like dark chocolate, but couldn’t tell that’s what these were.
  4. A petty complaint, but, per the last step in the recipe: “Best eaten warm.” Do they think I’m baking for a party, here?
  5. Step 3 of the recipe urges us not to overmix, but to mix only until the dry ingredients are incorporated, 5 to 10 seconds. My guess is that they don’t want to overdevelop the gluten (then why use bread flour, seriously?), but that is not enough time to work four cups of flour in.

Despite the misgivings brought on by the above, I gamely bought my ingredients and planned ahead so it had about 40 hours of resting time before baking, which is pretty good, I thought.

We tried to use a cookie scoop for maximum uniformity but the dough was so stiff from its time in the fridge that we quickly dispensed with that and grabbed two spoons instead.

They still wound up uniform-ish.

The recipe advises pushing in any discs that stick out of the dough for a better aesthetic once baked. Does it sound silly? Yes, but we dutifully did it anyway.

I was surprised by how much these spread, considering how long the dough had been chilled and that it didn’t really get a chance to warm up that much – I guess that’s what using butter will do for you.

We didn’t use flaked salt as recommended, but sprinkled a few grains of kosher salt on top to contrast against the sweetness of the cookie.

Overall? These weren’t bad, but I don’t know that they were worth the hassle, either. They were a perfectly OK cookie, but the flours, chilling, and pricey chocolate didn’t necessarily elevate them to superstar status. One interesting thing the discs did is melt and streak throughout the cookie, giving the inside a really neat appearance. And just like the recipe says, they truly do taste better warm. My test audience liked these well enough, so these may be a “sometimes” bake. (Or perhaps a more frequent bake until I use up the rest of the special flours I bought.)

Thanks for looking!

baking

Saying it with chocolate and peanut butter…

Have you ever had one of those days when you wanted to bake something for the special people in your life, but also didn’t want to spend all day messing around with rolling and cutting dough, decorating to the nines, and all that other stuff?

Relax, because I’ve got you.

In the lead-up to Valentine’s Day, I saw (and Pinned!) all manner of cutesy cookies and other sweet treats, a fair number of which were heart-shaped and bedecked with red and pink sprinkles and/or frosting. They were cute, but the prospect of having to actually find the time to make them was a daunting one. Eventually, it hit me: why not make something I already know is quick and tasty, but dress it up? A few weeks back, the newspaper had run an article in its Arts & Life section about how to add a swirl to brownies, and that sounded like a darned good idea.

I started with Quick and Easy Brownies (because they are quick and easy!), but you could use your favourite recipe.

They’re not naturally lumpy; I stirred in half a bag of semi-sweet chips and chunks (about 1 cup, give or take) for a little extra chocolatey goodness.

If the title of this post hasn’t completely given it away, I decided to try a peanut butter swirl. I spooned about half a cup of peanut butter – this is a visual estimate only – into a standard zip-top bag, snipped one corner, and went to town.

A quick word on this: I found it really hard to squeeze the peanut butter out! I have no idea if melting the peanut butter first or even just having held the filled bag in my hot little hands for a minute or two would have helped. Because of this, the peanut butter was a bit hard to control and didn’t always pipe on where I wanted it to. Notice the nearly-naked perimeter that goes 3/4 of the way around.

Next, the fun part! Take a butter knife or other implement of mass swirling, and start dragging it through the peanut butter.

Every single tip I read about this cautions against over-swirling. You still want some contrast between the base and the swirl, and don’t want it to all homogenize into one chocolateandpeanutbutter layer on top. I might have swirled more than necessary, but I was also trying to work my peanut butter into all those missed edges and corners. Overall, I think I managed it. Once I was satisfied, I baked as usual.

Apparently I gave the pan a quarter-turn clockwise when I took it out of the oven! But look at how nicely that swirl stayed in place. I half-expected it to sink to the bottom during baking, and the fact that it stayed on top gives me an inflated sense of my own culinary genius.

The only thing I would have done differently is to have cut the pieces larger. No pictures, but I did a 4 x 6 cut to get 24 pieces out of an 8″ square pan. They were the perfect size for popping into your mouth, but really didn’t show off the swirl to its best advantage. (They still tasted great, though!)

Thanks for looking! 🙂

baking

Safer than a leg snare…

Today’s musical inspiration is courtesy of Sam the Sham and the Pharaohs:

Years ago, I found a recipe for the charmingly-named Man Catcher Brownies in a magazine. Brownies are good, but brownies with a layer of caramel in the centre? Yes, please. I’ve made them several times and even shared them with coworkers, and somehow don’t have a harem of husbands, so perhaps the name is a bit of an exaggeration. Ahem.

Recently, I was leafing through one of my mom’s cookbooks. When I hit a recipe for saucily-named brownies, I glanced at it briefly before realizing that this was exactly the same recipe. There were a couple of minor tweaks; for example, how the second brownie layer was added, and a heck of a lot more caramel, but otherwise this was it. And despite having had the recipe in my collection for ages, I was suddenly craving them again. Luckily for me, my Baking Buddy was all in.

(You can find the recipe for Man Catcher Brownies here. The recipe comments include a step-by-step video from the girl who originally submitted the recipe to the magazine, so these are the originals, folks!)

First, we gathered our ingredients:

I have a question for my American friends, if anyone wants to chime in down below in the comments. Are you guys experiencing an ever-shrinking selection at the grocery store, too, or is that just happening here? Every single version of the recipe I’ve seen calls for a German chocolate cake mix, and if I had to wait to find one, these babies would never get made. It feels like over the last…ooh, decade or more, for sure, and probably much longer, all the grocery chains have been supplanting their previously wide array of certain products with their own store brand, leaving us with only a few token flavours/varieties. There is no orange cake mix, or German chocolate cake mix, or strawberry cake mix. We’re lucky to have a choice between devil’s food and regular chocolate. Meanwhile, President’s Choice, Compliments, and Co-op Gold all pop up like so many weeds. I’m pretty sure the same thing is happening with Jello flavours too (remember Berry Black?), and possibly canned soup. And yes, we bought a store brand mix for this because it’s not being used for an actual cake, but I’m sure the holy spirit of Huncan Dines (apologies to V.N.) is furious.

The most tedious part of this is unwrapping all the caramels…

I promise it’s worth it, though! With a little evaporated milk, these form a beautiful soft centre for our brownies.

Meanwhile, the cake mix, melted butter, and more evaporated milk get mixed together. The dough turns out really stiff, which makes this parting-of-the-Red-Sea trick really easy.

I did what felt like the logical thing, and divided it in half – half for the bottom and half for the top, right? Makes sense. The only problem is that half of this will not quite cover the bottom of a 9″ x 13″ pan, and you’ll need to borrow some from the top’s share. I had forgotten this from the last time I made them, and suddenly the fact that the version of the recipe in my mom’s book uses a 9″ square pan makes a lot more sense. After some mild cussing on my part, my Baking Buddy took over to get the dough pressed into the corners of the pan, and then we threw the whole mess in the oven for 7 minutes. The process of baking and puffing-up hides a multitude of sins, and I was already feeling better.

Now it’s time to top it! First, the caramel sauce gets spread over everything:

The partially-cooked bottom layer is quite delicate at this point, and spreading the caramel too vigorously will tear it. Once we were happy with our caramel coverage, we sprinkled some pecan pieces and semi-sweet chocolate chips over it, and then topped with the remaining dough. The problem with using more than half the dough for the bottom is that there won’t be enough to completely cover the top.

By this point, I was ready to pitch the whole thing, because really! But much like the bottom puffed up after baking, so too did the top after we stuck it back in the oven.

I don’t think anybody is going to be fooled into thinking that the top is completely covered (it’s not), but it was an improvement for sure. A little peekaboo caramel never hurt anyone, right?

The recipe is pretty adamant that they cool completely before slicing, so we waited patiently.

They sliced like a dream! And once they were cut into itty-bitty pieces (we got 32 from our pan), the exposed caramel wasn’t nearly as noticeable – it became more of a hint of what was to come than a huge breach in the middle of the pan.

Look at that lovely gooey caramel!

We layered ours between parchment in an airtight container, but these would make a perfect homemade gift for someone presented in a cute little treat box.

Thanks for looking! 🙂

baking

It’s two! Two! Two desserts in one!

Does anyone remember the old Certs commercials? (“Two! Two! Two mints in one!”) I just thought that my local stores had stopped carrying them, but apparently they’ve been discontinued altogether. Sigh. In other news, I’m still working on that time machine…

Speaking of a blast from my past: when I was a fresh-faced recent university graduate, I had a less-than-stellar job. I know, who would have imagined? Graduating and not waltzing into six figures and a corner office? I also had a terrifically inappropriate and un-PC nickname for it, but I’ll settle here for calling it “the Farm”, which is the version that won’t get me sent for sensitivity training. There’s not a lot of good that came from my time at the Farm, except for two recipes that the other farm girls shared with me.

One of those recipes was for chocolate brownie cookies. I hadn’t thought about that recipe in years, but when I stumbled across it again recently, I couldn’t not try it.

First, gather the following:

  • 2 cups all-purpose flour
  • 2/3 cup unsweetened cocoa powder
  • 1 tsp baking powder
  • 1/2 tsp baking soda
  • 1 1/2 cups granulated sugar
  • 1 cup real mayonnaise
  • 2 eggs
  • 1 tsp vanilla
  • 6 oz semisweet chocolate, chopped *
  • 1 cup coarsely chopped walnuts

* I used half a bag of semisweet “chips and chunks”, for interest and texture

Preheat oven to 375o F (190o C). Grease two cookie sheets. In a large bowl, stir together flour, cocoa, baking powder, and baking soda. In another bowl, with an electric mixer, beat together sugar, mayonnaise, eggs, and vanilla for 2-3 minutes until well mixed and creamy. Add the mayonnaise mixture to the flour mixture, stirring just until the flour is incorporated. Stir in the chocolate chunks and chopped walnuts.

Drop batter by heaping teaspoons onto prepared cookie sheets, at least 2″ (5 cm) apart. Bake for 10-12 minutes until cookies have puffed up and are dry on top but rich, moist, and gooey on the inside. Remove to a rack to cool. Makes 4 dozen cookies.

I recruited my baking buddy, and we were on our way!

It took a goodly bit of wrist action to get everything incorporated. When I first added the wet ingredients to the dry, the dry just kind of coated the wet, like a flour-y, cocoa-y blob. (Which sounds like the most delicious horror movie ever, if I’m being honest.)

Clearly my farm-girl friend had never heard of parchment paper. I assure you, the cookies turned out fine despite not using greasy cookie sheets.

Look! At! These! I think I squealed when I saw the dry, crackly brownie top these got. This might be a good spot to mention that we only set the oven to 350o F – as one typically will for cookies – and averaged 8-9 minutes per sheet instead of the 10-12 in the recipe. They came out perfectly moist and brownie-like, not undercooked at all. I can’t imagine what 10-12 at the elevated temperature would have done.

It made me a little sad, thinking of all the years I could have been eating these but wasn’t. Imagine the best brownie you’ve ever had, but in a cookie form – and with a way better edge-to-centre ratio. This will definitely be in regular rotation going forward.

Thanks for looking! 🙂

baking

Fast-acting relief for those chocolate cravings

When I was growing up, we weren’t really a brownie household. Cookies, sure, but brownies? Maybe occasionally, but they weren’t one of those staples at every get-together. Evidently, I’m making up for lost time, because this is now the second brownie recipe I’ve tried this year. If I’m being honest (which I am, because I just said so), I had made this second recipe once and they disappeared almost immediately, so what you’re seeing here is the second-recipe redux.

I didn’t go out looking for a brownie recipe, but when I saw this one on Life, Love, and Sugar, I was intrigued. It’s got eight ingredients (nine if you count the fact that I used a blend of regular and dark cocoa powder in mine), it makes a small square pan’s worth, and it doesn’t require any advanced baking techniques. I was sold.

Not pictured: the flour or sugar, but otherwise, this is alllll it takes.

The process is really quick: mix your wet ingredients together in one bowl…

…your dry ingredients in another…

…and then add the dry to the wet and combine.

Some of my more eagle-eyed readers might have noticed that there was a bag of peanut butter chips on the counter in the picture up top (go on and scroll up; I’ll wait). The first time I made these, I made them plain, just to see how they were. Since they came out so well, we decided this time to change it up a bit and add a mix-in to keep things interesting.

Once everything was folded in to our satisfaction, we spread the batter in our parchment-lined 9″ square pan.

They took a wee bit longer to bake than the recommended time in the recipe, but were they ever worth the wait!

That amazing, crackly top will never cease to impress me. They sliced like a dream, too.

Interesting discovery: although warm-from-the-oven brownies are much ballyhooed, these ones actually taste a little bit better at room temperature – the flavours come through better.

Apart from the baking time (and the peanut butter chips), the only change I made from the original recipe was using 1/3 cup regular unsweetened cocoa powder and 2 1/2 tablespoons of black cocoa powder. I use a blend of cocoas whenever I make cupcakes, too, and it gives them a certain je ne sais quoi.

And there you have it: moist, chocolatey perfection.

Thanks for looking! 🙂

baking

Like the Teddy Bears’ Picnic, only slightly gorier

I’m not going to bore everyone with a bunch of backstory and details, except to say that I made these for a recent birthday (the last small-bubble get-together before the latest lockdown). The birthday boy loves gummi bears (really loves them), and when I saw something like this on Pinterest, I knew I had to make them. The best part is, they’re so simple that you don’t really need to have a webpage open to follow along.

Without further ado…

Step one: Bake cupcakes. Any kind will do, but I did chocolate just because. Make or buy some chocolate frosting, and frost each cupcake with a thin-ish schmear using an offset spatula. You want to have frosting left over.

Step two: Tint your remaining frosting with black gel colour. You don’t have to get it black-black, but something vaguely dark grey would be good. We want to make these cupcakes look like barbeques, and this darkened frosting is going to be used for your grill. If you don’t trust your freehand drawing skills, trace the lines using a toothpick first so that you’ve got something to use as a guide.

Step three: This is the fun part! Grab some bamboo skewers – the ones I used are longer than a standard toothpick but shorter than the kind you actually barbeque with – and force those gummi bears onto them. Don’t listen to their little squeals. I used two different sizes because when I was at Bulk Barn I couldn’t decide which size would look more to-scale on a cupcake, but you do you.

Step four: Lay your skewered bears across your “grills” and hope people don’t think you’re macabre.

I put my very first skewer in rainbow order because that’s how my mind works and I have problems with randomness…but I tried to live large and let go for the others.

These went over really well – the birthday boy loved them, which meant it was easier to send some home with him later on so I didn’t wind up eating them all.

I think these could be fun for a summer birthday as well, or a backyard cookout.

Thanks for looking! 🙂

baking

Like Bert and Ernie…Bogie and Bacall…

I’ve been trying to behave. While everyone and their grandmother is Instagramming homemade sourdough or who-knows-what, I’ve been squelching my urge to bake, because how many cookies do I need to eat, seriously? I’m not saying I miss going into the office, but I miss having an outlet for all that baking.

I had to give in, though, when I found the recipe for Chocolate Peanut Butter Frosting on Sally’s Baking Addiction. Cupcakes were required, and immediately. How could I say “No” to chocolate and peanut butter? Besides, I reasoned, I could share these with my parents – there was no way my dad was going to complain about that combination.

I started out with my usual chocolate cupcake recipe, which I can almost make in my sleep. How good are they? The cat thought she needed to try them.

Why, kitty, why???

The frosting recipe was simple enough to follow, but made a way bigger batch than I’d usually use. Naturally this meant I had to go nuts piling it on, right? I mean, if I’m going to bake something utterly unnecessary, I might as well go whole-hog.

It was also really stiff, and I realized after piping the first couple that I should have added a touch more milk to it in order to soften it up. Normally, I hold a cupcake in one hand and rotate it as I pipe with the other; this stuff was a two-hand job. My hands were shaking so badly trying to get enough pressure on the piping bag that a casual observer might have thought I have some sort of neurological problem.

Despite the stiffness, the frosting wasn’t at all dry or hard, even after a couple of days. And its firmness may have been beneficial when one of them toppled off its plate onto the floor; it flattened a little bit but didn’t make a huge mess the way a softer frosting would have. In any case, they went over really well and were the perfect excuse to bake something.

Thanks for looking! 🙂