…my true love gave to me, three stockings hanging.
(OK, I might be a stocking short, here…)
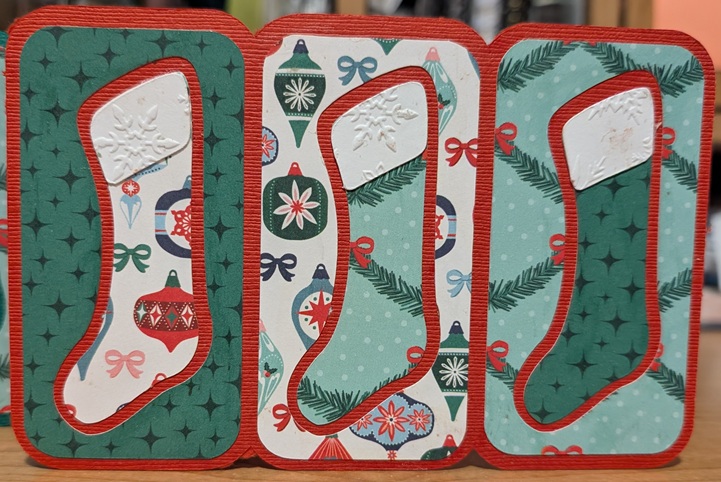
For the past several years, Lettuce Craft has hosted a Christmas card swap. As swaps go, it’s super low-key: you can choose how many people you want to exchange cards with, and then get your cards made before you sign up. Once sign-ups close, boom, you’re ready to send (and receive!). Who doesn’t like getting mail, especially when it’s a handmade card?
This year, I sent the tri-fold stockings card from the Merry and Bright kit on SVGCuts. They fit perfectly in your standard 18.5 cm x 13.5 cm envelope – that’s 7″ x 5″ for those who don’t speak metric – and were a fun way to mix and match patterns.
I stamped a festive message inside, and they were ready to go.
And just for fun, I did a variation with a green background:
…my true love gave to me: a peacock but no pear tree!
While I don’t swap as much as I used to, it was impossible to resist the siren call of the Santa Sack Swap on Lettuce Craft this year. One of the things I love about swapping – besides the whole sending and receiving mail factor, because of course – is that it often lets me make something I might not ordinarily make for myself or my immediate circle.
Case in point: a felt peacock.
While browsing my partner’s Pinterest, I saw something similar to this and forgot I had clicked on it until Etsy innocently suggested this pattern from Elliott’s Playground. Clearly the digital takeover is well on its way. It checked all the boxes for me, so I downloaded and printed, and started combing through my far-too-large collection of felt.
I’m quite happy with how he came out! I weighed him down at the front so my partner can set him just about anywhere and have him balance, and he seems to do that just fine. Instead of wrestling with cutting out and then affixing teeny tiny black felt circles for his pupils, I used the pupil piece as a template and satin-stitched his eyes. But I think my favourite part was his crown (fan? The feathers sticking out of his head, in any case). It’s small and sweet, and really finishes him off.
The instructions also included variations for a white version and a Christmas version, so I may have to revisit this pattern for ornaments next year.
I’ve been tie-dyeing since I was knee-high to a grasshopper an idealistic teenager who really wanted to be a hippie. I’ve gotten over the hippie stuff, mostly, but still enjoy the tie-dye. And although I’ve added vinyl transfers to a shirt I’ve already dyed (like my Canada Day shirts from a few years back), it didn’t occur to me to try dyeing a shirt that already had a graphic on it, until I saw someone do it on Lettuce Craft.
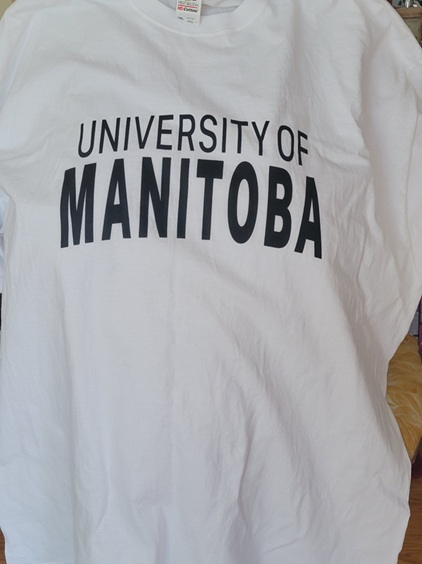
Back in the spring, I found this lonely guy in the clearance section:
I’m not a fan of white, and would normally never have looked twice, 40% savings be darned. But ah, as a blank canvas…that’s a different story.
After dampening the shirt and wringing it out (this is after prewashing, of course), I decided to go for a classic spiral pattern. My hands were covered in gloves which were in turn covered in dye, so I didn’t get an in-progress picture. If you’ve never tried this and want to see how, Tulip offers a really cool step-by-step.
After waiting the requisite 24 hours or so, the shirt was rinsed until the water ran clear, and it looked like this:
It still had to be run through the washing machine, though. It’s a little crazy how much dye there still is to be removed! Here’s the final product:
It might not be as brilliantly bright as it was post-rinse, but the colours are still vibrant and transform it into something summery and fun.
My Baking Buddy recently experienced the joy of fatherhood. His little bundle of joy weighs about seven and a half pounds, likes to wake him up at 3:00 AM, and meows when he comes home from work (but also at 3:00 AM).
Yes, he is fully in his Cat Dad era, and I couldn’t be more delighted for him.
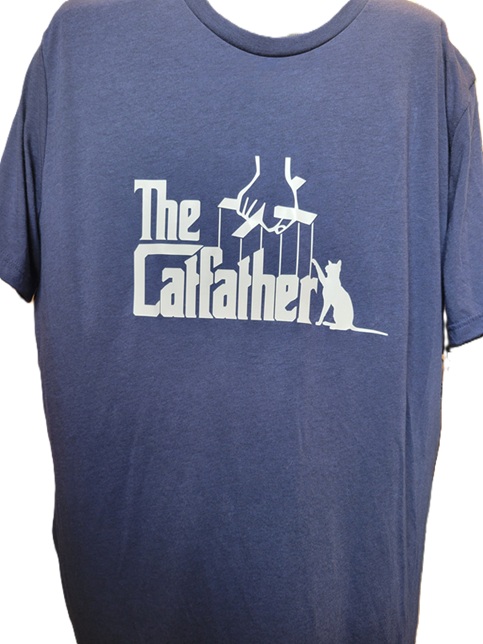
With Easter coming up, I wanted to put together a basket of some sort for him. I didn’t want to go overboard on candy, because a) who really needs that much candy, and b) a lot of Easter candy is aimed at kids and isn’t super-great. I finally decided on a few pieces of chocolate (Aero lambs come but once a year, so enjoy the bubbles while you can!), a newly-released book in a series he’s been reading, and a shirt to reflect the bliss that is having a furry friend inspect every plate and every glass he’s trying to eat or drink from.
After combing Etsy for “cat dad SVG”, I found this:
Black would have been classic for this but is so overdone, so I opted for a navy heather triblend from Michaels – I think it was Bella & Canvas. The design was cut from white Easy Weed Siser heat-transfer vinyl.
(Excuse the disembodied shirt.)
The vinyl adhered like a dream…I’m so happy with how this came out! He loved it, and couldn’t believe I had made it (despite having worked on vinyl projects with me before). It looks great on him, too.
I first heard about Altoid wallets a year ago or so – or rather, heard the term and then conducted my own online research and learned that yes, they’re pretty much exactly what they sound like. There’s something almost freeing about leaving the house with just a tin somewhat smaller than 2.5″ x 4″ containing all the essentials: a debit card, lip balm, hair tie, a few dollars in cash, and maybe even wireless earbuds if that’s how you roll…but I knew that would never work for me. I want an actual bag to hold my actual wallet, not to mention the sunglasses case, phone, reusable bag or two, and emergency rations in the form of leftover fun-size Halloween chocolate. (And occasionally, incoming/outgoing mail or a library book.) I dismissed the idea as “cute” and promptly forgot about it.
A month or two ago, Pinterest started showing me images of little mini beauty kits in an Altoids tin. Their creators managed to cram all this soft-girl aesthetic into a very small space, with strands of tiny faux pearls outlining teeny-tiny mirrors and little pink bows in the same shade as the lip stain tucked into the bottom. And thanks to the site algorithms, I also started seeing more pragmatic versions, like little tiny emergency kits.
I should make one for my mom, I thought, clearly a victim of social media saturation. Only…a beauty kit to go isn’t quite her speed (did you even know you can buy Altoid-sized mascara?), and a full-out “In Case of Emergency, Open Tin” scenario didn’t feel very gift-y somehow. I decided to hit somewhere between those two extremes, and decided on a cute tin with some purse essentials in it.
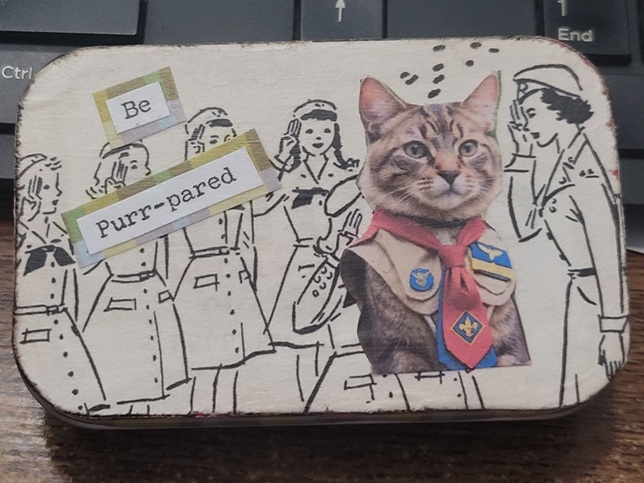
The theme came together in about five minutes for me when, in a fit of boredom, I googled “cat in boy scout uniform”. Google happily obliged with several images that I’m sure were AI-generated; one of them was captioned “Be Purr-pared”.
Yes! Be purr-pared, indeed! With the help of some musical inspiration, I was on my way.
I found some images from a vintage Girl Scouts manual on Etsy, and had my aesthetic.
And filled with lip balm, hand cream, Band-Aids, and gum for those post-coffee emergencies.
There was a good amount of Mod Podge involved, and it was impossible to perfectly line up the plaid on the short edges, but overall I’m pretty happy with how it turned out.
…my true love gave to me: a shirt with my life’s philosophy!
One of my looser goals for this year had been to craft for myself and not just for other people. It’s tough, man! Crafty types express their love via handmade items, and the idea of being even a little selfish and not putting others first feels foreign.
A couple of months ago, Michaels had a sale on long-sleeved t-shirts (buy 2, get 1 free) and I picked up a few. I live in t-shirts, but when the weather cools down the longer sleeves are a happy medium between your standard short-sleeved t-shirt and a sweatshirt. I hadn’t decided whether to embellish them or wear them as-is, and so they had been set aside after washing.
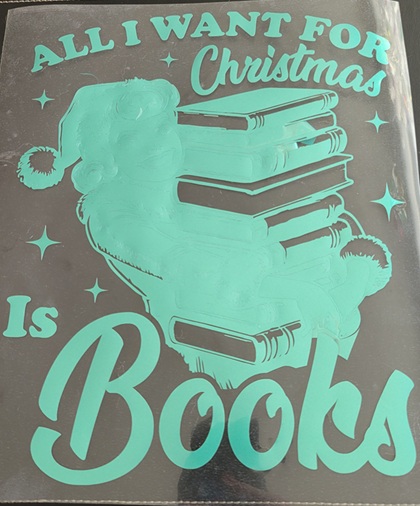
And then, while I was searching online for an appropriate SVG file for a swap I was in, I found the most perfect, retro-licious, bookish file – for me, not my partner. (Don’t worry, she got hers, too.)
I found a lovely, metallic-pearlescent heat-transfer vinyl in a peacock-green shade, and set to cutting…twice. It seems that although it looked vaguely like burnished metal, it is not considered metallic HTV by the Silhouette Studio software, and the machine cut right through the carrier sheet as well. Always check your settings! (This has been a public service announcement.)
It didn’t take me too long to get the more basic weeding done, but there were a lot of tiny bits and bobs to pick out, too.
This is probably the truest representation of the colour. See how it reflects and shines?
My shirt was red, and although red and green are certainly Christmassy, I was hoping the green wouldn’t look too dark, and that the design wouldn’t get lost.
I think it’s going to be OK!
Is it colourful? Heck, yes. But I don’t mind a little seasonal brightness.
In a fit of fey inspiration (largely fuelled by wanting an excuse to buy some of the neon yarn I’d been seeing at Michaels, because really, where else am I going to use acrylic neon yarn?), I crocheted a cat-sized party hat.
I found the pattern on Etsy and wound up using a too-large crochet hook and too-thick yarn, and so left a few rounds off the bottom before it turned into a hat for a medium-sized dog. Even with that, it was a little on the large side; luckily, by reshaping the base into a bit of an oval, it would sit further back on the cat’s head and not look quite as ridiculously oversized.
My friend Ricky recently had a birthday, and I wasn’t going to let the little matter of a couple thousand kilometres keep me from celebrating him in style. I got it in my head that I needed to do a “birthday in a box”-type package for him. In rapid succession, I decided on: an actual gift (Lego-adjacent building block set), a banner, a “I’m the Birthday Boy” badge that would likely have gotten him beaten up in school, a singing candle, and…cake? I make a mean cupcake, but I didn’t think they’d travel especially well via Canada Post. I looked at mug cake mixes at the grocery store, but just about dropped the box when I made the mistake of reading the nutrition information. (Cake will never be health food, but for 400 calories and 50 grams of sugar, reconstituted and microwaved “cake” just isn’t worth it.) I did find a homemade cake-in-a-can tutorial on Pinterest that, although I applaud its creativity in having layers of cake and icing sandwiched securely in a repurposed tin can, looked frankly kind of gross. Maybe if I couldn’t reasonably make him dessert, I could buy him dessert instead.
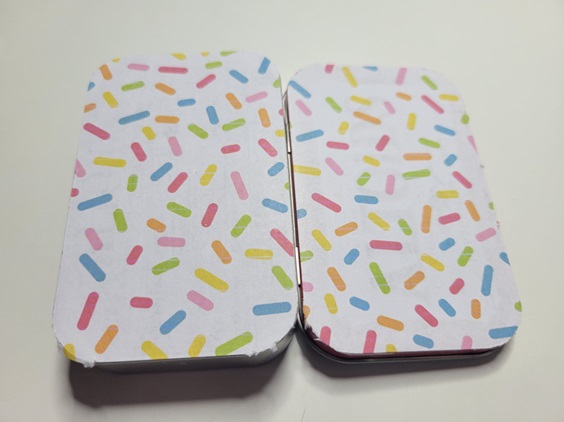
Armed with that somewhat heartening thought, I bought a Dairy Queen gift card to tuck in the box. Only…we all knew I couldn’t just toss the card in on its own, right? In looking through my Downloads folder, I found a sprinkle patterned digital paper I bought ages ago off of Etsy, and everything fell into place.
I’ve used this tutorial for altered Altoid tins before, and it’s delightful. The step by step pictures are a fantastic help, even for someone who doesn’t consider herself a papercrafter and gluer (like me).
I started out by covering the outside and inside surfaces with the paper, and then (not pictured) covered the edges. I learned in kindergarten that cutting in a straight line eludes me, so I used my Silhouette to cut perfectly straight pieces exactly the width of the various edges I had to cover.
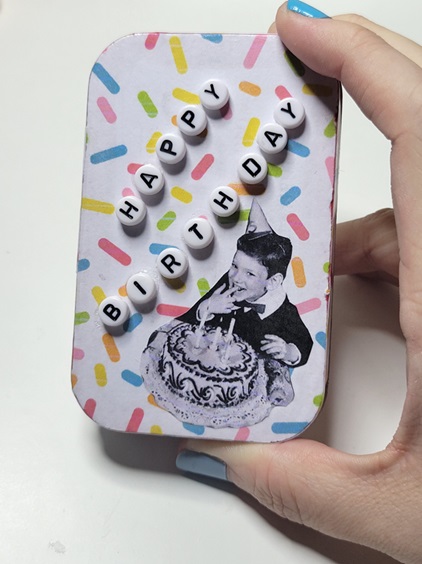
Next, I had to figure out what kind of decoration I wanted to add to it. I’m a fan of vintage kitsch (shocking, I know), and after a search-engine rabbit hole of results for “retro birthday party”, I found a couple of images I liked. I resized them to the width(ish) of the tin and printed them out, then cut out the section I wanted by hand. I also used a typewriter-inspired font to spell out a few well-wishes (although I only used one in the end). I couldn’t resist sneaking a quote from National Lampoon’s Animal House in there.
The front, on the other hand, required the big guns be brought out (brought in?).
Just laying out slips of paper saying Happy Birthday didn’t quite give it enough oomph. Luckily, I had bought some alphabet beads a year or so ago in a moment of inspiration.
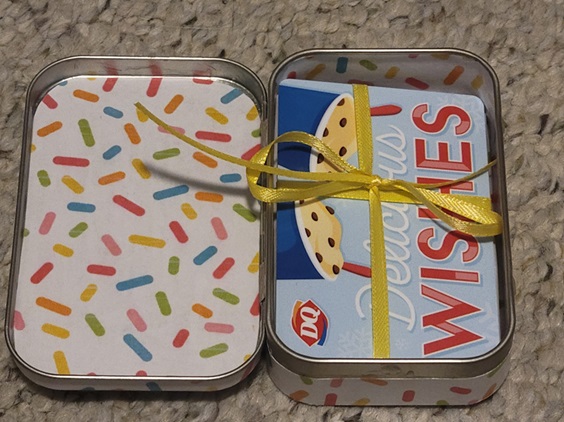
When the glue had dried, I was ready to add the gift card.
Besides being festive, the ribbon made it easier to pull out the gift card – experience is a great teacher sometimes.
The tin was the perfect size to tuck into a little open space at the end of the box, and the postal gods were on their game because it made it to him in time for his big day.
…my true love gave to me: a card with a greeting merry!
For the second year in a row, I signed up for the Christmas Card swap on Lettuce Craft, because who doesn’t like getting a little festive mail? Or mail in general, really?
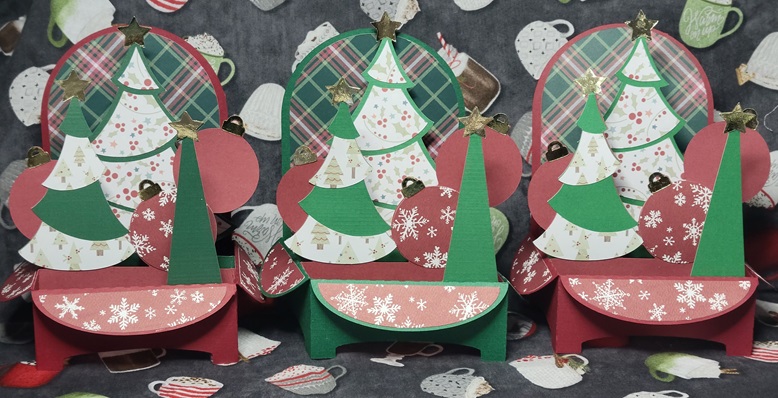
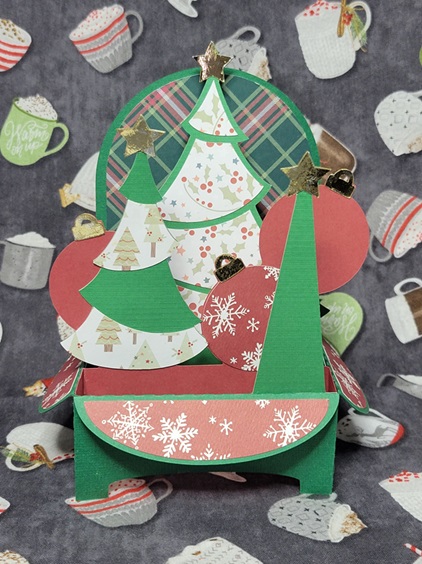
Last year, I kept things fairly simple with a bit of embossing powder and die-cut messages (trust me, it’s simpler than it might sound), but this year I apparently lost all sense of reason when I saw the Christmas Trees box card on SVGCuts. This had presence, drama, and a great reason to play with some fun patterned papers that mysteriously find their way into one’s stash but don’t get used for being “too busy”.
Speaking of patterned papers: trying to decide on a colour scheme was pretty much impossible. In the end, I made three cards in a traditional red-and-green theme, and the other three using fun mid-century pinks and teals. The traditional set got gold stars and ornament hangers, and I used silver for the mid-century set. I stamped the back of each card with a fun, festive message that still left plenty of room to sign. The pattern came with a little train to attach to the inside front of the card, but I left it out to make things all about the trees.
I wouldn’t say that making six 3D cards was a mistake, but it sure was an undertaking. The actual assembly wasn’t so bad – I hit upon a rhythm and system that got me down to about 30 minutes of gluing and positioning per card – but cutting out all the different pieces and keeping them sorted until I could put them together was a challenge. I started by making little piles for each card, starting with the solid coloured base and then setting subsequent stars, tree bits, etc. on top, and then putting each little group into its own envelope to wait patiently to be glued together.
The other challenge came when it was time to mail them. When folded flat, they’re 7 inches square (or as square as you can be with irregular edges), which is bigger than most envelope sizes commonly found in stores. Sure, there are 9″ x 12″ envelopes for letter-sized paper, but that felt like overkill. I found some 7.5″ x 10″ “catalogue envelopes” at Staples which fit the bill nicely. And then…I worried that they would get bent in the mail, so I made little cardboard sleeves to give them a bit of stiffness. Some people helicopter-parent their kids; I do it to my crafts.
Luckily, my over-packaging seems to have worked: four out of six partners have received them so far, and they’re standing just as straight as they did before mailing.
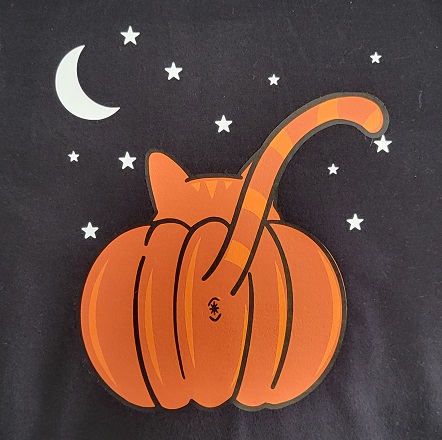
Ever since I first started playing around with heat transfer vinyl, the idea of doing multi-coloured/layered designs was always in the back of my mind. Like so many other things that live back there for “some day”, this was dismissed as being too complicated, and what if it didn’t work? That would be a waste of perfectly good vinyl!
I was finally spurred into action when I saw this hoodie on Modcloth. So cute! So cat-iful! The price was a bit hard to swallow, though. And once the price caught in my throat, I found other reasons to not buy it: with the graphic on the back, people might not be able to see and appreciate it to the full extent possible; they only had a handful of sizes left and were still asking nearly-full price; that’s still a crazy amount of money for a hoodie that’s got a strong seasonal vibe.
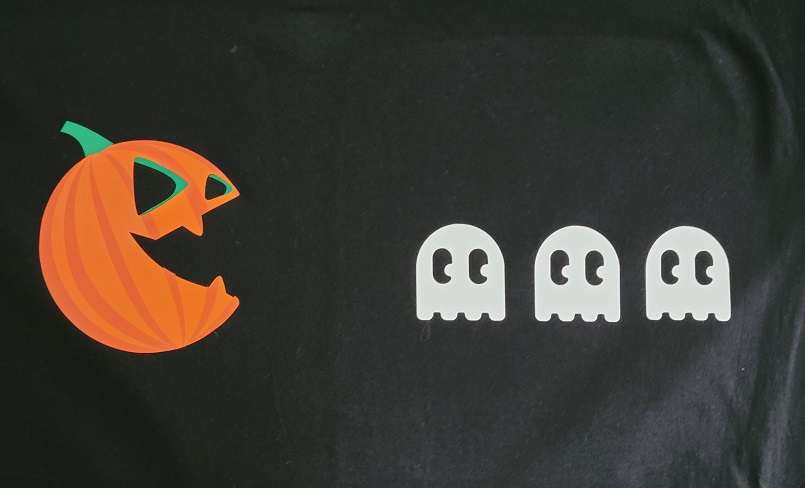
An Etsy search turned up the exact same image as an SVG file for a fraction of the price. (Note: searching for “pumpkin butt” generates a lot of hits for kits to, ahem, paint your infant’s backside orange and turn the resulting print into a pumpkin. Shudder. “Cat butt pumpkin” was a lot more helpful.) I gleefully informed my Crafting Buddy (who is also my Baking Buddy) that I had found our layered vinyl project. He said he wasn’t sure that he’d want a big pumpkin cat butt on the front of his shirt…”but I could see it as a smaller image on the chest, maybe”. Back to my search, where I found something appropriately pop-culture and masculine for his Halloween finery. Once I got the images resized appropriately, I cut out one colour/layer at a time and hoped against hope this would work.
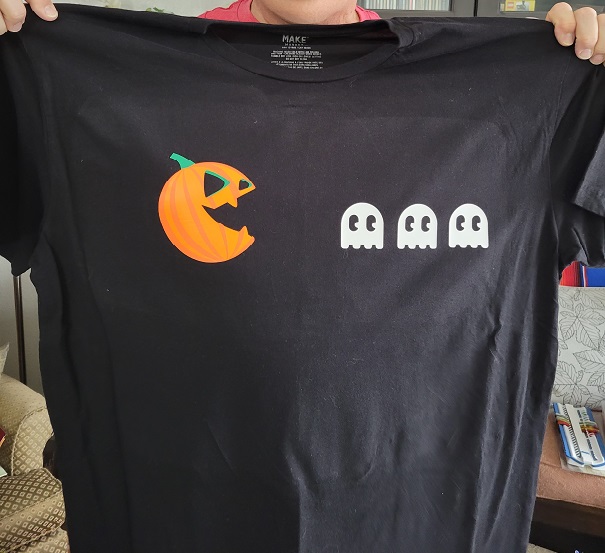
We started with his shirt because the pieces were a bit smaller and easier to wrangle.
This is the back side i.e. the part that gets placed against the shirt. I learned an invaluable lesson: if you’re going to weed everything ahead of time, make sure you have wax paper or something similar between your pieces, or else the carrier sheet will stick to the sheet immediately below and maybe even start peeling the vinyl off.
We started by dry-fitting (cold-fitting, sine this was before heat pressing?) the pieces to see how they would look.
It took some careful placement, but we got the remaining two layers of the pumpkin lined up. The ghosts should probably be a little bit closer to the pumpkin, but we moved them over to centre the design overall.
It looks pretty good! (The colour variance you’re seeing in the black is just from the heat press, and isn’t a permanent feature.)
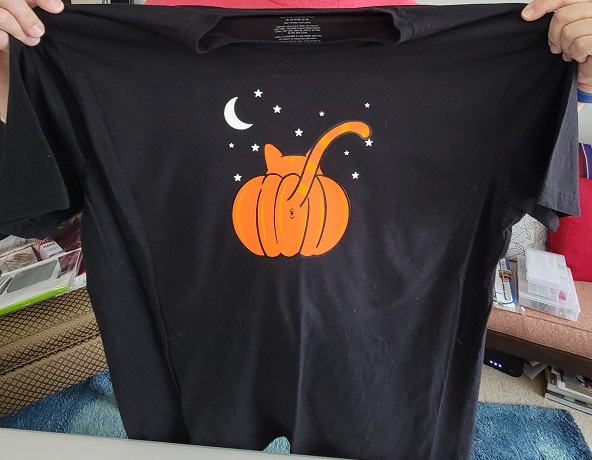
Once we had one under our belts, we assembled my shirt. It was slightly more awkward because of the larger pieces of vinyl.
We got things lined up pretty well, though!
Now we can check “layered vinyl” off our crafty bucket list. I don’t know how often I’ll do it, but it’s a nice trick to have up my sleeve.