My Baking Buddy recently experienced the joy of fatherhood. His little bundle of joy weighs about seven and a half pounds, likes to wake him up at 3:00 AM, and meows when he comes home from work (but also at 3:00 AM).
Yes, he is fully in his Cat Dad era, and I couldn’t be more delighted for him.
With Easter coming up, I wanted to put together a basket of some sort for him. I didn’t want to go overboard on candy, because a) who really needs that much candy, and b) a lot of Easter candy is aimed at kids and isn’t super-great. I finally decided on a few pieces of chocolate (Aero lambs come but once a year, so enjoy the bubbles while you can!), a newly-released book in a series he’s been reading, and a shirt to reflect the bliss that is having a furry friend inspect every plate and every glass he’s trying to eat or drink from.
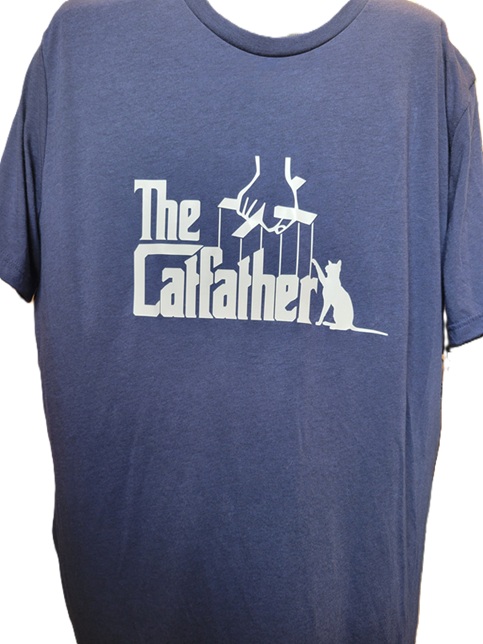
After combing Etsy for “cat dad SVG”, I found this:
Black would have been classic for this but is so overdone, so I opted for a navy heather triblend from Michaels – I think it was Bella & Canvas. The design was cut from white Easy Weed Siser heat-transfer vinyl.
(Excuse the disembodied shirt.)
The vinyl adhered like a dream…I’m so happy with how this came out! He loved it, and couldn’t believe I had made it (despite having worked on vinyl projects with me before). It looks great on him, too.
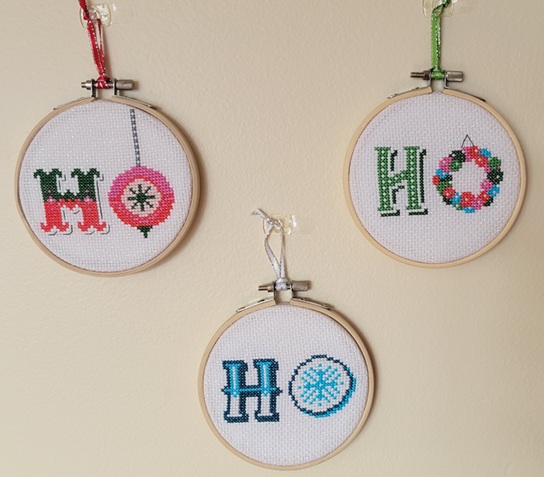
…my true love gave to me: some hoops to spread a message jolly!
Because it wouldn’t be Christmas if I weren’t finishing up a project last-minute, right? (Don’t worry, it’s been nearly a week; I was stuck waiting on a sunny day to get photos.) I love Stitchrovia‘s designs, and the idea of the different fonts really grabbed me. There’s something weirdly freeing about not making everything perfectly symmetrical.
I had stitched one of her patterns for Mother’s Day and by happy chance these used a lot of the same colours so finding my shades was a snap
Close-ups:
I probably use 14-count opalescent aida cloth more than any other needlework fabric. Sparkles make everything better!
I think the green H was my favourite…
They’re a perfect fit in 4″ hoops, and have joined the collection of holiday hoops adorning the walls.
…my true love gave to me: a shirt with my life’s philosophy!
One of my looser goals for this year had been to craft for myself and not just for other people. It’s tough, man! Crafty types express their love via handmade items, and the idea of being even a little selfish and not putting others first feels foreign.
A couple of months ago, Michaels had a sale on long-sleeved t-shirts (buy 2, get 1 free) and I picked up a few. I live in t-shirts, but when the weather cools down the longer sleeves are a happy medium between your standard short-sleeved t-shirt and a sweatshirt. I hadn’t decided whether to embellish them or wear them as-is, and so they had been set aside after washing.
And then, while I was searching online for an appropriate SVG file for a swap I was in, I found the most perfect, retro-licious, bookish file – for me, not my partner. (Don’t worry, she got hers, too.)
I found a lovely, metallic-pearlescent heat-transfer vinyl in a peacock-green shade, and set to cutting…twice. It seems that although it looked vaguely like burnished metal, it is not considered metallic HTV by the Silhouette Studio software, and the machine cut right through the carrier sheet as well. Always check your settings! (This has been a public service announcement.)
It didn’t take me too long to get the more basic weeding done, but there were a lot of tiny bits and bobs to pick out, too.
This is probably the truest representation of the colour. See how it reflects and shines?
My shirt was red, and although red and green are certainly Christmassy, I was hoping the green wouldn’t look too dark, and that the design wouldn’t get lost.
I think it’s going to be OK!
Is it colourful? Heck, yes. But I don’t mind a little seasonal brightness.
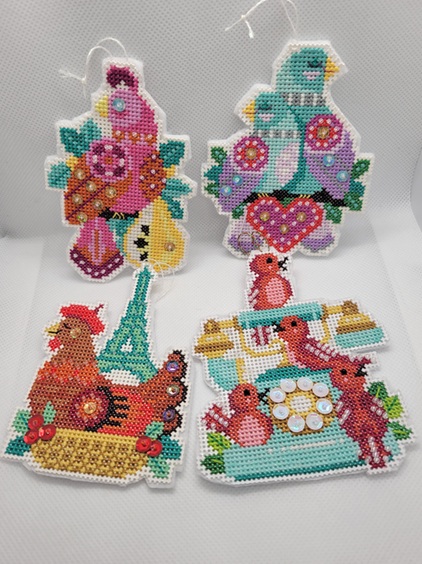
…my true love gave to me: a flock of birds to hang on the tree!
Every year, Satsuma Street releases a new entry in the “12 Days of Christmas” ornament series, and every year I buy the pattern but don’t get around to stitching it until the following year. I’ve got enough stuff going on by the time the holiday season rolls around without trying to race through another project. All this to say: while this pattern was released last year, it’s new-to-me for this year.
Calling birds…get it? I love a good pun.
I think my favourite detail on the ornament is the rotary dial on the phone:
…although I wonder how that works with only eight buttons (finger holes?).
Along with the previous three ornaments:
Gosh darn, there are a lot of birds in that song. Didn’t Alfred Hitchcock make a movie about dense ornithological populations? At least they’re cheery-looking.
…Halloween, of course! I’ve been having fun getting my annual fix of Bobby “Boris” Pickett, sending Halloween-themed happy mail, and fitting in a bit of spooky stitching!
First up, “Eye Scream” (get it? Get it?):
That poor pumpkin looks so upset…but then, I think I’d be, too.
Ermahgerd! It’s a haunted hearse!
Both ornaments are from Satsuma Street kits I got as a gift. I didn’t think to take pictures of the backs, but I used black glitter felt to finish them off so they’ll sparkle from either side as they hang from my (strictly hypothetical) Halloween tree. The hanging loops are glow-in-the-dark Kreinik fine braid, because I love me some glow-in-the-dark.
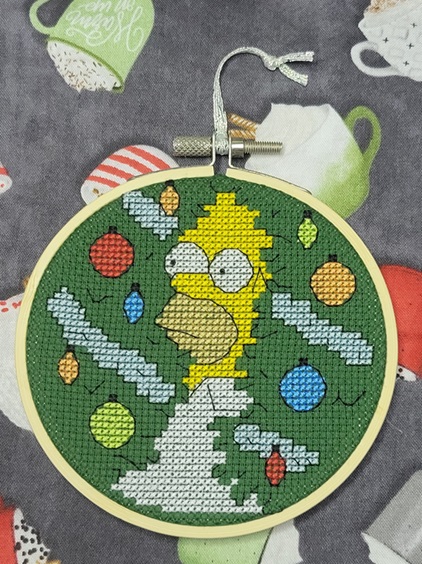
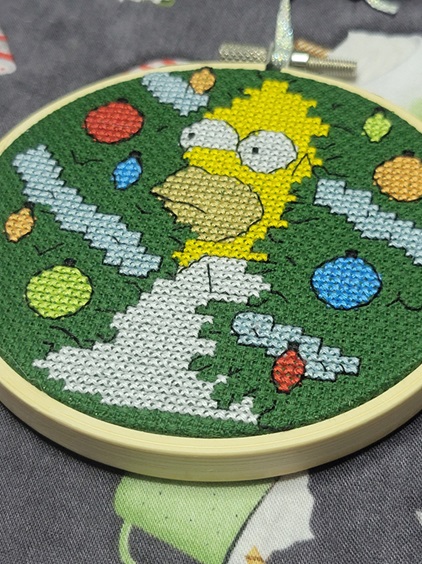
…my true love gave to me: a meme that comes straight from TV!
It was quite by accident that I found this pattern for a Christmas’d version of Homer Simpson moving silently through Ned Flanders’ hedge, but knew right away that I had to stitch it.
Luckily, my local needlework shop (always support your local needlework shop if you have a choice!) had the requisite Christmas green aida cloth, so I was able to get started on him right away.
He fits perfectly in a 4″ hoop!
The backstitch really creates the illusion of the hedge, and the two little French knots for his pupils are the finishing touch.
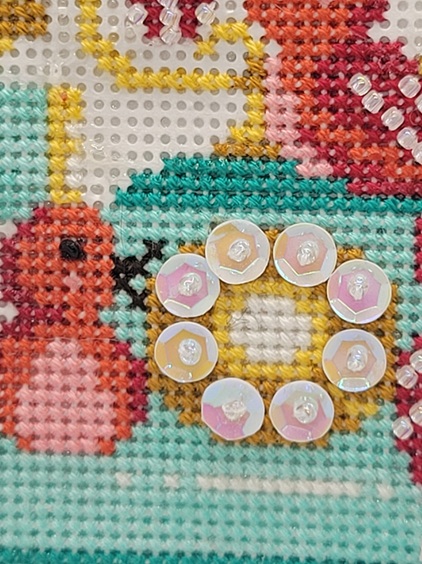
…my true love gave to me: a French hen to go with my two turtle doves and partridge in a pear tree!
By the time Satsuma Street released their holiday designs last year, I was done with taking on last-minute crafting projects. (Excuse me while I snicker behind my hand.) That didn’t stop me from buying the charts, though: one of them was the third installment in the 12 Days of Christmas series, and since I had stitched the first two last year it was a given I had to do this one as well.
Mon dieu! A French hen!
I didn’t think to take a picture of the back, but once I was finished stitching and attaching the beads and sequins, I glued it to glittery white felt so it will shimmer no matter how the lights catch it.
The four calling birds have been released, so I’ve got at least one project for next year lined up already.
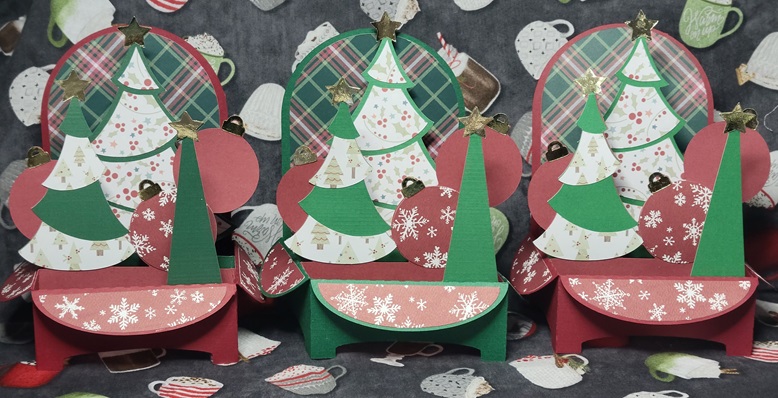
…my true love gave to me: a card with a greeting merry!
For the second year in a row, I signed up for the Christmas Card swap on Lettuce Craft, because who doesn’t like getting a little festive mail? Or mail in general, really?
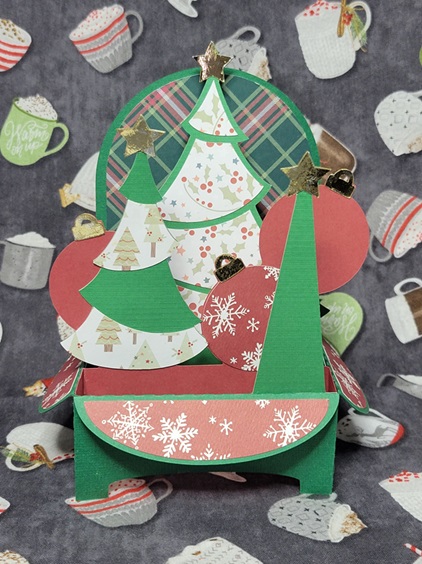
Last year, I kept things fairly simple with a bit of embossing powder and die-cut messages (trust me, it’s simpler than it might sound), but this year I apparently lost all sense of reason when I saw the Christmas Trees box card on SVGCuts. This had presence, drama, and a great reason to play with some fun patterned papers that mysteriously find their way into one’s stash but don’t get used for being “too busy”.
Speaking of patterned papers: trying to decide on a colour scheme was pretty much impossible. In the end, I made three cards in a traditional red-and-green theme, and the other three using fun mid-century pinks and teals. The traditional set got gold stars and ornament hangers, and I used silver for the mid-century set. I stamped the back of each card with a fun, festive message that still left plenty of room to sign. The pattern came with a little train to attach to the inside front of the card, but I left it out to make things all about the trees.
I wouldn’t say that making six 3D cards was a mistake, but it sure was an undertaking. The actual assembly wasn’t so bad – I hit upon a rhythm and system that got me down to about 30 minutes of gluing and positioning per card – but cutting out all the different pieces and keeping them sorted until I could put them together was a challenge. I started by making little piles for each card, starting with the solid coloured base and then setting subsequent stars, tree bits, etc. on top, and then putting each little group into its own envelope to wait patiently to be glued together.
The other challenge came when it was time to mail them. When folded flat, they’re 7 inches square (or as square as you can be with irregular edges), which is bigger than most envelope sizes commonly found in stores. Sure, there are 9″ x 12″ envelopes for letter-sized paper, but that felt like overkill. I found some 7.5″ x 10″ “catalogue envelopes” at Staples which fit the bill nicely. And then…I worried that they would get bent in the mail, so I made little cardboard sleeves to give them a bit of stiffness. Some people helicopter-parent their kids; I do it to my crafts.
Luckily, my over-packaging seems to have worked: four out of six partners have received them so far, and they’re standing just as straight as they did before mailing.
…my true love gave to me: some Grinchy little guys for the tree!
In unpacking the Christmas decorations this year, I came to the realization that wow, there were a lot of cross-stitched pieces in there, and I might have a problem. There were cross-stitched representations of the cats, typographical hoops, and a whole bunch of ornaments stitched on perforated paper. (And that’s not counting the older ones, stitched on flexible vinyl Aida, that are blocky and weird by contemporary design standards.)
Of course, even if I had (re)discovered this sooner, it likely wouldn’t have stopped me from working up these guys. I had had the pattern in my Etsy favourites for a long time, and finally had the chance to stitch it.
Because the design is so small, and because my Q-snaps are…not that small, it was easier to cut a piece of fabric (iridescent Aida for the win!) large enough to accommodate three repeats of the pattern than to struggle and curse a piece sized for one. I folded the strip into thirds, found the centre of each third, and set to stitchin’.
When they were done I washed and pressed the whole big piece, then cut the thirds apart and mounted each one in a 3″ wooden hoop. I had briefly debated painting the hoops somehow (or maybe spray them with glitter spray paint) but thought the understated look worked well for someone who stole Christmas before promptly returning it. He’s definitely adopted a pre-epiphany stance here.
A friend has called dibs on one, and I’ll be keeping one, leaving me with an extra to hang somewhere or keep up my sleeve as a crafty add-on to a gift.
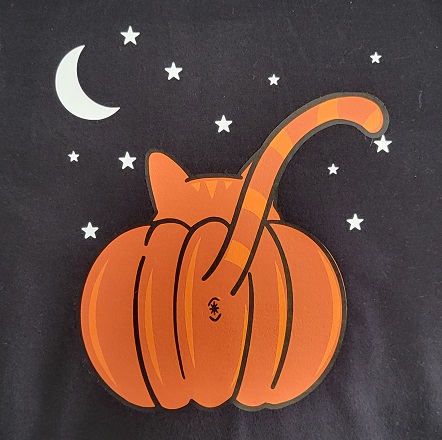
Ever since I first started playing around with heat transfer vinyl, the idea of doing multi-coloured/layered designs was always in the back of my mind. Like so many other things that live back there for “some day”, this was dismissed as being too complicated, and what if it didn’t work? That would be a waste of perfectly good vinyl!
I was finally spurred into action when I saw this hoodie on Modcloth. So cute! So cat-iful! The price was a bit hard to swallow, though. And once the price caught in my throat, I found other reasons to not buy it: with the graphic on the back, people might not be able to see and appreciate it to the full extent possible; they only had a handful of sizes left and were still asking nearly-full price; that’s still a crazy amount of money for a hoodie that’s got a strong seasonal vibe.
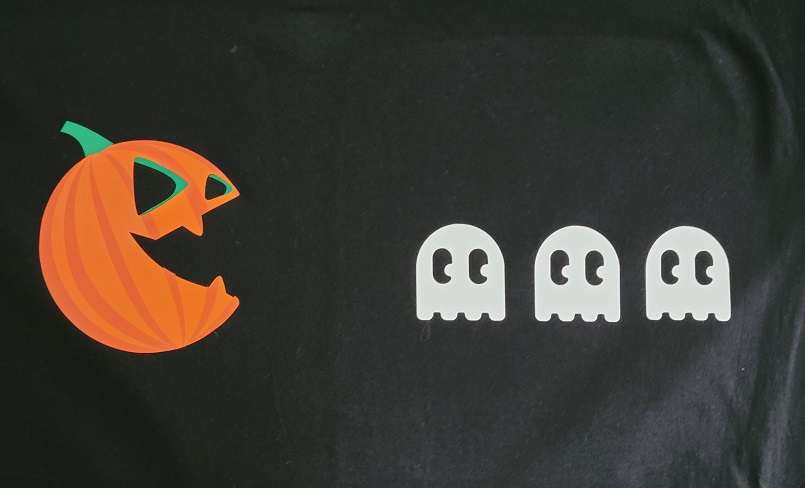
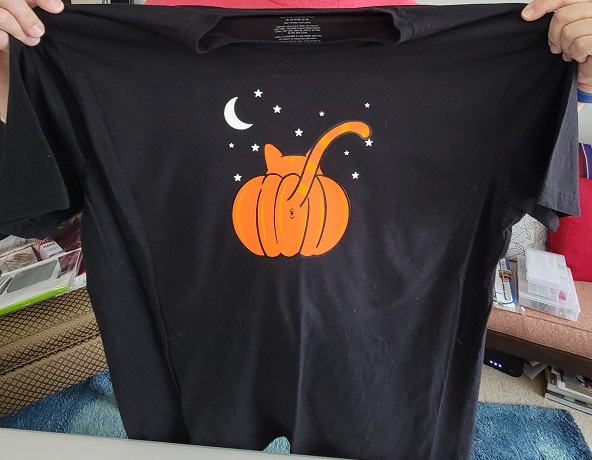
An Etsy search turned up the exact same image as an SVG file for a fraction of the price. (Note: searching for “pumpkin butt” generates a lot of hits for kits to, ahem, paint your infant’s backside orange and turn the resulting print into a pumpkin. Shudder. “Cat butt pumpkin” was a lot more helpful.) I gleefully informed my Crafting Buddy (who is also my Baking Buddy) that I had found our layered vinyl project. He said he wasn’t sure that he’d want a big pumpkin cat butt on the front of his shirt…”but I could see it as a smaller image on the chest, maybe”. Back to my search, where I found something appropriately pop-culture and masculine for his Halloween finery. Once I got the images resized appropriately, I cut out one colour/layer at a time and hoped against hope this would work.
We started with his shirt because the pieces were a bit smaller and easier to wrangle.
This is the back side i.e. the part that gets placed against the shirt. I learned an invaluable lesson: if you’re going to weed everything ahead of time, make sure you have wax paper or something similar between your pieces, or else the carrier sheet will stick to the sheet immediately below and maybe even start peeling the vinyl off.
We started by dry-fitting (cold-fitting, sine this was before heat pressing?) the pieces to see how they would look.
It took some careful placement, but we got the remaining two layers of the pumpkin lined up. The ghosts should probably be a little bit closer to the pumpkin, but we moved them over to centre the design overall.
It looks pretty good! (The colour variance you’re seeing in the black is just from the heat press, and isn’t a permanent feature.)
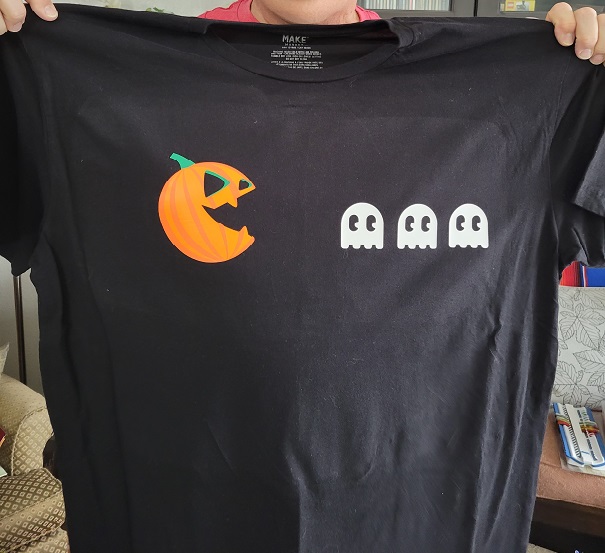
Once we had one under our belts, we assembled my shirt. It was slightly more awkward because of the larger pieces of vinyl.
We got things lined up pretty well, though!
Now we can check “layered vinyl” off our crafty bucket list. I don’t know how often I’ll do it, but it’s a nice trick to have up my sleeve.