craftmas, Cross-stitch and Embroidery

On the second day of Craftmas…

…my true love gave to me: two doves of indeterminate species.

If swapping (see my previous post) lets me make things I would never normally make and didn’t even know I wanted to make, then this is pretty much the polar opposite. As soon as I saw Satsuma Street’s “Holiday Glow” design on their social media, I knew I had to stitch it. At the time, it was an exclusive to the Jingle Ball, which meant I was out of luck. But patience is a virtue, and about a year later it appeared on their website, and with a discount code to boot.

There are a few things that stitchers love to complain about. Backstitch and French knots come to mind (the tedium!…although secretly, I kind of like French knots, and there’s no denying the definition provided by backstitch), but black or navy Aida cloth is a strong contender. No problem, I thought, this uses red Aida.

It turns out that even a relatively bright red Aida cloth can be a bit of a nightmare to stitch on and see the holes properly. Once I had a few stitches in place it was a little bit easier, but there was a lot of stitching by feel involved. And the metallics! I originally started out using DMC diamant for the gold and silver but switched to Petite Treasure Braid by Rainbow Gallery, and this may have been the single best decision I made all year.

(Note: I’m not sponsored by Rainbow Gallery; I just really, really love their Petite Treasure Braid. They’ll completely change your view of metallic threads.)

For all my moaning and apparent sudden-onset red blindness, the finished product was 100% worth it.

I found a 9″ x 7″ flexible hoop in a pale red at my local needlework shop and bought it on a whim. It’s not a perfect match to the fabric, but the colour works well with the thread shades and it doesn’t overwhelm the design.

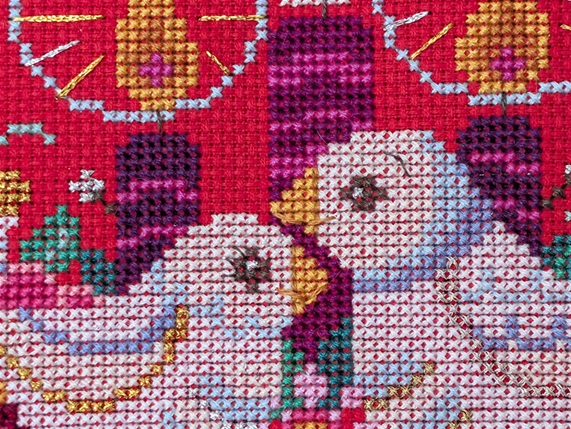
My favourite part to stitch was the rays around the candle flames. Who knew a few straight stitches in gold and silver would add the perfect finishing touch?

Thanks for looking! 🙂

Cross-stitch and Embroidery, Other Crafts

Snarky Ways to Leave Your Lover

(with apologies to Paul Simon)

“Your problem is trying to be too nice,” she said to me.

“You’ll find it easier if you’ll only be snarky.

It’s just the simplest way to get yourself set free –

Just use snarky ways to leave your lover.”

She said, “Some people think that ‘snarky’ equals ‘rude’.

In fact, some puritans would have it labelled ‘lewd’.

But nuts to them!  I say, who needs their attitude?

Embrace those snarky ways to leave your lover.”

CHORUS

Just tell him, “Nope, dope.”

“Can you not, Scott?”

“Would you go away, hey,

And let me be.”

I said, “No way, Jay!”

“OMG, ewww, Lou.”

What else can I say, hey,

Except for, “Bite me.”

She said, “Don’t let your conscience tell you that it’s wrong.

I hope you’ll see the light before I end this song.”

I said, “That’s great and all, but won’t it take too long

To learn these snarky ways…?”

She said, “Just try to find your inner snark tonight,

And I believe that your man-child will be gone without a fight.”

And then she left me, and I realized she probably was right

‘Bout using snarky ways to leave your lover.

(repeat CHORUS)

Soooo, I signed up for the Be My Snarky Valentine swap on Craftster, after having to sit out the Christmas edition due to having about a dozen other things to try to get done.  But all I really have to do on Valentine’s Day is show up to work (because it’s a weekday, not because I work in a Valentine-specific industry), so I figured I could swing this one.  We each had to craft one small, snarky item plus one snarky card for our partner.

While I typically find Valentine’s Day a bit annoying (and hence the appeal of a snarky swap), I’ve always liked the aesthetic of conversation hearts.  Heck, I don’t even mind eating them, although they tend toward chalky.  I’ve even been known to paint my nails in the same colours and stage ridiculous manicure shoots at my desk:

20160208_095417

(Seriously, what did we do before smartphones?  How did we document the inanity?)

So it seemed like a no-brainer for me to incorporate them into my snarky swap package, somehow.  Fortunately, my partner said she likes pastels, so I thought a mini felt garland might be in order.

Garland 2-2

Each heart is about 3 inches across at the widest points – I didn’t think to measure them – and are spaced 4 inches apart, with 6 inches to the hanging loop on each side.  I cut out two hearts of each colour and then applied fusible interfacing to one before sketching on my snarky sentiments to embroider.  Once they all said something, I sandwiched the ribbon between the two hearts, and blanket-stitched around each heart to secure the ribbon in place.

IMG_1065-2

IMG_1066-2

IMG_1067-2

I’m also a little particular about the colours being in the proper spectrum order, or at least as close as you can get.

Because I’m a cross-stitcher at heart, that’s the approach I used for my card.

Garland 1-2

I had some sparkly white Aida left over from my mom’s cat ornaments which was just perfect for my background.

Whatever your Valentine’s Day brings, I hope it’s better than Ralph’s. 🙂

Cross-stitch and Embroidery, Other Crafts

It’s the most wonderful time of the year…

I started my Halloween crafting early this year (as in, August).  While browsing Craftster one day, I saw sign-ups for a Vintage Halloween Swap and promptly submitted my information.  (It’s so much easier to rush the season if you’ve got a whole gang of Halloween-crazed crafters with you.  In fact, I’d argue this was hardly rushing it at all, considering some grocery stores are selling eggnog.  Yes, the Christmas beverage.)

My partner indicated she didn’t have a specific era of vintage in mind – which made my job simultaneously easier and more difficult – but mentioned that she was setting up a Halloween tree in her house this year and would like something to hang on it.

IMG_0972_1

I found the patterns for these guys on Etsy.  The set also included a cat and a piece of candy corn (neither of which were included in my partner’s preferred motifs).  Their original size was approximately 2 1/2 – 3″ at the widest point; I scanned each pattern piece at 150% to get a slightly more substantial finished product.  It’s really hard to see all the details in the photo, but trust me when I say:

  • the jack o’lantern’s features and the bat’s eyes are sparkly
  • the bat’s wing veins and blanket stitching are metallic purple (the better to glint off the Halloween tree lights, if there are any)
  • the ghost’s blanket stitching plus the bat’s fangs might look benign, but in fact glow in the dark.  I did not get a shot of them glowing, sorry.

The pompom garland was a happy eleventh-hour addition.  I was cruising the store for some little extras to tuck into her package when I happened upon bags of Halloween-themed pompoms, and couldn’t resist them.

They made a cute Halloween tree starter-set, but I was concerned that nothing had a truly vintage feel, which is why I started browsing Pinterest for vintage embroidery patterns.

IMG_0970_1

Because doesn’t everyone need a hand-embroidered tea towel?  I kept this pretty simple, with backstitch for pretty much everything except a little satin stitch to give the carving a warm, glow-y feeling.

It was a spook-tacular (sorry!) start to the Halloween season; stay tuned for more.

Thanks for looking! 🙂