Other Crafts

I have all the tender sweetness of a seasick crocodile

Other subject lines that were considered for this post:

"I've got garlic in my soul."
Rejected because: As an individual of Ukrainian descent, of course I have garlic in my soul.  Heart, soul, genes - you name it, it's there.  If I still ate meat, I'd probably be working my way through a coil of kubasa from Tenderloin Meats as I type this.

"I wouldn't touch you with a thirty-nine-and-a-half-foot pole."
Rejected because: In these fourth-wave days of aerosolized droplets, this actually sounds like sound public-health advice.  Thirty-nine-and-a-half-foot poles: when two metres just isn't enough.

Back when Craftster still roamed the interwebs, one of the members posted a picture of this same scarf she had made for herself, along with a bit of a rant how, as soon as she posted it on social media, everybody and his brother dogpiled on her: “Can you make me one? I neeeeeed it!” Several duplicates later, she was sick of the yarn colours and didn’t want to see the darned thing again, when all she had originally wanted was something cute to wear to a holiday party.

My crochet skills at the time were pretty rudimentary and I wouldn’t have dared attempt this for myself back then, but I’ve gained a bit of confidence and really wanted to try it this year. I didn’t include it as a Craftmas post because a) this was for myself, and not a gift, and b) I didn’t have it finished by the 25th. But who cares? It’s still warm and cute!

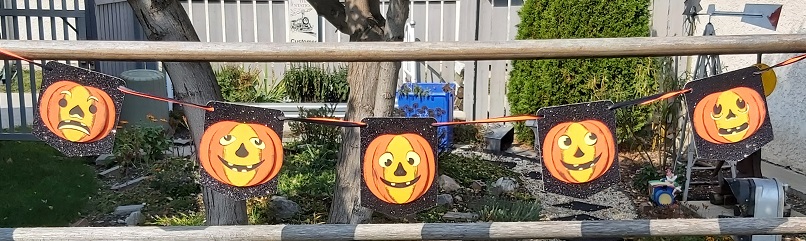
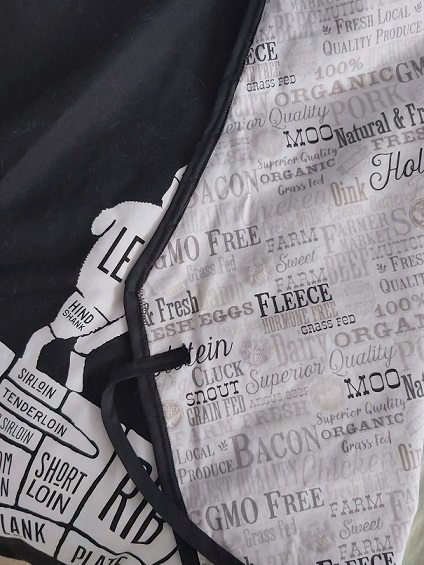
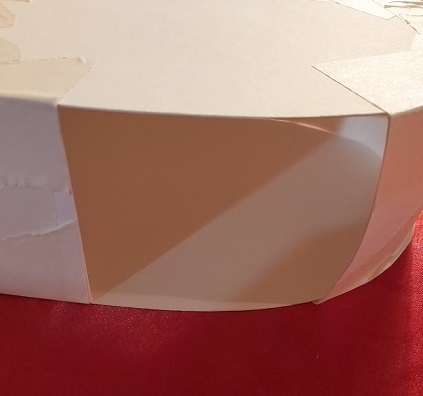
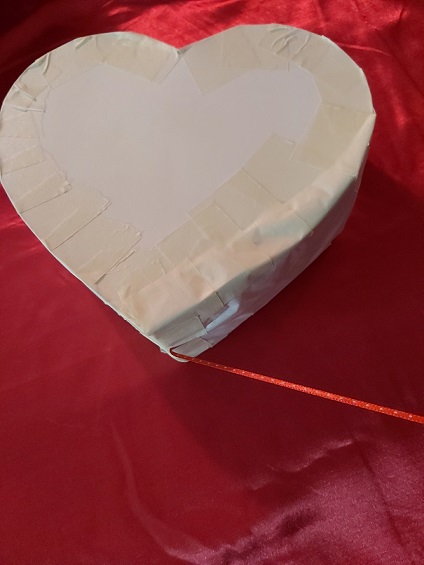
It’s folded in half in the picture above – the bottom half (not seen) is solid red, and altogether it measures 138 cm in length. I didn’t take a lot of in-progress shots because it worked up fairly quickly and there wasn’t a lot to be said. It’s done in Corner-to-Corner (C2C) crochet, which means that instead of working in either horizontal or vertical rows (depending on your perspective), you work it on the diagonal.

Like this:

See how that one side is much longer than the other? There are lots of great tutorials for it online, so I won’t attempt to elaborate further except to say that if I can do it, anyone can. The way you work “squares” of stitches at 90-degree angles to one another makes for a lovely soft and squishy texture.

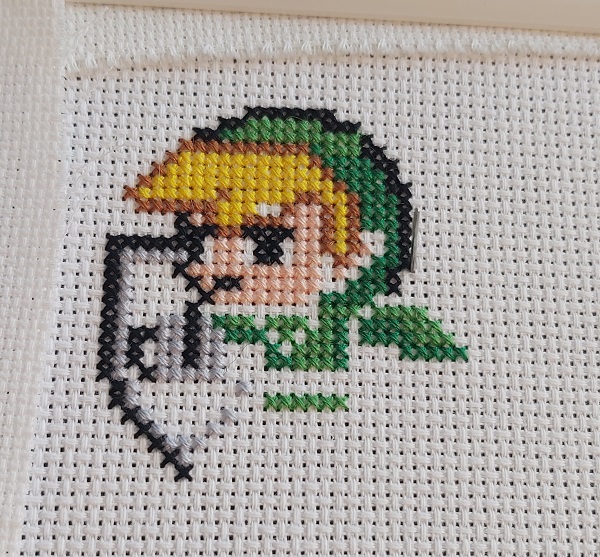
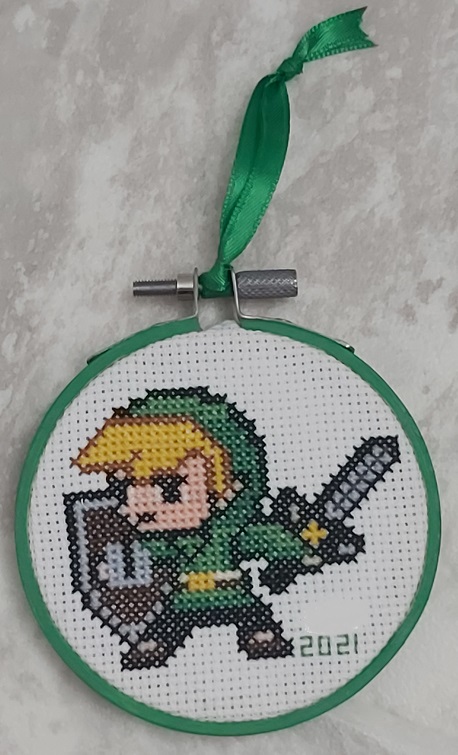
The eyes and nose are crocheted, too, and then sewn on, and the mouth was free-hand sewn on. I was going for his devious, plotting smirk.

(I promised my model anonymity in the form of decapitation.)

Even though Christmas is over, I’m still going to wear him until the weather warms up – hopefully he’s recognizable by the general public.

Thanks for looking – Happy New Year! 🙂

craftmas, Other Crafts

On the third day of Craftmas…

…my true love gave to me: a sparkly bauble for the tree.

It happened like this: my friend was trying to think of something he could give his immediate team at work for Christmas that wasn’t just a three-pack of Lindt chocolate or something else that had been done before. I saw a tutorial to make glitter-filled ornaments, and that pretty much settled the matter. (Are you noticing a theme in this year’s Craftmas posts yet? Hint: it’s glitter! I swear that was unintentional.)

We started out with a container of 80mm disc ornaments from our friendly neighbourhood craft store and removed the cap from the top of each…

Mike McEwen’s Beijing dreams will go unfulfilled, sadly…

…poured a bit of Polycrylic (we had to venture a bit further afield for this; the big box store next to the friendly neighbourhood craft store charged twice as much for half the amount) into each one and swirled it around to coat, before inverting the ornaments in an egg carton to drain the last few drops out…

…and then went wild with glitter! We poured some into each Polycrylic-coated ornament using a funnel, and then shook/swirled it around to coat the entire inside before emptying the excess glitter back into its container.

We didn’t stop there, though. We used the cutting machine to cut everyone’s name out of permanent adhesive vinyl, plus “2021” for the back of each one and a few snowflakes for good measure, and then set to work personalizing each one.

Of course, we had to remove the excess vinyl (“weed”) first:

I made a couple for my neighbours, but he was a machine putting together the ones for his coworkers!

We even had a bit of pop-culture fun with these:

All in all, these were a really fun project to put together. We have almost an entire can of Polycrylic left over, so I suspect there will be more sparkle in the future.

Thanks for looking – Merry Christmas! 🙂

craftmas, Cross-stitch and Embroidery

On the second day of Craftmas…

…my true love gave to me: some hoops for the wall (or the tree)!

This is indeed serendipitous timing: I downloaded the patterns for these hoops exactly one year ago (based on the “printed” date at the bottom of the pages). Someone on Lettuce Craft had stitched one of the designs, and I absolutely loved the typography. I immediately went off to download a digital copy of the magazine they were from (the November 2020 issue of Cross Stitcher, if anyone’s interested) even though I knew there was no way they were happening last year, not with 10 days to go before Christmas.

This year, however, I started early to make sure they’d be done. Although I loved the typography, I didn’t love the original colour scheme – the yellow-green looked so wishy-washy – and so I chose my own colours for a bolder, simpler look.

The holly berries were supposed to be red cross-stitches, but I had some beads on hand that worked perfectly. The gold metallic accents were my substitution, too, and worth the frustration of working with metallic thread.

I framed the finished pieces in 4″ wooden hoops that I sprayed with glitter spray paint – it’s not a solid, disco-ball kind of glitter, but adds a bit of shimmer to the plain wood. It also carried the theme of the iridescent fabric, which doesn’t show well in the above pictures. But take a gander at this progress shot:

What a beaut, huh?

My other moment of inspiration in making these: because stitching on pieces of fabric that are too small to fit in a hoop or frame properly is the worst, I cut one large piece and marked off thirds, then centered a design in each third.

My mom laid claim to two of these as soon as they were done, and the third went to a friend. No matter where they hang, though, I hope they spread some holiday cheer.

Thanks for looking! 🙂

craftmas, Other Crafts

On the first day of Craftmas…

…my true love gave to me: a card to spread greetings merry!

When my friend and I first made our foray into the world of cutting machines last year, we didn’t realize their full potential. I made a couple of Schitts Creek-themed masks using heat transfer vinyl (HTV), and we experimented with HTV on tea towels, but…how many vinyl-ed tea towels or whimsical pop culture masks does anyone really need? As such, the Silhouette sat largely untouched until I discovered that by upgrading my software to a paid (ahem!) version, I could open and cut SVG files rather than importing only PNG or Silhouette-formatted ones.

After making the haunted house box card and pumpkin banner for the Halloween Spooktacular Swap, I was feeling good about my paper-crafting abilities and scanned SVGcuts.com for something cute and Christmassy. I wasn’t disappointed.

I liked the elegance and (relative) simplicity of the Rooftops Box Card, and decided it was perfect to send to my aunt and uncle.

It creates such a neat effect with just four shades of cardstock.

A better angle to show the dimension (I used 3D foam squares to affix Santa’s sleigh):

And just for good measure, a close-up of the glittery snow I added before assembling:

There may or may not have been glitter all over everything, including my pants, by the time I was done.

I also decided to try my hand at North Pole Rudolph. This one was part of a larger set, and didn’t have an instructional video so I was left studying the product image carefully and trying to make mine look like hers. I think (?) I succeeded.

More glitter on this one, too, but what’s Christmas without at least a little bit of glitter? The designer had used a red adhesive gem for his nose, but I had mini pompoms, so that’s what I used. I hope it stays on until it arrives at its destination!

It’s a little hard to tell from the picture above, but this is a tri-fold card:

(The colours are truer in the first shot, but this proves that it can actually stand up.)

It just dawned on me that I didn’t take pictures of the back of either card, but be it known that I stamped a festive message on each one. They went out in the mail yesterday, so should be ready to spread good cheer in just a matter of days.

Thanks for looking! 🙂

Cross-stitch and Embroidery

Yo ho ho and a bottle of…milk

Just a short blast for today, because there’s haunting to do…

I love Halloween. I love cats. So cats dressed up for Halloween feels like a no-brainer, especially if I can work a Satsuma Street design into the mix.

One-Eyed Jack is one of their new Halloween ornament designs for 2021. I was too impatient to order and wait for the kit, so I purchased the PDF pattern from her Etsy shop and printed it out at home so I could start stitching right away.

And you know what they say, kids…if life gives you white perforated paper in your stash when a pattern calls for black, grab a Sharpie and make it so (or “sew”). 😉

I altered the pattern slightly to make his markings look a bit more like my parents’ cat, and I left the plumage off his hat, but definitely added all the sparkly beads and sequins as prescribed.

Because I apparently have too much time on my hands, I created (another!) stop-motion video of the process:

He was a big hit, and is currently affixed to my parents’ refrigerator door via the magic of magnets, keeping watch over any tasty treasures that might get put in there.

Thanks for looking – Happy Halloween! 🙂

Cross-stitch and Embroidery, Other Crafts

Halloween in a box

After what felt like a lifetime away from swapping (it was, gentle reader, a little more than a year), I signed up for the Halloween Spooktacular Swap on Lettucecraft at the very last possible moment to turn their five-some into a sextet. My partner described her style in her questionnaire as vintage with a touch of gothic. The original parameters of the swap were for either one medium or two small items, but we agreed that an extra crafted item would be fine, too. With these guidelines, I pulled together a perfectly vintage-y, slightly goth-y Halloween package.

The very first thing I decided on was this vintage-inspired banner.

I cut out the pieces using my Silhouette machine, “aged” the pumpkins a bit, and then glued the works together. To add a bit of dimension, I used adhesive foam squares in between the pumpkins’ layers to make them pop.

A few close-ups:

One of her favourite Halloween themes listed on her questionnaire was “Sleepy Hollow”. Etsy came through for me, and offered up the perfect little pattern designed to fit a 4″ hoop.

But what to do for an extra crafty item? Maybe something like…

…run with her love of old-school movie monsters and alter an Altoids tin into a spooky tea bag tin (individually wrapped, of course, because we all know not to eat open Halloween treats).

It would have been weird to send a package without a note or card or something, right?

The haunted house card (and the banner!) came from SVG Cuts. This was the second time I’ve put one of their box cards together, and it was deceptively simple to make.

I added in some candy (of course) and a few little Halloween-y extras just for fun, and voila – Halloween in a box.

Thanks for looking – stay spooky! 🙂

Other Crafts

I can see clearly now, Lorraine is gone…

I have a confession: I knew this blog turned the big 1-3 this year (how am I the parent of a teenager, however digital?), but got myself confused about the actual date, and thought for one brief, shining moment that this was its champagne birthday. It was not. For anyone hoping to witness that milestone, you’re stuck with me for another eight years.

As soon as I realized my error, I scrapped my foolish plan of turning on the oven in the ridiculously oppressive prairie heat just to make some sort of elaborate birthday cake. Instead, I thought I’d share some of the irreverent fun (“Not that much fun.” – Ed.) that I try to bring to the proverbial table.

For the uninitiated, a “mondegreen” is a misheard lyric. For example, the title of this post: Johnny Nash actually sang that he could see clearly now because the rain [was] gone. With my love for wordplay, it’s probably not surprising that I find these misinterpretations amusing, and have been known to deliberately sing the wrong words to songs even when I know better.

Although I’m not really a crafts-with-paper type, I had had the idea to create a series of Artist Trading Cards featuring various mondegreens, and I finally made it happen. I started by cutting cardstock into 2.5″ x 3.5″ pieces, then used some origami paper cut to size for my backgrounds. After that, I just had to type out my lyrics and find appropriate images. Because I wanted whoever wound up receiving these to know just what the heck I was getting at, I also wrote the correct lyric (plus title/artist) on the back of each card.

“You know how bad girls get.” – The Police, Don’t Stand So Close to Me
“Hold me closer, tiny dancer.” – Elton John, Tiny Dancer
“‘Scuse me while I kiss the sky.” – Jimi Hendrix, Purple Haze
“Breaking rocks in the hot sun.” – The Bobby Fuller Four, I Fought the Law
“Sont des mots qui vont très bien ensemble, très bien ensemble.” – The Beatles, Michelle

There we have it: art (or “art”) for art’s sake. I had no real plan for these, but I’ve sent a couple of them off to crafty pals who hopefully enjoy a side of pop culture with their papercraft.

Thanks for looking – and for sticking with me the last 13 years! 🙂

General Sewing

Protect ya neck (or at least your clothes)

Oh, goodness. This was originally meant to be a Christmas present, but time got away from me and rushing to finish it – especially when I wasn’t 100% sure how I wanted to do the edges – would have harshed my holiday mellow. Instead, I took my time, and have something nice to show for it. (Before you ask: no, I’m not quite that much of a slacker. I finished this in early February, so I’m really only a slacker about posting it, not sewing it.)

Although my local fabric store had had other fabrics from the same collection, I had to source the apron panel online. And, OK, some of the other fabrics too, because you just never know.

This is not a picture of my panel, but of an identical one, because I apparently lacked the foresight to photograph it before merrily cutting into it.

See that black with white lettering at the very bottom? It’s actually a rectangle with several lines of type. Per the instructions, one is supposed to cut them into strips to use as neck and waist ties, but I snorted at their adorable shortness and instead bought some double-fold bias tape. Etsy now thinks I love bias tape, and won’t stop recommending it to me.

I shouldn’t knock the bias tape – it provided a beautiful finish when I used it all along the edges and held the front of the apron to the lining admirably. Using a straight stitch, no matter how slowly I went, seemed to be an exercise in futility as both sides didn’t seem to catch and I’d have to go over them. Switching to a zig-zag stitch solved this and let me edge the entire thing with a minimum of frustration (but still lots of pinning).

Once I finished edging the apron, I cut two generous lengths from what was left of the bias tape to use as waist ties, and worked with what was left after that for the neck loop – I think I had about 10 cm left after all that. I zig-zagged the raw edges of the tape for all my ties and loops before attaching them to keep them strong.

Oh, remember that extra fabric I bought “just because”? It made a perfect backing for this. Ooh, matchy!

So instead of a Christmas gift, it became a totally-unexpected Lunar New Year gift (because there’s a cow on it, which is kind of like an ox, maybe? The recipient is a city boy, so I’m not too worried).

Thanks for looking! 🙂

Other Crafts

Don’t Go Breaking My Heart

Actually, in this case, you don’t need to! There’s a handy pull string to reduce your smashing by 100%.

I had seen these mini pinatas ages ago on the dearly departed Craftster, and saved the tutorial for myself despite being an asocial and unromantic weirdo. I managed to find the original tutorial using the Wayback Machine, but also took my own step-by-step pictures in case that ever ceases to be.

To start with, you’ll need to cut out two hearts from cardstock or posterboard. Mine are just a hair over 8″ across because I was using letter-sized cardstock, but you’re limited only by your imagination and raw materials. You’ll also need a “side strip/strips” whose width will dictate how deep your pinata is (and how much you can stuff inside it). I cut three 2.5″ wide x 11″ long strips from another sheet of cardstock, but only wound up using two of them.

Once I taped my two strips together, I could start attaching them to my first heart. I ran pieces of masking tape along one edge of my new double-long strip and then starting curving it along the edge of my heart and taping it down. Your edge will – nay, should – be shorter than the full circumference of your heart; that gap is where you’ll add your candy.

Here’s one spot where I deviated from the original tutorial: while I only had one heart attached to the edge, I poked a couple of holes in the edge and added a hanging loop, in case the recipient wants to display it.

Once I was satisfied a) with the size of my candy door, and b) that my hanging loop was secure and I wouldn’t need to access the inside of the pinata, I added my second heart and secured it to my edge with even more masking tape.

Now the raison d’être: add your candy. If you want this to be hung/displayed for a while, you may want to be mindful of the weight of whatever you’re putting in.

Remember when I said I wouldn’t need to access the inside of the pinata anymore? I lied, kind of. Once the candy is in, you can cover the opening with a folded-up piece of tissue paper, but to add a pull string you’ll need to affix that to the inside of the pinata above the opening, then tape it to the underside of the tissue. It’s a bit fiddly, and if I do one of these again I might attach it before I add my second heart, just to save fumbling around after. Make that pull string good and long so that your recipient has something to grab onto!

And now…you get to decorate! This was less annoying than I thought it would be. The girl who wrote the original tutorial used shredder scissors to fringe her tissue paper, but I did it old-school with normal scissors, and managed to not completely cramp up my hand.

I decided to go for a quasi-ombré look, and overlapped rows of tissue to keep it looking full and fluffy.

Once I got the heart faces done, I cut short pieces of my fringed tissue to do the sides. I used your garden-variety glue stick for this, and it was shockingly neat: no gluey residue, and practically zero dry time.

Finally seeing the light of day! Once my tissue-papering was done, I made a little instructional tag for my pull string, just in case there were any doubts as to what to do.

This didn’t take me too long, overall – a couple of episodes of Lolita Podcast – but just long enough to serve as a good reason to not be polyamourous.

Thanks for looking…happy Valentine’s Day!

Cross-stitch and Embroidery

It’s dangerous to go alone! Take this.

Happy New Year! (Can I still say that now…?) I hope everyone had a nice – and safe! – holiday season.

After my Christmas making, I got a few days’ rest before starting in on this project. My friend Jeanette has a birthday coming up later this month, and has been a Legend of Zelda fan forever. I’ve never played a single one of the games, but the franchise is 35 years old this year. Crazy, isn’t it? In any case, it’s certainly iconic, irrespective of my own gaming proclivities.

I found this pattern as pixel art on Pinterest, and knew I had found the perfect little stitch.

He started to take shape pretty quickly. Can you see where I missed a couple stitches in his hair?

Better lighting, but still with that weird negative space in his bangs.

Hair (and everything else) complete, and framed up. That 3″ hoop turned out to be the perfect size.

When I first found the pattern, it showed his pants as white/grey, which was not how I remembered them. A pretty-much-identical pixel art pattern showed his pants as black, which looked more correct to me, but I wasn’t quite sure.

Folks, there are entire wikis devoted to Link’s outfit across various games. Sometimes his pants are brown; sometimes they’re white/grey; sometimes he wears none at all, his modesty protected only by his long tunic. Never are they black, but this seemed like a good place to start a trend.

I mailed this out last weekend, so if our respective postal systems have managed to work out the backlog of Christmas gifts clogging the works, she should have this before the big day actually arrives.

Thanks for looking! 🙂