Other Crafts

The Boy Scouts were right!

I first heard about Altoid wallets a year ago or so – or rather, heard the term and then conducted my own online research and learned that yes, they’re pretty much exactly what they sound like. There’s something almost freeing about leaving the house with just a tin somewhat smaller than 2.5″ x 4″ containing all the essentials: a debit card, lip balm, hair tie, a few dollars in cash, and maybe even wireless earbuds if that’s how you roll…but I knew that would never work for me. I want an actual bag to hold my actual wallet, not to mention the sunglasses case, phone, reusable bag or two, and emergency rations in the form of leftover fun-size Halloween chocolate. (And occasionally, incoming/outgoing mail or a library book.) I dismissed the idea as “cute” and promptly forgot about it.

A month or two ago, Pinterest started showing me images of little mini beauty kits in an Altoids tin. Their creators managed to cram all this soft-girl aesthetic into a very small space, with strands of tiny faux pearls outlining teeny-tiny mirrors and little pink bows in the same shade as the lip stain tucked into the bottom. And thanks to the site algorithms, I also started seeing more pragmatic versions, like little tiny emergency kits.

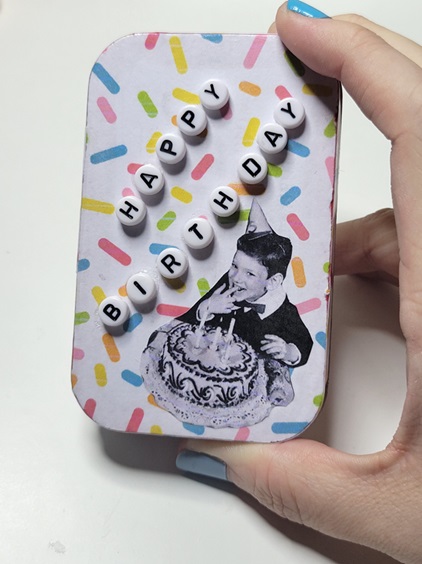
I should make one for my mom, I thought, clearly a victim of social media saturation. Only…a beauty kit to go isn’t quite her speed (did you even know you can buy Altoid-sized mascara?), and a full-out “In Case of Emergency, Open Tin” scenario didn’t feel very gift-y somehow. I decided to hit somewhere between those two extremes, and decided on a cute tin with some purse essentials in it.

The theme came together in about five minutes for me when, in a fit of boredom, I googled “cat in boy scout uniform”. Google happily obliged with several images that I’m sure were AI-generated; one of them was captioned “Be Purr-pared”.

Yes! Be purr-pared, indeed! With the help of some musical inspiration, I was on my way.

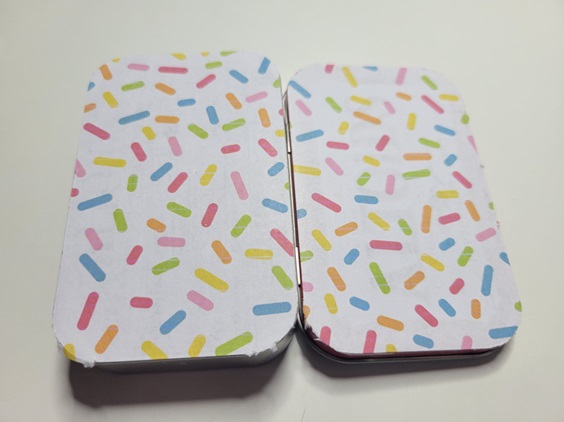
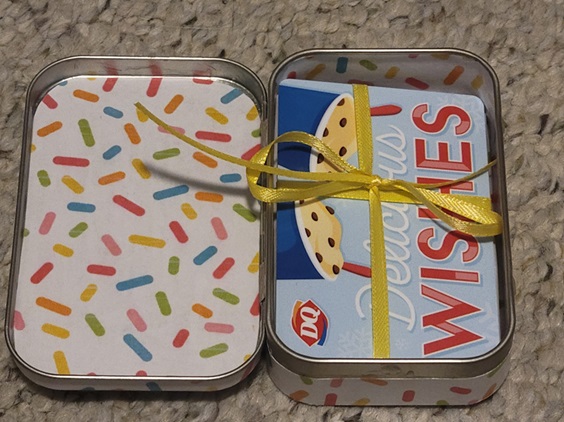
I found some images from a vintage Girl Scouts manual on Etsy, and had my aesthetic.

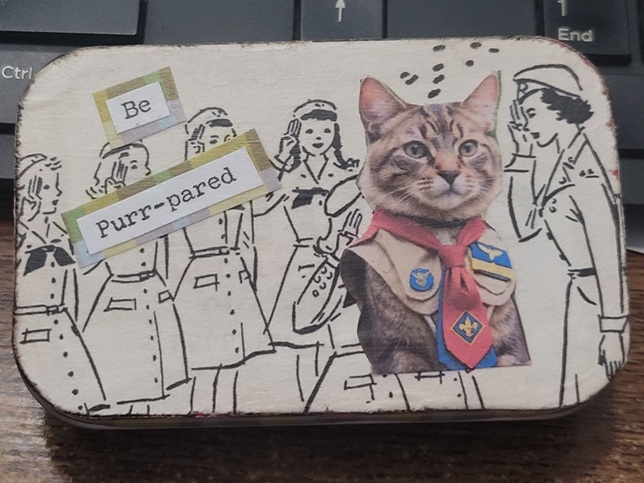
And filled with lip balm, hand cream, Band-Aids, and gum for those post-coffee emergencies.

There was a good amount of Mod Podge involved, and it was impossible to perfectly line up the plaid on the short edges, but overall I’m pretty happy with how it turned out.

Thanks for looking! πŸ™‚

craftmas, Cross-stitch and Embroidery

On the third day of Craftmas…

…my true love gave to me: some hoops to spread a message jolly!

Because it wouldn’t be Christmas if I weren’t finishing up a project last-minute, right? (Don’t worry, it’s been nearly a week; I was stuck waiting on a sunny day to get photos.) I love Stitchrovia‘s designs, and the idea of the different fonts really grabbed me. There’s something weirdly freeing about not making everything perfectly symmetrical.

I had stitched one of her patterns for Mother’s Day and by happy chance these used a lot of the same colours so finding my shades was a snap

Close-ups:

I probably use 14-count opalescent aida cloth more than any other needlework fabric. Sparkles make everything better!

I think the green H was my favourite…

They’re a perfect fit in 4″ hoops, and have joined the collection of holiday hoops adorning the walls.

Thanks for looking – Merry Christmas! πŸ™‚

craftmas, Other Crafts

On the second day of craftmas…

…my true love gave to me: a shirt with my life’s philosophy!

One of my looser goals for this year had been to craft for myself and not just for other people. It’s tough, man! Crafty types express their love via handmade items, and the idea of being even a little selfish and not putting others first feels foreign.

A couple of months ago, Michaels had a sale on long-sleeved t-shirts (buy 2, get 1 free) and I picked up a few. I live in t-shirts, but when the weather cools down the longer sleeves are a happy medium between your standard short-sleeved t-shirt and a sweatshirt. I hadn’t decided whether to embellish them or wear them as-is, and so they had been set aside after washing.

And then, while I was searching online for an appropriate SVG file for a swap I was in, I found the most perfect, retro-licious, bookish file – for me, not my partner. (Don’t worry, she got hers, too.)

I found a lovely, metallic-pearlescent heat-transfer vinyl in a peacock-green shade, and set to cutting…twice. It seems that although it looked vaguely like burnished metal, it is not considered metallic HTV by the Silhouette Studio software, and the machine cut right through the carrier sheet as well. Always check your settings! (This has been a public service announcement.)

It didn’t take me too long to get the more basic weeding done, but there were a lot of tiny bits and bobs to pick out, too.

This is probably the truest representation of the colour. See how it reflects and shines?

My shirt was red, and although red and green are certainly Christmassy, I was hoping the green wouldn’t look too dark, and that the design wouldn’t get lost.

I think it’s going to be OK!

Is it colourful? Heck, yes. But I don’t mind a little seasonal brightness.

Secret Santas, take note!

Thanks for looking! πŸ™‚

craftmas, Cross-stitch and Embroidery

On the first day of craftmas…

…my true love gave to me: a flock of birds to hang on the tree!

Every year, Satsuma Street releases a new entry in the “12 Days of Christmas” ornament series, and every year I buy the pattern but don’t get around to stitching it until the following year. I’ve got enough stuff going on by the time the holiday season rolls around without trying to race through another project. All this to say: while this pattern was released last year, it’s new-to-me for this year.

Calling birds…get it? I love a good pun.

I think my favourite detail on the ornament is the rotary dial on the phone:

…although I wonder how that works with only eight buttons (finger holes?).

Along with the previous three ornaments:

Gosh darn, there are a lot of birds in that song. Didn’t Alfred Hitchcock make a movie about dense ornithological populations? At least they’re cheery-looking.

Thanks for looking! πŸ™‚

Cross-stitch and Embroidery

We all scream for…

…Halloween, of course! I’ve been having fun getting my annual fix of Bobby “Boris” Pickett, sending Halloween-themed happy mail, and fitting in a bit of spooky stitching!

First up, “Eye Scream” (get it? Get it?):

That poor pumpkin looks so upset…but then, I think I’d be, too.

Ermahgerd! It’s a haunted hearse!

Both ornaments are from Satsuma Street kits I got as a gift. I didn’t think to take pictures of the backs, but I used black glitter felt to finish them off so they’ll sparkle from either side as they hang from my (strictly hypothetical) Halloween tree. The hanging loops are glow-in-the-dark Kreinik fine braid, because I love me some glow-in-the-dark.

Happy Halloween, everyone – stay safe! πŸ™‚

Other Crafts

Dr. Seuss could never

In a fit of fey inspiration (largely fuelled by wanting an excuse to buy some of the neon yarn I’d been seeing at Michaels, because really, where else am I going to use acrylic neon yarn?), I crocheted a cat-sized party hat.

I found the pattern on Etsy and wound up using a too-large crochet hook and too-thick yarn, and so left a few rounds off the bottom before it turned into a hat for a medium-sized dog. Even with that, it was a little on the large side; luckily, by reshaping the base into a bit of an oval, it would sit further back on the cat’s head and not look quite as ridiculously oversized.

Where’s the cake?

Thanks for looking! πŸ™‚

General Sewing

Home again, home again, jiggity jig

I have mixed feelings about reusable shopping bags. On the one hand, I appreciate the sustainability factor and the waste reduction, especially when some of the last plastic carrier bags provided in stores tended to rip if you even looked at them funny, rendering them unusable after the first five minutes. On the other hand, I still don’t always remember to bring a reusable bag with me, and wind up purchasing a new one which as often as not gets used as a Goodwill donation bag as soon as I get it home. (Especially those weird, crinkly, plasticky ones…) It also irks me a bit that I’m having to pay for the privilege of advertising for the store.

I’ve talked before about poochie bags, which are great for those little drugstore runs for deodorant and toothpaste, but what about bigger shopping trips? Enter the Vanessa market bag from I Think Sew.

I found the pattern really easy to follow, and quick to sew – especially once I had my first one under my belt. They’re the approximate size and shape of a “traditional” plastic shopping bag, which I find oddly comforting.

Each bag needs just a hair less than 2 metres of fabric – one for the outside, and one for the lining. For the lining, I like to purchase a king-size flat sheet: it really won’t show so the pattern or colour isn’t super-important, the fabric is typically sturdy, and it’s cheaper than buying a similarly sized cut at the fabric store.

The pattern also includes a patchwork variation which is fat quarter-friendly and not that much more difficult to make, if a little more time-consuming. I had bought so many fun prints when I was sewing masks and this is a great way to mix and match a few.

I’ve given a couple of these away as gifts, and am told they always get commented on at the store.

Thanks for looking! πŸ™‚

Other Crafts

Happy birthday; I got you…mints?

My friend Ricky recently had a birthday, and I wasn’t going to let the little matter of a couple thousand kilometres keep me from celebrating him in style. I got it in my head that I needed to do a “birthday in a box”-type package for him. In rapid succession, I decided on: an actual gift (Lego-adjacent building block set), a banner, a “I’m the Birthday Boy” badge that would likely have gotten him beaten up in school, a singing candle, and…cake? I make a mean cupcake, but I didn’t think they’d travel especially well via Canada Post. I looked at mug cake mixes at the grocery store, but just about dropped the box when I made the mistake of reading the nutrition information. (Cake will never be health food, but for 400 calories and 50 grams of sugar, reconstituted and microwaved “cake” just isn’t worth it.) I did find a homemade cake-in-a-can tutorial on Pinterest that, although I applaud its creativity in having layers of cake and icing sandwiched securely in a repurposed tin can, looked frankly kind of gross. Maybe if I couldn’t reasonably make him dessert, I could buy him dessert instead.

Armed with that somewhat heartening thought, I bought a Dairy Queen gift card to tuck in the box. Only…we all knew I couldn’t just toss the card in on its own, right? In looking through my Downloads folder, I found a sprinkle patterned digital paper I bought ages ago off of Etsy, and everything fell into place.

I’ve used this tutorial for altered Altoid tins before, and it’s delightful. The step by step pictures are a fantastic help, even for someone who doesn’t consider herself a papercrafter and gluer (like me).

I started out by covering the outside and inside surfaces with the paper, and then (not pictured) covered the edges. I learned in kindergarten that cutting in a straight line eludes me, so I used my Silhouette to cut perfectly straight pieces exactly the width of the various edges I had to cover.

Next, I had to figure out what kind of decoration I wanted to add to it. I’m a fan of vintage kitsch (shocking, I know), and after a search-engine rabbit hole of results for “retro birthday party”, I found a couple of images I liked. I resized them to the width(ish) of the tin and printed them out, then cut out the section I wanted by hand. I also used a typewriter-inspired font to spell out a few well-wishes (although I only used one in the end). I couldn’t resist sneaking a quote from National Lampoon’s Animal House in there.

The front, on the other hand, required the big guns be brought out (brought in?).

Just laying out slips of paper saying Happy Birthday didn’t quite give it enough oomph. Luckily, I had bought some alphabet beads a year or so ago in a moment of inspiration.

When the glue had dried, I was ready to add the gift card.

Besides being festive, the ribbon made it easier to pull out the gift card – experience is a great teacher sometimes.

The tin was the perfect size to tuck into a little open space at the end of the box, and the postal gods were on their game because it made it to him in time for his big day.

Thanks for looking! πŸ™‚

craftmas, Cross-stitch and Embroidery

On the fourth day of Craftmas…

…my true love gave to me: a meme that comes straight from TV!

It was quite by accident that I found this pattern for a Christmas’d version of Homer Simpson moving silently through Ned Flanders’ hedge, but knew right away that I had to stitch it.

Luckily, my local needlework shop (always support your local needlework shop if you have a choice!) had the requisite Christmas green aida cloth, so I was able to get started on him right away.

He fits perfectly in a 4″ hoop!

The backstitch really creates the illusion of the hedge, and the two little French knots for his pupils are the finishing touch.

Thanks for looking – Merry Christmas! πŸ™‚

craftmas, Cross-stitch and Embroidery

On the third day of Craftmas…

…my true love gave to me: a French hen to go with my two turtle doves and partridge in a pear tree!

By the time Satsuma Street released their holiday designs last year, I was done with taking on last-minute crafting projects. (Excuse me while I snicker behind my hand.) That didn’t stop me from buying the charts, though: one of them was the third installment in the 12 Days of Christmas series, and since I had stitched the first two last year it was a given I had to do this one as well.

Mon dieu! A French hen!

I didn’t think to take a picture of the back, but once I was finished stitching and attaching the beads and sequins, I glued it to glittery white felt so it will shimmer no matter how the lights catch it.

The four calling birds have been released, so I’ve got at least one project for next year lined up already.

Thanks for looking! πŸ™‚