craftmas, Other Crafts

On the second day of Craftmas…

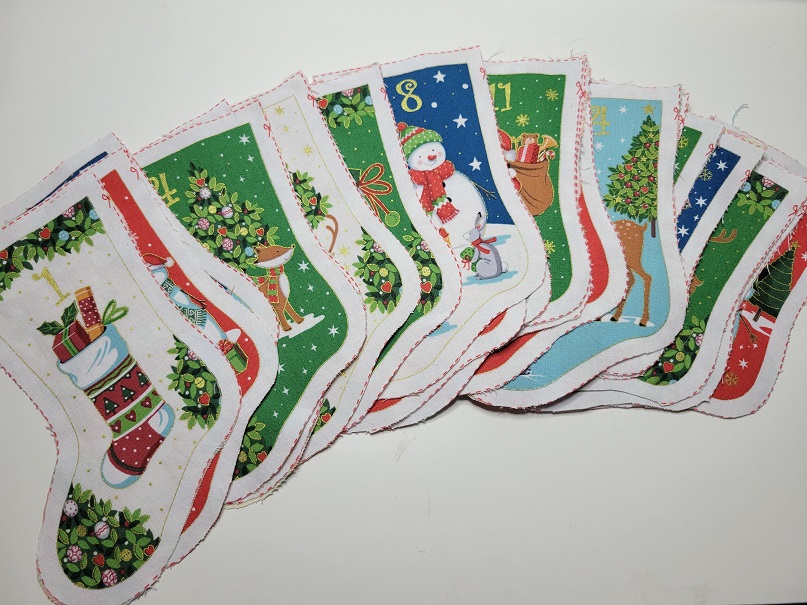
…my true love gave to me: a card with a greeting merry!

For the second year in a row, I signed up for the Christmas Card swap on Lettuce Craft, because who doesn’t like getting a little festive mail? Or mail in general, really?

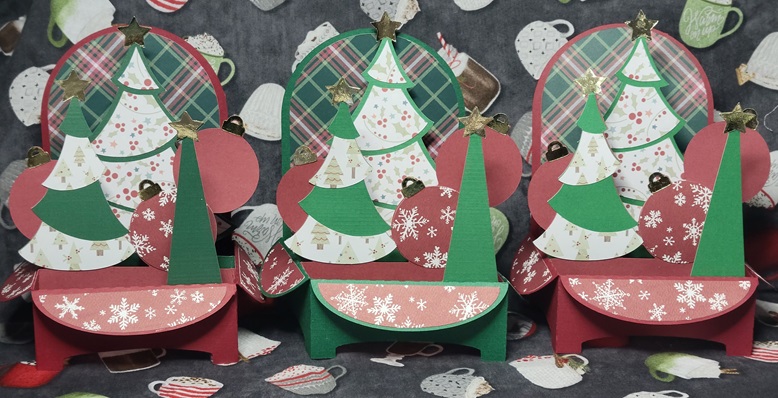
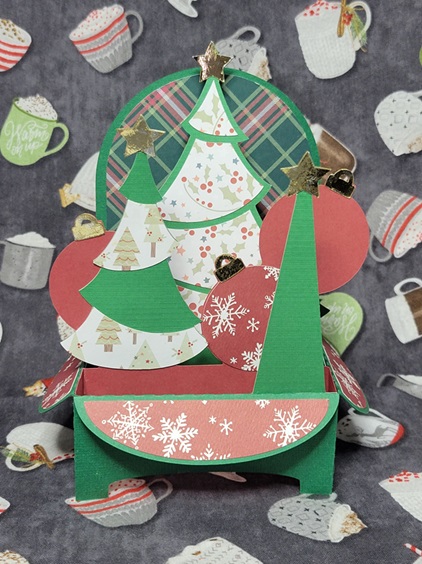
Last year, I kept things fairly simple with a bit of embossing powder and die-cut messages (trust me, it’s simpler than it might sound), but this year I apparently lost all sense of reason when I saw the Christmas Trees box card on SVGCuts. This had presence, drama, and a great reason to play with some fun patterned papers that mysteriously find their way into one’s stash but don’t get used for being “too busy”.

Speaking of patterned papers: trying to decide on a colour scheme was pretty much impossible. In the end, I made three cards in a traditional red-and-green theme, and the other three using fun mid-century pinks and teals. The traditional set got gold stars and ornament hangers, and I used silver for the mid-century set. I stamped the back of each card with a fun, festive message that still left plenty of room to sign. The pattern came with a little train to attach to the inside front of the card, but I left it out to make things all about the trees.

I wouldn’t say that making six 3D cards was a mistake, but it sure was an undertaking. The actual assembly wasn’t so bad – I hit upon a rhythm and system that got me down to about 30 minutes of gluing and positioning per card – but cutting out all the different pieces and keeping them sorted until I could put them together was a challenge. I started by making little piles for each card, starting with the solid coloured base and then setting subsequent stars, tree bits, etc. on top, and then putting each little group into its own envelope to wait patiently to be glued together.

The other challenge came when it was time to mail them. When folded flat, they’re 7 inches square (or as square as you can be with irregular edges), which is bigger than most envelope sizes commonly found in stores. Sure, there are 9″ x 12″ envelopes for letter-sized paper, but that felt like overkill. I found some 7.5″ x 10″ “catalogue envelopes” at Staples which fit the bill nicely. And then…I worried that they would get bent in the mail, so I made little cardboard sleeves to give them a bit of stiffness. Some people helicopter-parent their kids; I do it to my crafts.

Luckily, my over-packaging seems to have worked: four out of six partners have received them so far, and they’re standing just as straight as they did before mailing.

Thanks for looking! 🙂

craftmas, Cross-stitch and Embroidery

On the first day of Craftmas…

…my true love gave to me: some Grinchy little guys for the tree!

In unpacking the Christmas decorations this year, I came to the realization that wow, there were a lot of cross-stitched pieces in there, and I might have a problem. There were cross-stitched representations of the cats, typographical hoops, and a whole bunch of ornaments stitched on perforated paper. (And that’s not counting the older ones, stitched on flexible vinyl Aida, that are blocky and weird by contemporary design standards.)

Of course, even if I had (re)discovered this sooner, it likely wouldn’t have stopped me from working up these guys. I had had the pattern in my Etsy favourites for a long time, and finally had the chance to stitch it.

Because the design is so small, and because my Q-snaps are…not that small, it was easier to cut a piece of fabric (iridescent Aida for the win!) large enough to accommodate three repeats of the pattern than to struggle and curse a piece sized for one. I folded the strip into thirds, found the centre of each third, and set to stitchin’.

When they were done I washed and pressed the whole big piece, then cut the thirds apart and mounted each one in a 3″ wooden hoop. I had briefly debated painting the hoops somehow (or maybe spray them with glitter spray paint) but thought the understated look worked well for someone who stole Christmas before promptly returning it. He’s definitely adopted a pre-epiphany stance here.

A friend has called dibs on one, and I’ll be keeping one, leaving me with an extra to hang somewhere or keep up my sleeve as a crafty add-on to a gift.

Thanks for looking! 🙂

craftmas, Cross-stitch and Embroidery

On the third day of Craftmas…

…my true love gave to me: a night known for being starry!

Earlier this year (or maybe late last year?), I read about a shop called CrossStitchObsession that produces charts of miniaturized works of art in cross-stitch form. The picture the article featured included a tiny version of van Gogh’s The Starry Night, and one of my nearest and dearest particularly admires that painting. This was a stocking stuffer just waiting to stuff!

I had my doubts when I first started – it really didn’t look like too much.

Gradually, though, a picture began to emerge.

Before long, anyone would have been able to recognize it!

It actually got harder to do the further I got! I’m not one for marking up charts to cross out what I’ve already stitched, and without that, trying to match up the blank spots on the perforated paper to the chart became quite the trick. There are so many shades of blue in this, and they all started to look alike after a while.

I backed it with some navy blue cardstock to give it a little sturdiness. The mini easel was one of those miraculous Michaels finds. They came in a pack of four, so I might have to stitch a few more mini masterpieces.

For comparison, here’s the original painting (image courtesy of the MoMA website):

That the designer(s) got that much detail into a 2″ x 3″ pattern is simply astounding. I’m so excited for him to unwrap it on Christmas!

Thanks for looking! 🙂

craftmas, Cross-stitch and Embroidery

On the second day of Craftmas…

…my true love gave to me: two turtle doves and a partridge in a pear tree!

“Wait, wait, that’s not how this works! You’re just supposed to use the format of the song to talk about what you’ve made, not rip it off word-for-word. You know better than that! Now, what did you actually make? OK…two…turtledoves and…a partridge in a pear tree? Really? Uh, carry on, then, I guess.”

I don’t collect much anymore. Sure, my tsundoku spiralled out of control during the pandemic, but books don’t count, right? One soft spot I have, though, is cross-stitched interpretations of “The 12 Days of Christmas”. I’ve probably got no fewer than six or eight different patterns, not to be stitched (yet!), but to be admired and the possibilities dreamt of.

Late last year, I was delighted to see that Satsuma Street had been offering, for the last two years, an ornament pattern for the first two days. Not only do I *heart* Satsuma Street, but stitching a single 3″x4″-ish ornament felt much more achievable than the entire 12 days at once – although I also own that pattern of theirs.

Anything that starts with colours like this has to be good right?

I worked on these at a nice, leisurely pace, occasionally setting them aside if something more pressing came along, but got the beads and sequins added in time for them to go on the tree this year.

I backed them with white felt for a little extra stability, and used an iridescent white metallic thread for the hanging loops.

She already has a French hen in this year’s ornament collection, so I’m sure you can guess what’s going in my virtual cart. I’m hoping she continues with this series, because I’d love to be able to display all twelve days, eventually…just nine more years to go, at the current rate!

Thanks for looking! 🙂

craftmas, General Sewing, Other Crafts

On the first day of Craftmas…

My true love gave to me: a calendar to count down daily!

Back in the summer sometime, in the course of scrolling through Etsy, I came across a panel of 24 mini-stockings meant to be made into an advent calendar. Did I need it? No. But also maybe yes. In either case, it was delivered to me in short order. If you’re curious and/or want to try this at home, kids, it’s the “Merry Christmas Mini Stocking Advent” by Makower.

The instructions included were pretty straightforward: lay your stocking panel wrong-sides-together on top of whatever fabric you want for your stocking backs, pin and cut.

Of course, I had help.

Once they were all cut out…

…I could pin each front-back pair and sew them together.

It’s funny how much smaller they are once they’re turned right side out! From here, the instructions cheerfully directed me to press the top edge under 1/4″ and stitch close to the edge, then cut ribbon into 6″ length and fold in half and stitch the ends to the inside edge to create hanging loops. There was no way those tiny little things were going to fit around the needle plate on my machine, and I wasn’t about to hand-sew a hem. Instead, while they were inside out, I pressed that top edge the recommended 1/4″, and then turned them right side out and pressed everything – including the top edge. It still created a neat finish, and I can always sew them later if I change my mind.

Rather than deal with making ribbon loops, I decided to attach them to their display rope (that’s a very technical term) using mini clothespins. Thankfully, both the clothespins and the Command Hooks supported the weight of the chocolates I had tucked inside.

I really like that each stocking’s design is oh-so-slightly different. Even the ones that look the same have small differences!

After the day’s chocolates have been, um, dispensed with, the stocking gets re-attached, toe-up, to keep the wall from looking empty as the 24th draws closer. I’m looking forward to turning this into a yearly tradition, where the only decision is what kind of treats to fill them with.

Thanks for looking! 🙂

craftmas, Other Crafts

On the third day of Craftmas…

…my true love gave to me: a sparkly bauble for the tree.

It happened like this: my friend was trying to think of something he could give his immediate team at work for Christmas that wasn’t just a three-pack of Lindt chocolate or something else that had been done before. I saw a tutorial to make glitter-filled ornaments, and that pretty much settled the matter. (Are you noticing a theme in this year’s Craftmas posts yet? Hint: it’s glitter! I swear that was unintentional.)

We started out with a container of 80mm disc ornaments from our friendly neighbourhood craft store and removed the cap from the top of each…

Mike McEwen’s Beijing dreams will go unfulfilled, sadly…

…poured a bit of Polycrylic (we had to venture a bit further afield for this; the big box store next to the friendly neighbourhood craft store charged twice as much for half the amount) into each one and swirled it around to coat, before inverting the ornaments in an egg carton to drain the last few drops out…

…and then went wild with glitter! We poured some into each Polycrylic-coated ornament using a funnel, and then shook/swirled it around to coat the entire inside before emptying the excess glitter back into its container.

We didn’t stop there, though. We used the cutting machine to cut everyone’s name out of permanent adhesive vinyl, plus “2021” for the back of each one and a few snowflakes for good measure, and then set to work personalizing each one.

Of course, we had to remove the excess vinyl (“weed”) first:

I made a couple for my neighbours, but he was a machine putting together the ones for his coworkers!

We even had a bit of pop-culture fun with these:

All in all, these were a really fun project to put together. We have almost an entire can of Polycrylic left over, so I suspect there will be more sparkle in the future.

Thanks for looking – Merry Christmas! 🙂

craftmas, Cross-stitch and Embroidery

On the second day of Craftmas…

…my true love gave to me: some hoops for the wall (or the tree)!

This is indeed serendipitous timing: I downloaded the patterns for these hoops exactly one year ago (based on the “printed” date at the bottom of the pages). Someone on Lettuce Craft had stitched one of the designs, and I absolutely loved the typography. I immediately went off to download a digital copy of the magazine they were from (the November 2020 issue of Cross Stitcher, if anyone’s interested) even though I knew there was no way they were happening last year, not with 10 days to go before Christmas.

This year, however, I started early to make sure they’d be done. Although I loved the typography, I didn’t love the original colour scheme – the yellow-green looked so wishy-washy – and so I chose my own colours for a bolder, simpler look.

The holly berries were supposed to be red cross-stitches, but I had some beads on hand that worked perfectly. The gold metallic accents were my substitution, too, and worth the frustration of working with metallic thread.

I framed the finished pieces in 4″ wooden hoops that I sprayed with glitter spray paint – it’s not a solid, disco-ball kind of glitter, but adds a bit of shimmer to the plain wood. It also carried the theme of the iridescent fabric, which doesn’t show well in the above pictures. But take a gander at this progress shot:

What a beaut, huh?

My other moment of inspiration in making these: because stitching on pieces of fabric that are too small to fit in a hoop or frame properly is the worst, I cut one large piece and marked off thirds, then centered a design in each third.

My mom laid claim to two of these as soon as they were done, and the third went to a friend. No matter where they hang, though, I hope they spread some holiday cheer.

Thanks for looking! 🙂

craftmas, Other Crafts

On the first day of Craftmas…

…my true love gave to me: a card to spread greetings merry!

When my friend and I first made our foray into the world of cutting machines last year, we didn’t realize their full potential. I made a couple of Schitts Creek-themed masks using heat transfer vinyl (HTV), and we experimented with HTV on tea towels, but…how many vinyl-ed tea towels or whimsical pop culture masks does anyone really need? As such, the Silhouette sat largely untouched until I discovered that by upgrading my software to a paid (ahem!) version, I could open and cut SVG files rather than importing only PNG or Silhouette-formatted ones.

After making the haunted house box card and pumpkin banner for the Halloween Spooktacular Swap, I was feeling good about my paper-crafting abilities and scanned SVGcuts.com for something cute and Christmassy. I wasn’t disappointed.

I liked the elegance and (relative) simplicity of the Rooftops Box Card, and decided it was perfect to send to my aunt and uncle.

It creates such a neat effect with just four shades of cardstock.

A better angle to show the dimension (I used 3D foam squares to affix Santa’s sleigh):

And just for good measure, a close-up of the glittery snow I added before assembling:

There may or may not have been glitter all over everything, including my pants, by the time I was done.

I also decided to try my hand at North Pole Rudolph. This one was part of a larger set, and didn’t have an instructional video so I was left studying the product image carefully and trying to make mine look like hers. I think (?) I succeeded.

More glitter on this one, too, but what’s Christmas without at least a little bit of glitter? The designer had used a red adhesive gem for his nose, but I had mini pompoms, so that’s what I used. I hope it stays on until it arrives at its destination!

It’s a little hard to tell from the picture above, but this is a tri-fold card:

(The colours are truer in the first shot, but this proves that it can actually stand up.)

It just dawned on me that I didn’t take pictures of the back of either card, but be it known that I stamped a festive message on each one. They went out in the mail yesterday, so should be ready to spread good cheer in just a matter of days.

Thanks for looking! 🙂

craftmas, General Sewing

On the fourth day of Craftmas…

…my true love gave to me: some fun, patterned PPE!

(If you had asked me back when I started this blog whether I’d ever use the term “PPE” here, I probably wouldn’t have known what you were talking about. Oh, the times we live in…)

My friend Jeanette is considered an essential worker, and although I would sincerely hope her employer provides her with suitable equipment when she has to be around people, I wanted to do something fun for her. A writer, she loves all things vintage-typewriter, and when I saw this fabric at Marshalls this summer, I had to pick up a third of a metre – just enough for a mask or two.

They have the coolest fabrics there, honestly (that’s where my background came from, too). Earlier in the summer, I found this beautiful zodiac fabric and made my mom an Aquarius mask, and then found Leo and Scorpio for my dad and for Mr. Gummi Bear when I found the typewriter key fabric.

The original Aquarius mask (not pictured) wasn’t long for this world. On about her third or fourth time wearing it out, she bent and re-bent the nose wire so vigorously that it broke. This is probably also a cautionary tale about using dollar-store pipe cleaners as nose wires, but what do you have to do to it to break it so quickly? She also complained about the thin elastic I used for ear loops cutting into her ears; the fact that she requested that elastic specifically was irrelevant. Could I replace the wire and elastic? I thought about the amount of unpicking required, and decided it was easier to make her a new one. And hey, if she was getting a new one for Christmas, so were the others.

I used a sturdier wire in all three of them, and the elastic is this super-soft and springy, rounded stuff I found on Etsy. Just let them try and complain about sore ears!

Thanks for looking – Merry Christmas! 🙂

craftmas, General Sewing

On the third day of Craftmas…

…my true love gave to me: a scarf for the pep rally!

Even though my friend Ricky* defected to Toronto 15+ years ago, and I see him once a year if I’m lucky, I still try to find the perfect Christmas gift to send every year. In this case, “perfect” translates loosely to “not totally impersonal, not ridiculously expensive, and not a bear to ship in terms of either packaging logistics or postage costs”. I don’t ask for much, do I?

A couple of years ago, I put together a Batman starter kit (mini Bat Signal plus some socks, soap, and mints all featuring the caped crusader’s likeness), and last year it was a box of local goodies that he wouldn’t be able to get in the Big Smoke. With everything that’s been going on this year, I opted for something nostalgic to remind him of those carefree high school days. *pause for laughter* Or at least something in our school colours.

I’ve actually made this scarf twice before, but this was my first time making it according to the original instructions and not trying to shoehorn in an extra colour. Based on a tutorial from the dearly departed Craftster, the premise is simple: choose two colours of fleece (A and B); cut eighteen 4″ by 6″ rectangles and four 6″ squares out of colour A; cut twenty 4″ by 6″ rectangles out of colour B; use nine, two, and ten of each kind of cutout to form each side of the scarf and then sew the two sides together for double-layer warmth.

I sincerely thought that cutting out all those rectangles was the most annoying/time-consuming part of this (admittedly simple) project – and then I remembered that every time you sew two of them together, you have to tie off the thread ends at both ends of the seam. Every time. For 2+10+9-1 seams per side.

To be fair, tying off the thread ends isn’t difficult or as prone to causing hand cramps as marathon fleece-cutting, but it’s the start-and-stop (especially if you leave them all until the end) that makes them a pain. By the time I was doing the second side of my scarf, I got smart, and tied my threads while I was on a conference call – it kept my hands busy, but wasn’t so distracting that I wasn’t paying attention to what was going on.

I think this should ward off the Toronto chill, no?

There was a time when I would have wrapped that scarf all around my model’s head to preserve anonymity or else digitally alter the photo up to and including decapitation; but darned if a co-ordinating mask doesn’t do the trick.

And sure, the scarf is nice and wouldn’t look out of place at the homecoming game (assuming we had a football team, which we did not), but it needed a little something extra to really complete the theme.

Perfect, right? It had the blue-and-gold scheme, and we both spent four years with the same English teacher who spent those years drilling into our heads such gems as the eight (nine? Ten? Google seems to be very divided on this) parts of speech. I think all of my grammatical neuroses can be traced back to that classroom.

In some miracle of modern postal service, his parcel arrived with a week to spare before Christmas, and I hope he’ll be able to get some use out of both, lockdown or no.

Thanks for looking….go Sabres!! 🙂

*Not his real name, but a nickname given by that same English teacher.