Towel Day is still a few weeks away, but if you’re looking for a more travel-friendly option that hooks conveniently onto belt loops, backpack straps, etc., I’ve got your back. I’ve talked about making this kind of hanging hand towel before, but this time I have a step-by-step guide to walk you through the process, if you’re feeling crafty and want to try it yourself.

I started by cutting out my “topper” from my fabric of choice. I came up with (using that term very loosely) the pattern by tracing around an existing towel-top I already had.

As with most sewing projects, you want to start with your right sides together before sewing your seam. The wide (bottom) part gets left open, but you’ll sew up one side, around the peak, and down the other side.


To make it easier and less bulky when it’s time to turn these right side out, I snipped off the very tip of my point. You could also trim the seam allowance all the way around if you’re concerned, but I’ve never had a problem with it.

Et voilà! These will need to be ironed to make those edges nice and crisp. While you’re at it, fold the raw edge to the inside slightly and press it into place, too (probably 1 cm or so – just enough that you’ll be able to catch the edges when you sew it all together. I just eyeball it, because it’s pretty hard to screw these up. If these are going to be hanging as a set, you might want to work on them side-by-side to ensure you’re shortening them by the same amount).

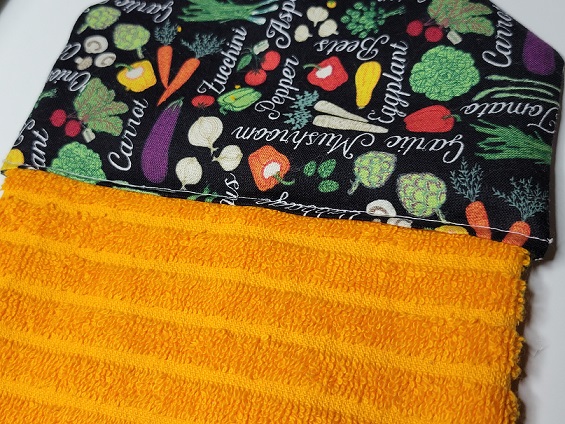
On to the towel part! Normally, I take a single hand towel and cut it in half, but I couldn’t find a hand towel in the colour I wanted, so I opted for two facecloths instead. They’re a bit shorter side-to-side than a hand towel half would be, but work well. (Not pictured: me hacking off the thick hem at the edge that’s going to go inside my topper, because no way was my sewing machine going to get through all that.)

Fold your towel (facecloth) into thirds-ish so that it looks like it will fit inside the opening of your topper. A hand towel half would have had more overlap in the middle. Clearly, I tried to test-fit this before realizing I’d need to get rid of the one hem.
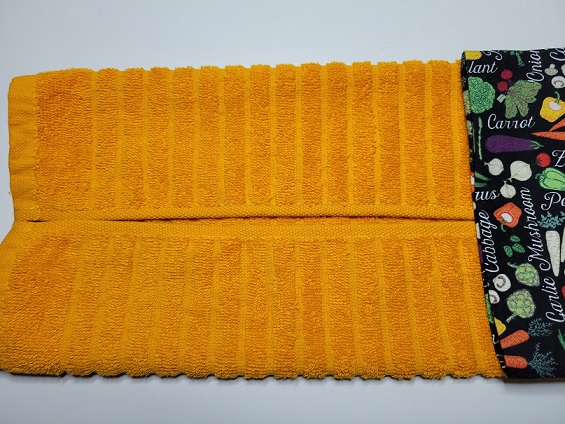
Hey, look, it fits! There’s just a little bit of extra space at the end of my topper, and that’s OK. If you’ve got more than just a little bit, try tugging on your folds gently to make your towel fill the space better. Because these were going to be hanging up as a set, I used the lines on my towel to gauge how much I had inside the topper and how much would hang down, and tried to keep both towels even. If you’re making a single one, go crazy! Well, within reason. I probably had about 2 or 3 cm of my towel up inside the topper to make sure it all got sewn together and there was no risk of it tearing out if someone were to give it a good yank. This is probably a good time to mention that if you like one side of your topper better than the other – maybe it’s got a cooler pattern placement or whatnot – figure that out now, and make that your front. I’m pretty equal-opportunity about my veggies, so however I grabbed it is how it got positioned.
Good choice making that the front, WittyChild! So many pretty colours… I sewed close enough to the folded edge of my topper that I wouldn’t have a big ol’ fabric flap flapping around and flipping up on me, but far enough away from the folded edge that both the front and back got “caught”, and I didn’t have that delightful experience of the front looking fiiiiiine while the back had a big gap where the fabric didn’t get sewn to the towel (or vice versa). If you folded up your raw edge evenly back when you were ironing all the things, you’ll be thanking yourself now. I don’t pin this into place before I start sewing; I just take it slow. Fine, I did try pinning the towel not pictured above, and broke a sewing machine needle when it hit one of the pins. There’s something to be said for my lazy-girl approach.

It’s time to add your buttons! I was so excited when I found these perfect orange specimens in my stash, but now think that I might have bought them with this project in mind and forgotten about them. Still! I knew I wanted my buttonhole to be near the point to allow maximum folding-over capability in case I found myself with a particularly chunky cupboard door handle at some point, and so I positioned my button where I wanted that buttonhole and then used a marking pencil (sewing pencil? Tailor’s pencil?) to mark where the top and bottom of the button are to determine how long the buttonhole needs to be.

Of course, if I had been just a little less excited about the buttons’ shiny orange-ness, I might have noticed that the card they came on had a handy measuring guide. Spoiler alert: my folksy home-remedy way of sizing worked perfectly here, too, since my buttons weren’t thick or irregularly-shaped.

It’s weird to think that buttonholes are just a series of glorified zig-zag stitches. If you don’t have a buttonhole function on your sewing machine or simply hate adding them to projects (I myself loathe sewing buttons on, but love making buttonholes. Somewhere, my sewing soul mate is out there, the one who hates the buttonhole function but loves sewing those suckers on), you could always use what the fabric store cheerfully calls “hook and loop tape”, but be it known that this stuff will eventually lose its grippy power and cause your towels to fall to the floor at the slightest provocation, such as staring at them too intently, and that’s just impractical and a little unsanitary.

Oh my stars and garters, cutting the buttonhole open once you’ve sewn it is the single most satisfying part of this whole project. It almost makes sewing on the buttons worth it.
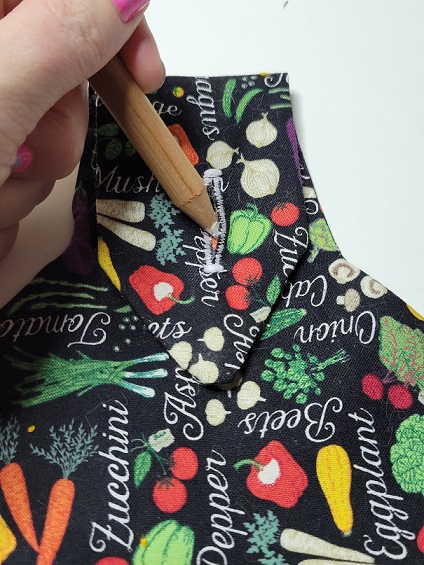

After folding my point down to about where I’d want it, I used that marking pencil through the buttonhole to mark where my button is going to sit.

I might not like sewing them on, but I am endlessly pleased by the fact that the thread matches so well.

And there they are, ready to decorate, cheer, and dry! I keep both of them on door/drawer handles close to the kitchen sink for easy access when I need one, but they also work well on oven doors, dishwasher handles…
Thanks for looking! 🙂

What a useful idea! Love, LOVE the veggie pattern paired with orange!
Thanks – me, too! I have two more sets of the hangers cut out of that fabric, and I’m thinking maybe purple towels for the second set…