baking

Saying it with chocolate and peanut butter…

Have you ever had one of those days when you wanted to bake something for the special people in your life, but also didn’t want to spend all day messing around with rolling and cutting dough, decorating to the nines, and all that other stuff?

Relax, because I’ve got you.

In the lead-up to Valentine’s Day, I saw (and Pinned!) all manner of cutesy cookies and other sweet treats, a fair number of which were heart-shaped and bedecked with red and pink sprinkles and/or frosting. They were cute, but the prospect of having to actually find the time to make them was a daunting one. Eventually, it hit me: why not make something I already know is quick and tasty, but dress it up? A few weeks back, the newspaper had run an article in its Arts & Life section about how to add a swirl to brownies, and that sounded like a darned good idea.

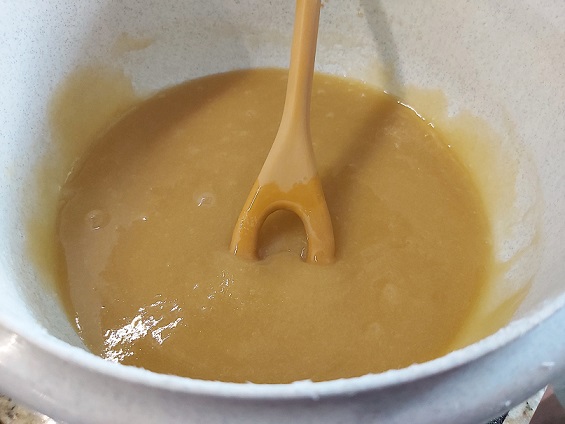
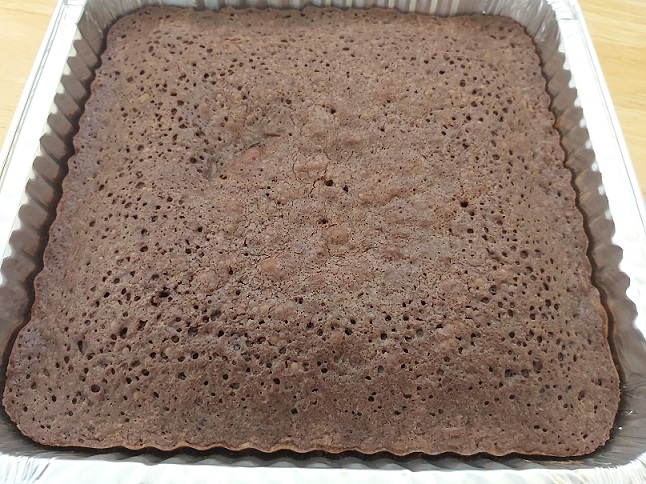
I started with Quick and Easy Brownies (because they are quick and easy!), but you could use your favourite recipe.

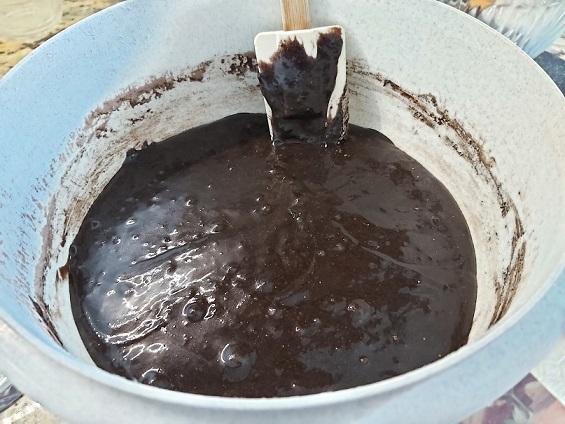
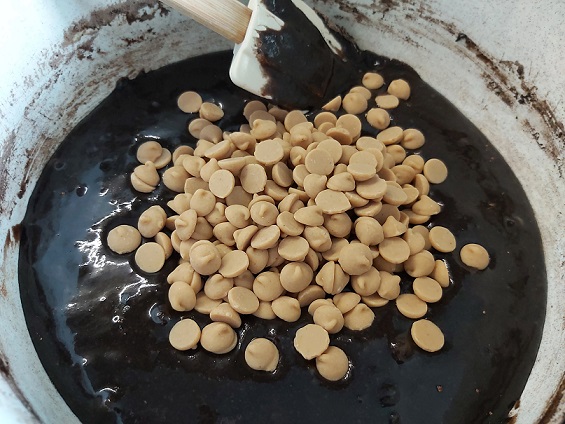
They’re not naturally lumpy; I stirred in half a bag of semi-sweet chips and chunks (about 1 cup, give or take) for a little extra chocolatey goodness.

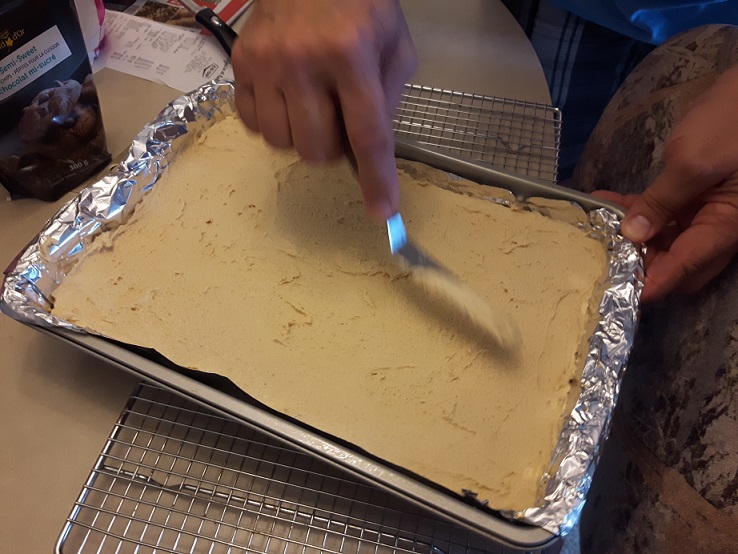
If the title of this post hasn’t completely given it away, I decided to try a peanut butter swirl. I spooned about half a cup of peanut butter – this is a visual estimate only – into a standard zip-top bag, snipped one corner, and went to town.

A quick word on this: I found it really hard to squeeze the peanut butter out! I have no idea if melting the peanut butter first or even just having held the filled bag in my hot little hands for a minute or two would have helped. Because of this, the peanut butter was a bit hard to control and didn’t always pipe on where I wanted it to. Notice the nearly-naked perimeter that goes 3/4 of the way around.

Next, the fun part! Take a butter knife or other implement of mass swirling, and start dragging it through the peanut butter.

Every single tip I read about this cautions against over-swirling. You still want some contrast between the base and the swirl, and don’t want it to all homogenize into one chocolateandpeanutbutter layer on top. I might have swirled more than necessary, but I was also trying to work my peanut butter into all those missed edges and corners. Overall, I think I managed it. Once I was satisfied, I baked as usual.

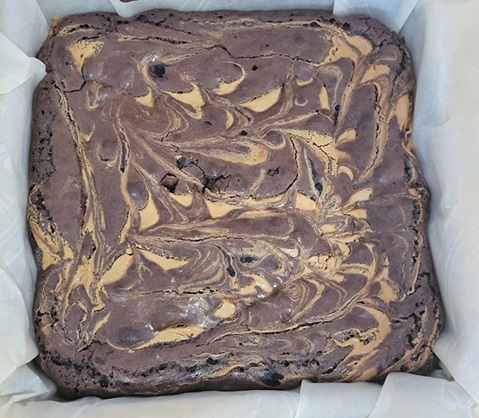
Apparently I gave the pan a quarter-turn clockwise when I took it out of the oven! But look at how nicely that swirl stayed in place. I half-expected it to sink to the bottom during baking, and the fact that it stayed on top gives me an inflated sense of my own culinary genius.

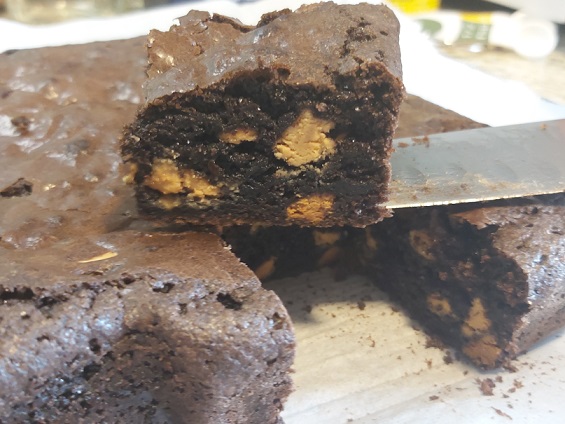
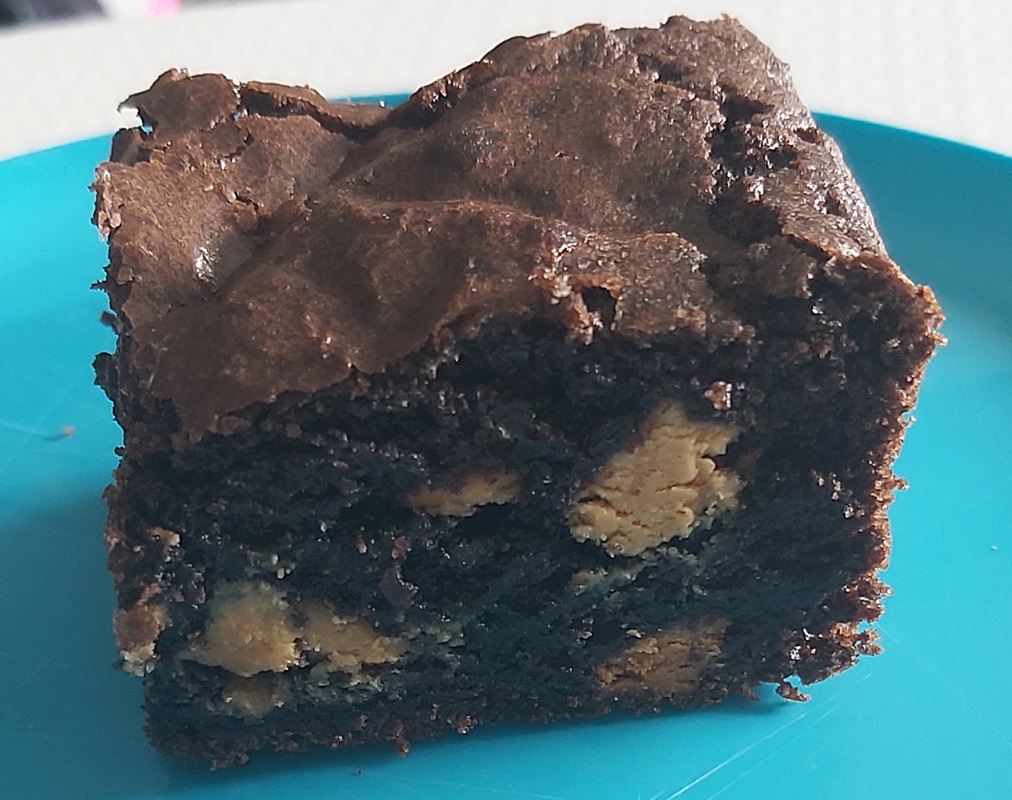
The only thing I would have done differently is to have cut the pieces larger. No pictures, but I did a 4 x 6 cut to get 24 pieces out of an 8″ square pan. They were the perfect size for popping into your mouth, but really didn’t show off the swirl to its best advantage. (They still tasted great, though!)

Thanks for looking! 🙂

baking

Safer than a leg snare…

Today’s musical inspiration is courtesy of Sam the Sham and the Pharaohs:

Years ago, I found a recipe for the charmingly-named Man Catcher Brownies in a magazine. Brownies are good, but brownies with a layer of caramel in the centre? Yes, please. I’ve made them several times and even shared them with coworkers, and somehow don’t have a harem of husbands, so perhaps the name is a bit of an exaggeration. Ahem.

Recently, I was leafing through one of my mom’s cookbooks. When I hit a recipe for saucily-named brownies, I glanced at it briefly before realizing that this was exactly the same recipe. There were a couple of minor tweaks; for example, how the second brownie layer was added, and a heck of a lot more caramel, but otherwise this was it. And despite having had the recipe in my collection for ages, I was suddenly craving them again. Luckily for me, my Baking Buddy was all in.

(You can find the recipe for Man Catcher Brownies here. The recipe comments include a step-by-step video from the girl who originally submitted the recipe to the magazine, so these are the originals, folks!)

First, we gathered our ingredients:

I have a question for my American friends, if anyone wants to chime in down below in the comments. Are you guys experiencing an ever-shrinking selection at the grocery store, too, or is that just happening here? Every single version of the recipe I’ve seen calls for a German chocolate cake mix, and if I had to wait to find one, these babies would never get made. It feels like over the last…ooh, decade or more, for sure, and probably much longer, all the grocery chains have been supplanting their previously wide array of certain products with their own store brand, leaving us with only a few token flavours/varieties. There is no orange cake mix, or German chocolate cake mix, or strawberry cake mix. We’re lucky to have a choice between devil’s food and regular chocolate. Meanwhile, President’s Choice, Compliments, and Co-op Gold all pop up like so many weeds. I’m pretty sure the same thing is happening with Jello flavours too (remember Berry Black?), and possibly canned soup. And yes, we bought a store brand mix for this because it’s not being used for an actual cake, but I’m sure the holy spirit of Huncan Dines (apologies to V.N.) is furious.

The most tedious part of this is unwrapping all the caramels…

I promise it’s worth it, though! With a little evaporated milk, these form a beautiful soft centre for our brownies.

Meanwhile, the cake mix, melted butter, and more evaporated milk get mixed together. The dough turns out really stiff, which makes this parting-of-the-Red-Sea trick really easy.

I did what felt like the logical thing, and divided it in half – half for the bottom and half for the top, right? Makes sense. The only problem is that half of this will not quite cover the bottom of a 9″ x 13″ pan, and you’ll need to borrow some from the top’s share. I had forgotten this from the last time I made them, and suddenly the fact that the version of the recipe in my mom’s book uses a 9″ square pan makes a lot more sense. After some mild cussing on my part, my Baking Buddy took over to get the dough pressed into the corners of the pan, and then we threw the whole mess in the oven for 7 minutes. The process of baking and puffing-up hides a multitude of sins, and I was already feeling better.

Now it’s time to top it! First, the caramel sauce gets spread over everything:

The partially-cooked bottom layer is quite delicate at this point, and spreading the caramel too vigorously will tear it. Once we were happy with our caramel coverage, we sprinkled some pecan pieces and semi-sweet chocolate chips over it, and then topped with the remaining dough. The problem with using more than half the dough for the bottom is that there won’t be enough to completely cover the top.

By this point, I was ready to pitch the whole thing, because really! But much like the bottom puffed up after baking, so too did the top after we stuck it back in the oven.

I don’t think anybody is going to be fooled into thinking that the top is completely covered (it’s not), but it was an improvement for sure. A little peekaboo caramel never hurt anyone, right?

The recipe is pretty adamant that they cool completely before slicing, so we waited patiently.

They sliced like a dream! And once they were cut into itty-bitty pieces (we got 32 from our pan), the exposed caramel wasn’t nearly as noticeable – it became more of a hint of what was to come than a huge breach in the middle of the pan.

Look at that lovely gooey caramel!

We layered ours between parchment in an airtight container, but these would make a perfect homemade gift for someone presented in a cute little treat box.

Thanks for looking! 🙂

baking

Fast-acting relief for those chocolate cravings

When I was growing up, we weren’t really a brownie household. Cookies, sure, but brownies? Maybe occasionally, but they weren’t one of those staples at every get-together. Evidently, I’m making up for lost time, because this is now the second brownie recipe I’ve tried this year. If I’m being honest (which I am, because I just said so), I had made this second recipe once and they disappeared almost immediately, so what you’re seeing here is the second-recipe redux.

I didn’t go out looking for a brownie recipe, but when I saw this one on Life, Love, and Sugar, I was intrigued. It’s got eight ingredients (nine if you count the fact that I used a blend of regular and dark cocoa powder in mine), it makes a small square pan’s worth, and it doesn’t require any advanced baking techniques. I was sold.

Not pictured: the flour or sugar, but otherwise, this is alllll it takes.

The process is really quick: mix your wet ingredients together in one bowl…

…your dry ingredients in another…

…and then add the dry to the wet and combine.

Some of my more eagle-eyed readers might have noticed that there was a bag of peanut butter chips on the counter in the picture up top (go on and scroll up; I’ll wait). The first time I made these, I made them plain, just to see how they were. Since they came out so well, we decided this time to change it up a bit and add a mix-in to keep things interesting.

Once everything was folded in to our satisfaction, we spread the batter in our parchment-lined 9″ square pan.

They took a wee bit longer to bake than the recommended time in the recipe, but were they ever worth the wait!

That amazing, crackly top will never cease to impress me. They sliced like a dream, too.

Interesting discovery: although warm-from-the-oven brownies are much ballyhooed, these ones actually taste a little bit better at room temperature – the flavours come through better.

Apart from the baking time (and the peanut butter chips), the only change I made from the original recipe was using 1/3 cup regular unsweetened cocoa powder and 2 1/2 tablespoons of black cocoa powder. I use a blend of cocoas whenever I make cupcakes, too, and it gives them a certain je ne sais quoi.

And there you have it: moist, chocolatey perfection.

Thanks for looking! 🙂

baking

Trust me, I’m a doctor!

Overheard in class the other day:

Q. What type of doctor is Dr Pepper?

A. A fizz-ician. *rim shot*

Matt couldn’t have known it when he told the joke, but Dr Pepper is my One True Love and has been since I was a kid. Dr Pepper will never not call, or text obsessively asking where I am, or stare at its phone and tune out everything I say. I don’t drink it as regularly as I used to (because sugary drinks…), but my opinion of restaurants is still very much influenced by whether they serve it. (Points to Mongo’s, Boston Pizza, and Taco Time!)

When I found this recipe for Dr Pepper Brownies, I was sufficiently intrigued to pin it. (Question: If this action is taking place on Pinterest, did I pin it or did I Pin it? In any case, I saved it for future reference.) Through some weird bit of kismet, I had a brownie mix in the pantry so this required no extra acquisition of ingredients on my part. Those are the best recipes!

As it turned out, my mix was already of the chocolate-chunk variety, so I didn’t need to add chocolate chips as called for in the recipe.

Full disclosure: one of the things that really appealed to me about this recipe was that it only called for 1/4 cup of Dr Pepper, which meant – oh, darn – I’d have to drink the rest of the can myself. This is the same “one for you, one for me” methodology I use when Christmas shopping, but oh, did it ever work well this time!

The baking instructions in the recipe differed slightly from the box instructions…I went with the box, only because I figured if anyone would know how to make their mix, they would.

The addition of the soda created a really interesting texture on top. I was a little concerned they wouldn’t have that flaky-chewy brownie thing going on…

But I was wrong! These were really moist and lovely. Even my dad, who usually ignores anything that isn’t a cookie, waxed poetic about the chocolatey chewiness. No one who tried one could taste much Dr Pepper, unfortunately, but I swear I got a little bit of…fizz?…if I ate mindfully.

And because I can’t resist co-ordinating whenever possible:

Yes, I can match my wardrobe to my kitchen projects.

Thanks for looking! 🙂

baking

Is there such a thing as too much chocolate and peanut butter? Maybe…

It’s been well-documented in my years of blogging (and even more years baking and not putting it out there on the interweb) that chocolate and peanut butter is a flavour combination that rates very highly with my test audience.  Frankly, I think that the very best cookies contain lots of peanut butter and little to no chocolate, but hey, give the people what they want, right?

I grabbed my Baking Buddy and told him we were going to try the Buckeye Brownies as published on the Brown Eyed Baker.  Even though I don’t typically like having someone else around when I’m baking (seriously, this towel has my name all over it), it was actually a really ingenious if kind of Marxist solution: by splitting the cost of ingredients, each person is only out half the cash, and each person gets half a pan to eat rather then try to work through an entire 9 x 13 pan alone.  Plus, it’s a fairly inexpensive way to spend an afternoon, and feels productive.  That’s what, win-win-win-win?  I can’t argue with that kind of logic.

Although I’ve got a totally kickin’, never-fail brownie recipe of my own, I took a leap of faith and followed the recipe to the letter.  My devil-may-care attitude was rewarded; those brownies – a.k.a. the ultra-important foundation of this entire endeavour – turned out perfectly.

Buckeye Brownies 1

A lovely, slightly cracked top – what a sight to behold!  Baking Buddy’s mind was blown when I demanded the aluminum foil to line the pan: he had never done that before, and marveled at the ridiculously easy clean-up that followed (eventually).  Waiting the recommended time for these to cool enough to add the next layer was the longest part of the entire process, so if you’re going to try these, make sure you can find some way to amuse yourself for a while.

Buckeyes require peanut butter, right?

Buckeye Brownies 2

Action shot!  (And clearly, we don’t believe in putting our groceries away during brownie-cooling downtime; sorry.)

This part was a lot like the peanut butter frosting I use on cupcakes, only…more.  Lots more.

Buckeye Brownies 3

Only here did I deviate from the recipe.  The recipe called for milk chocolate chips in the ganache/glaze, a thought which immediately made my teeth hurt.  Don’t get me wrong, I love milk chocolate, particularly if it’s got peanuts, caramel, or nougat in it.  But the thought of it smeared on top of a thick sweet layer of peanut butter?  Shudder.  I used semi-sweet instead, a twist heartily supported by Baking Buddy.

Buckeye Brownies 4

As we cut them, my first, stomach-dropping thought was, “They look like Nanaimo bars!”  (Something I would likely never make because they’re far too sweet and rich.)  “Hey, they kinda look like Nanaimo bars,” remarked Baking Buddy cheerfully.  It’s all about agreeing on the important things, folks.

These brownies are lovely, and the layers showed perfectly, and…holy crow, are they ever rich!  I can’t begin to imagine what milk chocolate chips would have brought to the party.  If you’re going to make ’em and eat ’em like this, a cup of coffee or glass of milk (depending on your preference) is strongly recommended…but during the postmortem, we discussed ways to make them better.  Halving the peanut butter mixture?  Halving the peanut butter mixture and omitting the chocolate glaze?  The top two layers almost ruin a wonderfully chewy brownie that stands up well on its own – but on the bright side, I now have a second basic brownie recipe in my arsenal.

Thanks for looking! 🙂